NEPI Engine – Pre-Built Image Download and Installation
NOTE: The following instructions are for installing NEPI pre-built images on a new system that does not already have a version of NEPI installed. If you just want to update your NEPI device with a new pre-built image, follow the software updating steps in the “Software Updating, Backup, and Cloning” instructions available at:
https://nepi.com/documentation/nepi-engine-software-updating-backup-and-cloning/
Introduction
While the NEPI Engine software is available in source-code format and pre-installed hardware solutions from both Numurus and its edge-compute hardware partners, Numurus maintains NEPI ready software images for some of the leading edge-compute solutions on the market to further accelerate our customers’ journey and get them up and running in the least amount of time.
NEPI Pre-Built Image Licenses
NEPI Pre-Built System Image files are licensed under Commercial licenses as defined in the Numurus Software License Terms available at:
https://numurus.com/wp-content/uploads/Numurus-Software-License-Terms.pdf
NEPI System Image license terms include two license options:
1) A Commercial “Professional” license limited to use in
customer products, excluding the sale, lease, or sub-licensing of stand-alone software in
pre-built image formats.
2) A Commercial “Enterprise” license for use in
customer products and the sale, lease, or sub-licensing of stand-alone software in
pre-built image formats.
NEPI software license options and details can be found at:
https://nepi.com/software-nepi-engine/
Prerequisites
Hardware Stack Solution Parts
The following table provides the minimal hardware required to install a pre-built NEPI Engine image.
|
Part* |
Quantity |
|
NVIDIA GPU Module |
1 |
|
GPU Carrier Board |
1 |
|
Carrier Board Compatible SSD Card (1TB+ recommended) |
1 |
|
(Optional) Carrier Board Compatible Wi-Fi Hardware |
1 |
|
Carrier Board and GPU compatible Fan/Heat Sink and Thermal Paste |
1 |
|
Miscellaneous mounting and assembly hardware (nuts, bolts, spacers…) |
1 |
|
Carrier Board Power Supply |
1 |
|
Ethernet Cable |
1 |
|
Compatible USB flashing cable for your carrier board |
1 |
* These parts can be purchased separately and assembled yourself, or in some cases, purchased as a pre-assembled hardware product. Offerings vary by board vendor.
Tools Required
|
Tool |
|
PC with Linux Ubuntu 18.04 or higher and internet access |
|
(Optional) Pin Jumper |
* While some carrier boards include a “recovery mode” button, other boards only provide a pin header option that requires a separate jumper to put the board into “recovery mode”.
Setup Your PC for NEPI Engine Installation
The following instructions assume you have downloaded all of your NEPI Engine Software Files to the “Downloads” folder of your home drive “~/Downloads”. If using a different folder, replace this text with the path to your downloaded files in the following instructions.
1) Install a compatible “Chrome” browser on your PC.
2) Install Unzip on your PC by opening a terminal and typing
sudo apt-get install unzip
3) Install Rsync on your PC by opening a terminal and typing
sudo apt-get install rsync
4Configure your PC’s Ethernet (built-in or adapter) port networking settings to be on the same subnet as the GPU device.
NOTE: YOU WILL NEED TO ENSURE THAT THE TARGET COMPUTER’S ETHERNET INTERFACE IS CONFIGURED WITH A STATIC IPV4 ADDRESS ON THE 192.168.179.0/24 SUBNETWORK.
Example:
- IP Address: 192.168.179.5 Netmask: 255.255.255.0
5) Download and install the default NEPI private SSH key
“nepi_engine_default_private_ssh_key” from:
https://www.dropbox.com/scl/fo/pjtoga7vi6za4yu3ymv5x/h?rlkey=i7riagxjo9eujkud4h6v912s8&dl=0
6) Then create a new folder on your PC to store the key in (the remaining instructions assume “~/ssh_keys” ), then copy the downloaded key to that new folder.
7) Open terminal in the folder you copied the key to, directory and change permissions for the key
sudo chmod 600 nepi_engine_default_private_ssh_key
Download NEPI Engine Software Files
Before beginning the NEPI Engine software installation and setup process, please download the following files using the provided download links in the following table to your Linux Ubuntu PC’s home “Downloads” folder “~/Downloads”. The instructions in this document assume all files are downloaded to this folder.
GPU Init File Image Links for Specific Hardware
|
Vendor |
Supported Product |
NEPI Init File Image Download Link* |
|
Connect Tech |
Boson Carrier Board with NVIDIA Xavier NX Module |
https://www.dropbox.com/scl/fo/4ivcyy3sdmh77v7zsye0s/h?rlkey=6vm3puq5ob9qc7vn03expxpax&dl=0 |
|
Vecow |
EAC-2000 with NVIDIA Xavier NX Module |
https://www.dropbox.com/scl/fo/fhcjlg31v7lvg2x2m7qvw/h?rlkey=vbhbkocc67r4u1wum9nfueaf8&dl=0 |
|
Seeed Studios |
A203 Carrier Board NVIDIA Xavier NX Module |
https://www.dropbox.com/scl/fo/g043p9ul2poxhudgh5hys/h?rlkey=i8mwjzm7hxqlayq1ircks1gb6&dl=0 |
|
Seeed Studios |
A603 Carrier Board with NVIDIA Orin NX Module |
https://www.dropbox.com/scl/fo/5fjo0s4d3cjefno7r3xv3/h?rlkey=igvgsxx8juckwyhsgj1p8fwok&dl=0 |
* Each top-level folder contains the latest NEPI Engine init file release version for a particular board, with older image versions available in the “Archive” folder within these folders. Each image file contains a NVIDIA Jetpack version identifier such as “jp5.1.1”.
SSD Root File Image Links for Specific Hardware
|
Vendor |
Supported Product |
NEPI Root File Image Download Link* |
|
Connect Tech |
Boson Carrier Board with NVIDIA Xavier NX Module |
https://www.dropbox.com/scl/fo/z24ahrn2ik71lo0swtxbd/h?rlkey=40zve1e0lssfyozk8e3chiixd&dl=0 |
|
Vecow |
EAC-2000 with NVIDIA Xavier NX Module |
https://www.dropbox.com/scl/fo/bwjf5mf4b65ug6phod9yy/h?rlkey=i5j6iywi7ucnwxs6pjl1k7or2&dl=0 |
|
Seeed Studios |
A203 Carrier Board NVIDIA Xavier NX Module |
https://www.dropbox.com/scl/fo/b77jirhc3ivf68vlh38la/h?rlkey=rt51q98bhzh1u9uv5gunvd0b7&dl=0 |
|
Seeed Studios |
A603 Carrier Board with NVIDIA Orin NX Module |
https://www.dropbox.com/scl/fo/fm5ptong1mqc4qq3zxhr8/h?rlkey=w5sxw635y0km8216327h7pfet&dl=0 |
* The top-level user partition files folder contains the NEPI Engine user partition demo files for the latest NEPI Engine release version, with older versions available in the “Archive” folder within this folder. Each folder contains a three number version identifier such as “2.1.1”.
Download NVIDIA JETPACK and Manufacture’s BSP Files
Download NVIDIA Jetpack and Board Support Package (BSP) per the manufacturer’s instructions, ensuring that the Jetpack and BSP versions you download matches the NVIDIA Jetpack version identifier number in the NEPI Init Image you downloaded.
Example:
- “nepi_xavier_nx_a203_jp5.0.2_ssd_init_rootfs.img.raw” should use Jetpack 5.0.2
The tables below provide links to NEPI supported NVIDIA Jetpack SDK software packages and GPU board installation instructions from support carrier board vendors.
Manufacture NVIDIA Jetpack Installation Instruction Links for Supported Boards
|
Vendor |
Supported Product |
Manufactures Install Instructions Link |
|
Connect Tech |
Boson Carrier Board with NVIDIA Xavier NX Module |
https://connecttech.com/ftp/Drivers/L4T-Release-Notes/Jetson-Xavier-NX/XAVIER-NX-32.6.1.pdf |
|
Vecow |
EAC-2000 with NVIDIA Xavier NX Module |
|
|
Seeed Studios |
A203 Carrier Board NVIDIA Xavier NX Module |
|
|
Seeed Studios |
A603 Carrier Board with NVIDIA Orin NX Module |
Flash Your GPU with NVIDIA JETPACK and Manufacture’s BSP Files
In general, Numurus recommends flashing Jetpack OS components via the NVIDIA flash.sh script – the Boson “Preferred approach” and A203 “Flashing JetPack OS via Command Line” installation instructions from the links below should be used. The NVIDIA flash.sh script will report success or failure following the flashing step. But you may also optionally verify successful flashing by power cycling your flashed Hardware Stack and observing (with HDMI monitor attached to hardware stack) an Ubuntu splash screen and setup page. You do not need to complete these graphical setup steps.
NEPI Engine Installation Instructions
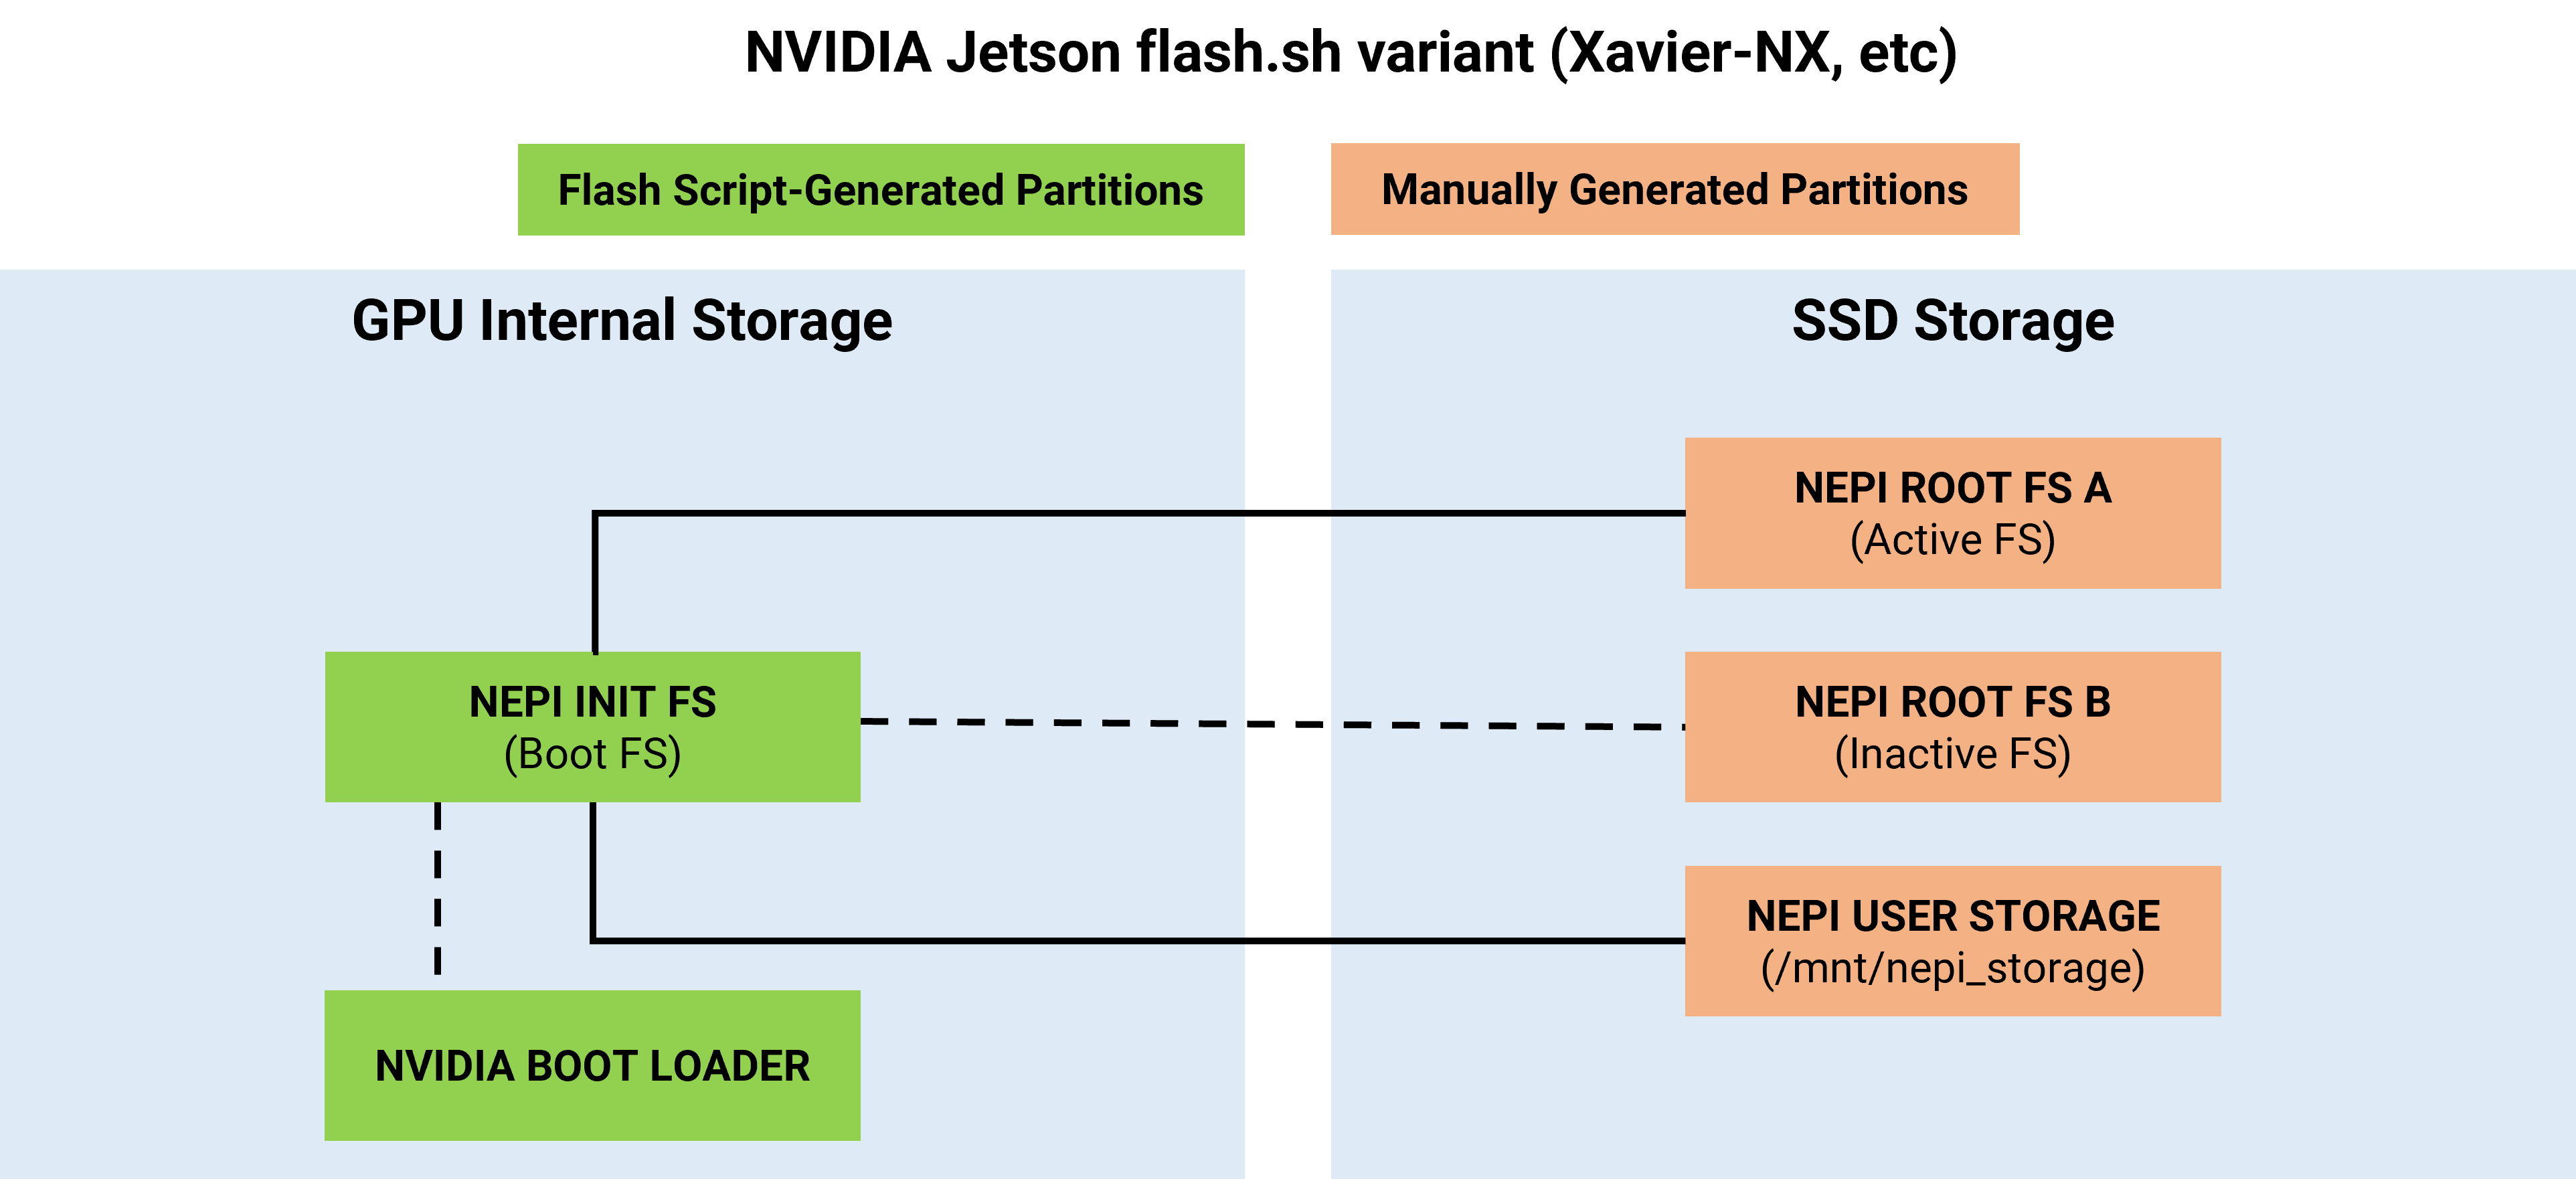
The NEPI Image installation instructions are split into three main steps: 1) Jetson Module Flashing, 2) SSD Module Configuration, and 3) Device Configuration, where steps 1 and 2 may be combined for certain modules as detailed below. The following sections provide clear instructions for each of these installation steps.
NOTE: Module Flashing and SSD Module Configuration steps differ depending on whether the Jetson target module has an embedded flash drive (e.g., Xavier-NX) or runs exclusively from external media (e.g., Orin-NX). In particular, embedded flash systems are flashed using the older Linux4Tegra flash.sh script, while external-only systems are flashed using the newer Linux4Tegra l4t_initrd_flash.sh script. Ensure that you are following the correct flashing and configuration steps for your variant below.
Jump to the appropriate installation instruction section for specific GPU Modules
Instructions for Xavier-NX (flash.sh variant)
NEPI Engine GPU Module Flashing
1) Flash the manufacture BSP according to manufacturer instructions for the Jetpack version matching your NEPI Engine Init Image file.
2) Unzip the NEPI Engine Init Image file you downloaded for your particular GPU carrier board hardware. Open a terminal and type:
unzip ~/Downloads/<The NEPI Engine Init Image file you downloaded>
Example:
unzip ~/Downloads/ nepi_xavier_nx_boson_jp4.6.1_ssd_init_rootfs.img.raw.zip
unzip ~/Downloads/nepi_xavier_nx_a203_jp4.6.1_ssd_init_rootfs.img.raw.zip
3) Put the Jetson in “Recovery Mode” button/jumper again as you did in step 1. As before, you may verify your Jetson is in recovery mode by typing the following in a terminal window on your USB connected PC:
lsusb
You should see an Nvidia entry in the list. If you do not, try again. Generally, you will also hear the fan spin up. Your screen should look similar to below:

4) Backup the original “system.img” file in your Jetpack SDK folder on your PC, then copy the uncompressed NEPI Engine Init Image file to that same folder and rename it to “system.img.raw” (overwriting the existing file with that name) by typing the following in a terminal window on your PC:
mv <path/to/your/Linux_for_Tegra>/bootloader/system.img <path/to/your/Linux_for_Tegra>/bootloader /system.img.manufacturer_bsp
mv ~/Downloads/<The unzipped NEPI Engine Init Image file you downloaded> <path/to/your/Linux_for_Tegra>/bootloader/system.img.raw
Example:
mv ~/Applications/Jetpack_4.6.1_Xavier_NX/Linux_for_Tegra/bootloader/system.img ~/Applications/Jetpack_4.6.1_Xavier_NX/Linux_for_Tegra/bootloader/system.img.manufacturer_bsp
mv ~/Downloads/ nepi_xavier_nx_boson_jp4.6.1_ssd_init_rootfs.img.raw ~/Applications/Jetpack_4.6.1_Xavier_NX/Linux_for_Tegra/bootloader/system.img.raw
5) Flash the NEPI Engine Init Image by typing the following in terminal on your PC:
sudo <path/to/your/Linux_for_Tegra>/flash.sh -r -k APP jetson-xavier-nx-devkit-emmc mmcblk0p1
You should see the following message when image flashing is complete

NEPI Engine Root File System and User Storage Partition Setup
The NEPI Engine Root File System partitions, both primary and backup, along with the NEPI user storage (nepi_storage) partiion reside on an SSD card installed on your hardware stack. The following instructions cover configuring the SSD card’s Root File System partitions and flashing the NEPI Engine Root File System images (main and backup).
NOTE: This installation tutorial uses an external SSD USB adapter to configure and flash your SSD card. An alternative approach is to install the SSD card into your GPU hardware stack at this point and perform the SSD partition and folder setup directly on your GPU hardware stack using “fdisk” or “parted” Linux command line tools in an SSH connected terminal. You can find a detailed tutorial on setting up an SSH connection to your NEPI device in the NEPI Engine tutorial “Accessing and Customizing the File System” at:
https://nepi.com/documentation/
6) Using an appropriate USB adapter for your SSD card, connect it to your PC, open a terminal window, and type the following:
sudo gparted
NOTE: If gparted is not installed, you may need to install it first with
sudo apt-install gparted
7) On the upper right side of the gparted application screen, select the /dev filesystem identifier associated with your USB SSD adapter, which will vary depending on your PC storage configuration. You can determine which identifier it is by looking for a new entry in this list after plugging the adapter into your PC.
NOTE: Beware, selecting the wrong identifier here can cause major harm to your Linux installation. Double check your selection! Work with the SSD identified by
- /dev/nvme0n1
and should erase any existing partitions and then create 3 new partitions:
- /dev/nvme0n1p1 (label = ROOTFS_A, size = 50GB, filesystem type = ext4)
- /dev/nvme0n1p2 (label = ROOTFS_B, size = 50GB, filesystem type = ext4)
- /dev/nvme0n1p3 (label = DATA, size = whatever remains on the SSD, filesystem type = ext4)
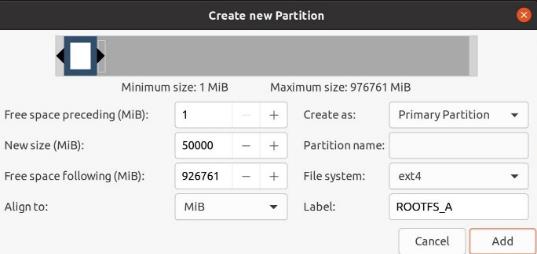
8) Create the first root Root File System partition by right clicking on the “unallocated” partition, select New, and create it using the values below. Numurus recommends 50000 MiB rootfs partitions to ensure sufficient space for additional software installation and system logging.
- New Size: 50000, File System: ext4, Label: ROOTFS_A
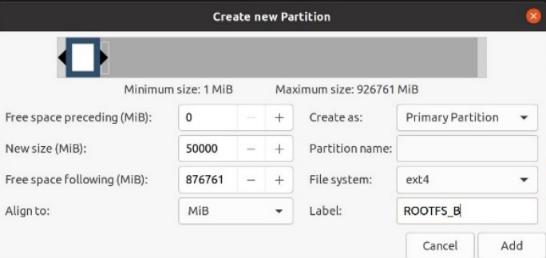
9) Create the second Root File System partition by right clicking on the “unallocated” partition, select New, and create it using the values below. Numurus recommends 50000 MiB rootfs partitions to ensure sufficient space for additional software installation and system logging.
- New Size: 50000, File System: ext4, Label: ROOTFS_B
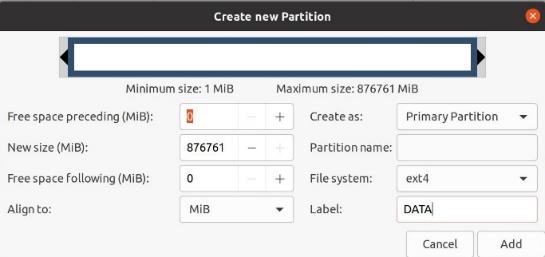
10) Create the user storage partition by right clicking on the “unallocated” partition, select New, and create it using the values below. This partition should be set to use remaining unallocated space on the SSD card.
- New Size: Use all remaining space, File System: ext4, Label: DATA
11) Click the “Check” icon at the top to apply changes
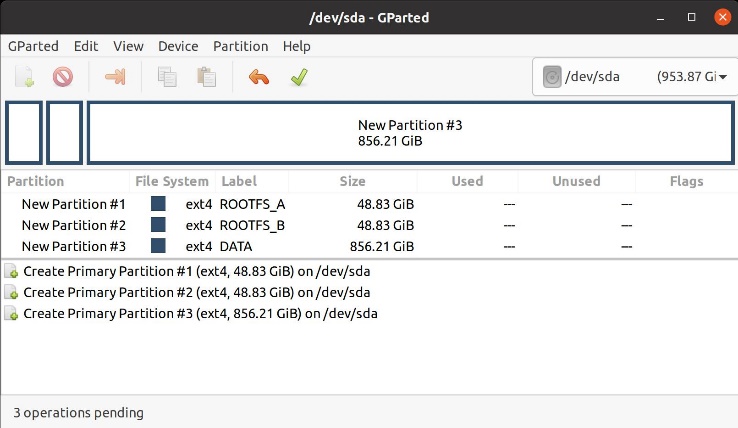
12) With all that done, your screen should look like the below. Click the green checkmark at the top to apply the operations.
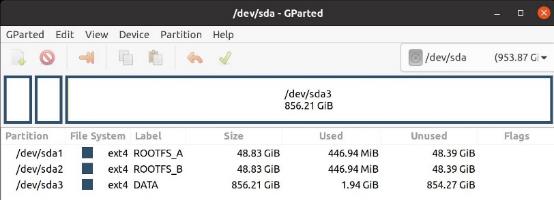
13) Close the gparted application window, then unplug and re-plug the SSD adapter to mount the new partitions.
14) Now we need to flash the custom NEPI image to the ROOTFS_A partition on the SSD, using the drive mappings revealed with the df -h command we just ran. This is likely to just be /dev/sdb1/ as in the example below the following, but if you get an error, you will need to replace /dev/sdb1 with whatever your host’s device mapping is. In your terminal window, type the following, replacing <image_name> with the name of the latest image from Dropbox:
sudo dd if=~/Downloads/<image_name> of=/dev/sdb1 bs=64M status=progress
Example:
sudo dd if=~/Downloads/nepi_2.0.2_s2x_bxn.img.raw of=/dev/sdb1 bs=64M status=progress
15) In similar fashion, flash the custom NEPI image to the ROOTFS_B partition, possibly located at /dev/sdb2 (but again, modify this if your host’s drive mappings are different). In your terminal window, type the following, replacing <image_name> with the name of the latest image from Dropbox:
sudo dd if=~/Downloads/<image_name> of=/dev/sdb2 bs=64M status=progress
Example:
sudo dd if=~/Downloads/nepi_2.0.2_s2x_bxn.img.raw of=/dev/sdb2 bs=64M status=progress
16) Depending on partition sizes you chose when partitioning the SSD and the size of the image file, you may need to expand the size of these filesystems to ensure they included all space in the partition.
Example:
sudo resize2fs /dev/sdb1
17) Repeat previous step for ROOTFS_B partition.
Example:
sudo resize2fs /dev/sdb2
18) After completing the Root File System and user storage partition creation processes, install the SSD card on the target GPU carrier board, connect your PC to your new NEPI enabled GPU, and power up the system. On bootup, NEPI will autopopulate the user storage drive with required subfolders.
19) Start an SSH session from your PC to your NEPI device by opening a terminal and entering the text below that uses the ssh key you downloaded in the “Setup Your PC for NEPI Engine Installation” section of this tutorial:
ssh -o StrictHostKeyChecking=no -i ~/ssh_keys/nepi_engine_default_private_ssh_key nepi@192.168.179.103
You can find a detailed tutorial on setting up an SSH connection to your NEPI device in the NEPI Engine tutorial “Accessing and Customizing the File System” at:
https://nepi.com/documentation/
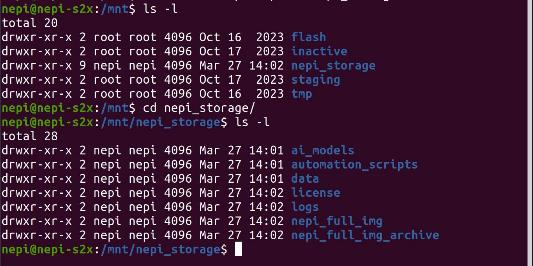
20) Within the SSH connected terminal window, verify that the permissions for both the nepi_storage partition and its folders are now correct:
ls -l /mnt
ls -l /mnt/nepi_storage
Test Your NEPI Engine Installation
Try to connect to the device’s NEPI RUI (Resident User Interface). Open a chrome browser on your PC and navigate to http://192.168.179.103:5003/ .
You can find a detailed tutorial on connecting to and using the NEPI RUI in the NEPI Engine tutorial “Connecting and Setup” at:
https://nepi.com/documentation/
Similarly, connect to the NEPI network storage and ensure you can access the folders as well as create and delete files within the folders.
Instructions for Orin-NX (l4t_initrd_flash.sh)
NEPI Engine GPU Module Flashing
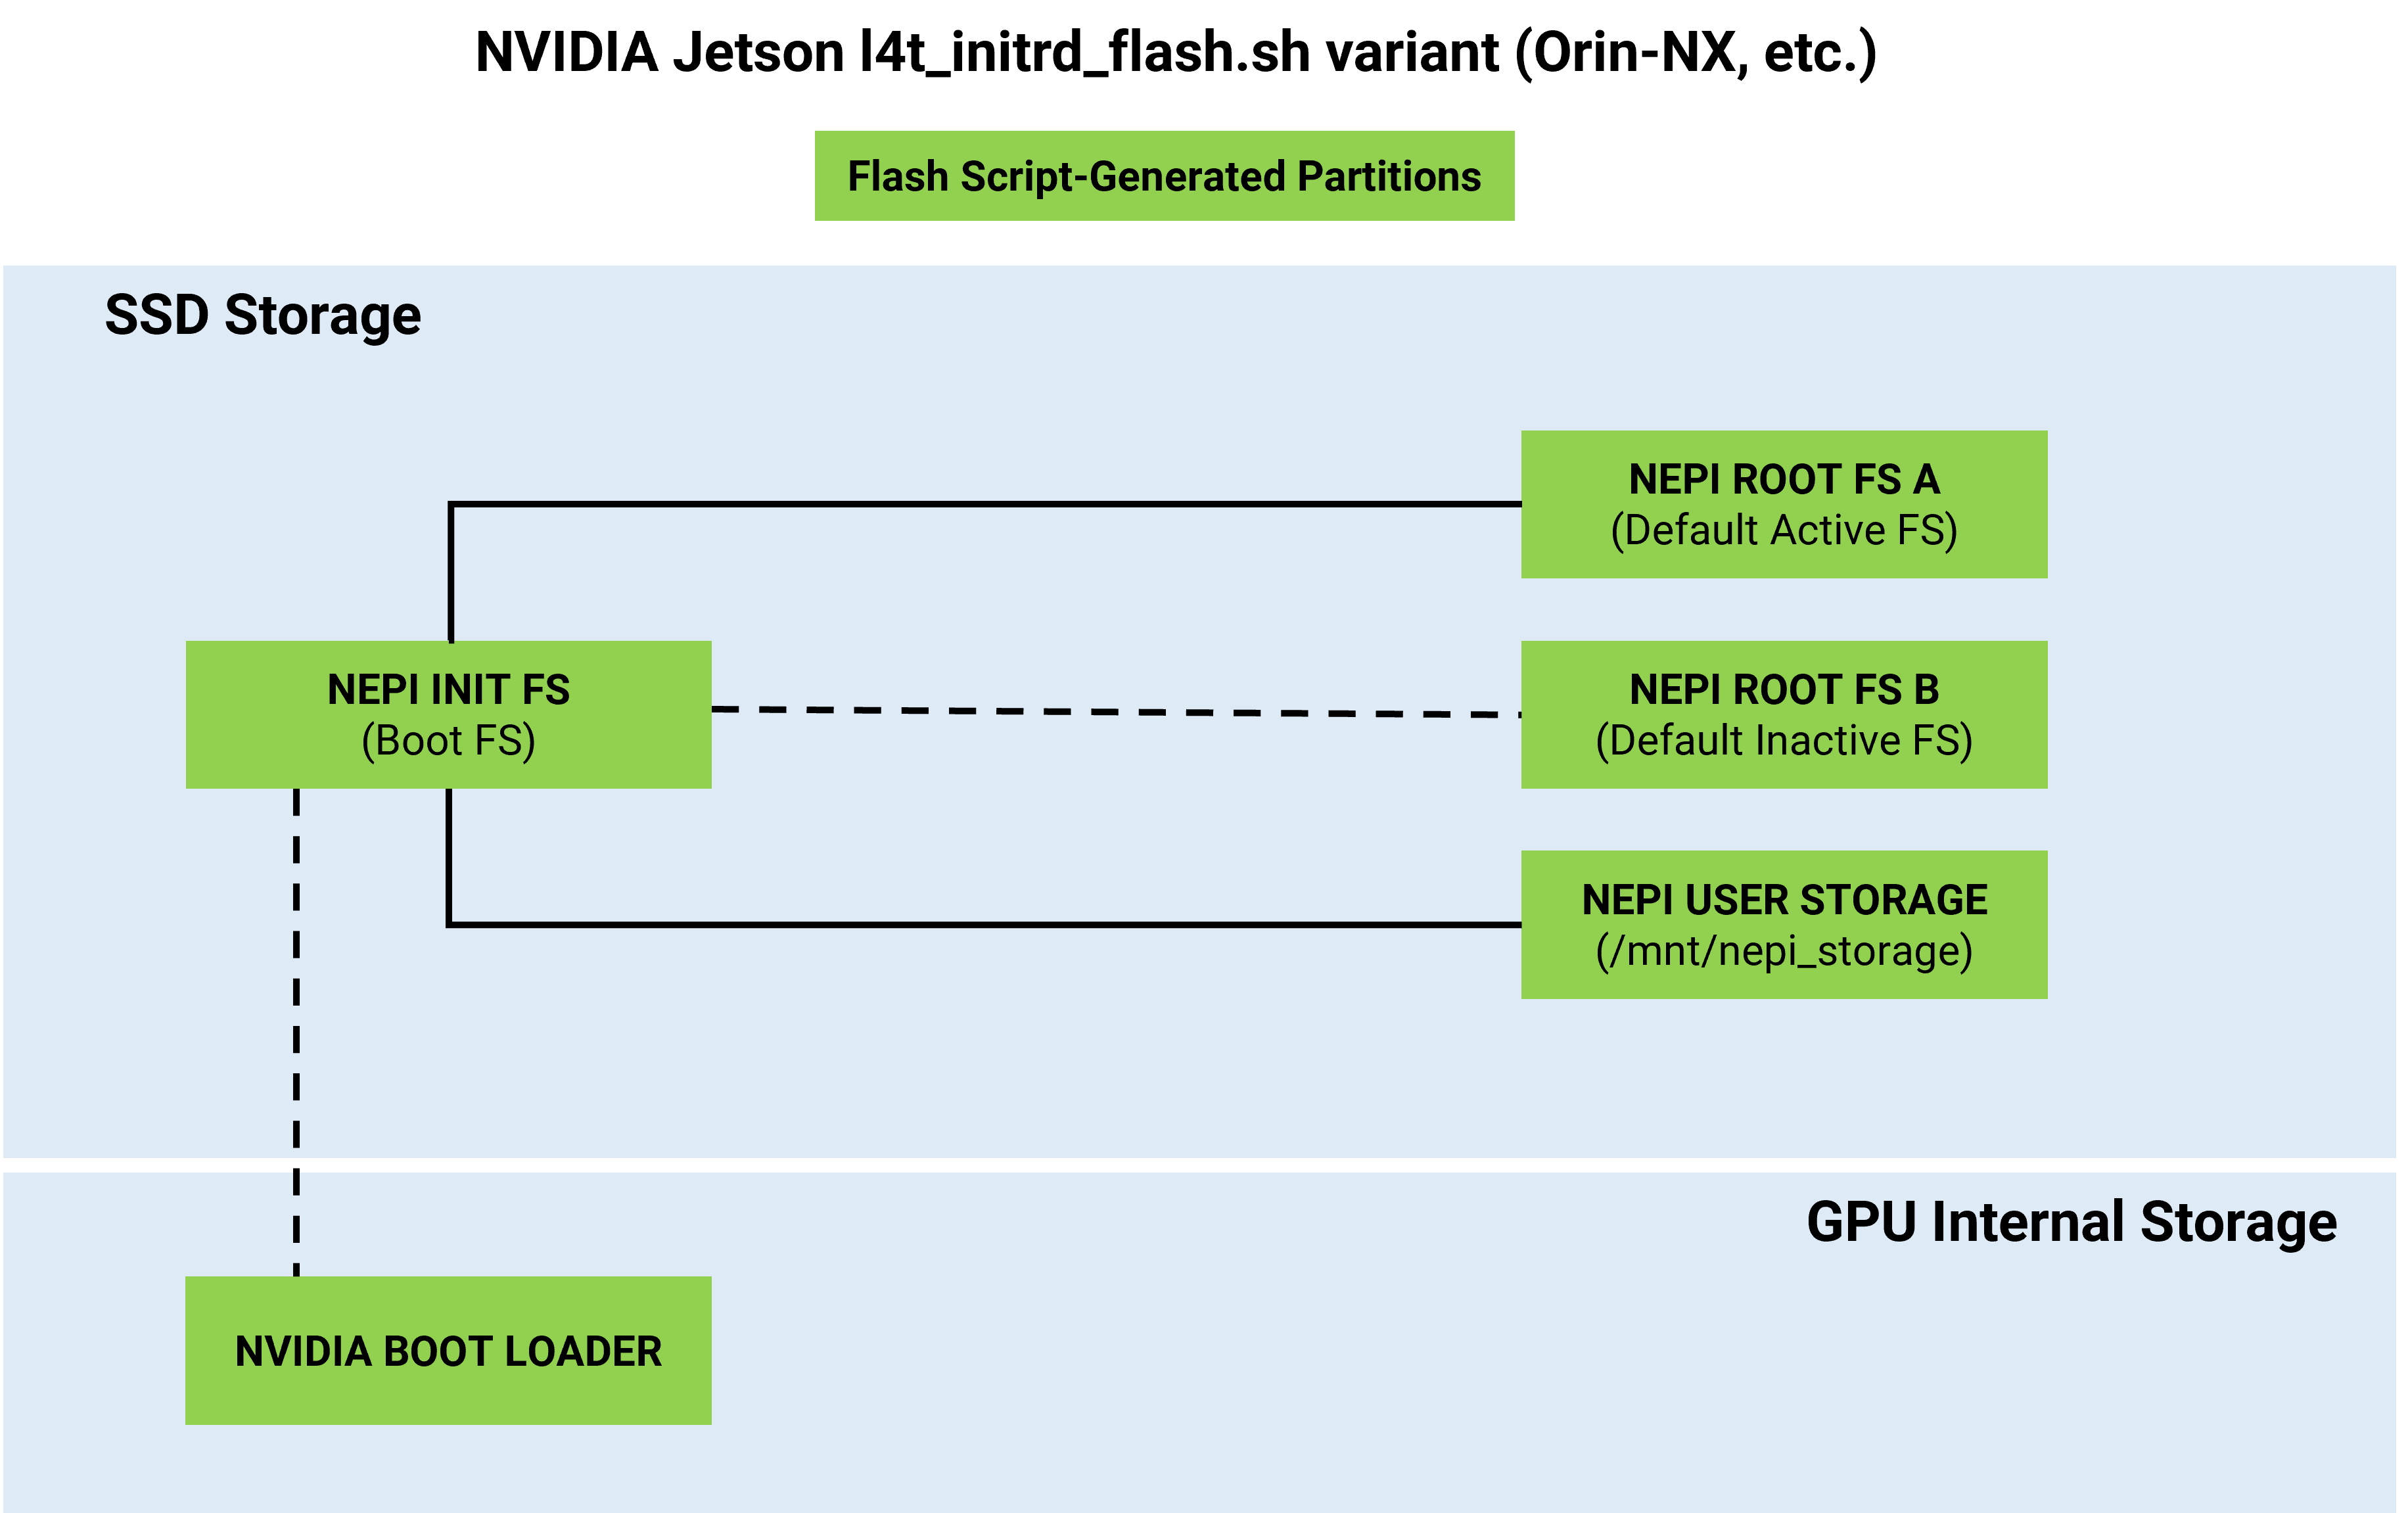
1) Extract the NEPI Init flash archive you downloaded for your particular GPU carrier board hardware (the archive contains the “external” folder, which includes the NEPI Init ROOTFS and will be populated with the NEPI Main ROOTFS Image file in steps below.
Example:
tar -xf ~/Downloads/nepi_orin_nx_a603_jp5.1.2_init_flash.tar.gz
2) Extract the NEPI Main Image you downloaded for your particular GPU carrier board hardware and move it to the external folder extracted in the previous step with version-generic new name.
Example:
mv ~/Downloads/nepi_2.1.3_a603_rfs.img.raw ~/Downloads/nepi_orin_nx_a603_jp5.1.2_init_flash/external/nepi_orin_nx_a603_ssd_main_rootfs.img.raw
3) Follow manufacturer’s instructions to prepare your Jetpack BSP installation, resulting in a Linux_for_Tegra (L4T) installation. The rest of these instructions assume that your working directory is the root of this L4T install.
4) Copy the NEPI custom partition layout config file to the proper L4T subdirectory
Example:
cp ~/Downloads/flash_l4t_t234_nvme_nepi_custom.xml ./tools/kernel_flash
NOTE: The partition layout config. file is specific to the size SSD that you have. You may need to modify it if your SSD size differs from the size in the downloaded config. file. See here for a description of this file:
https://docs.nvidia.com/jetson/archives/r35.4.1/DeveloperGuide/text/AR/BootArchitecture/PartitionConfiguration.html#format-of-a-partition-configuration-file
5) Build the QSPI internal components (but do not flash anything yet).
Example:
./tools/kernel_flash/l4t_initrd_flash.sh --showlogs -p "-c bootloader/t186ref/cfg/flash_t234_qspi.xml" --no-flash --network usb0 p3509-a02+p3767-0000 internal
6) Move the entire unarchived “external” folder to ./tools/kernel_flash/images
7) Put the target device into “recovery mode” per manufacturer’s instructions.
8) Now you are ready to flash internal QSPI and external SSD storage.
Example: (single long command):
./tools/kernel_flash/l4t_initrd_flash.sh --external-device nvme0n1p1 -p "-c ./bootloader/t186ref/cfg/flash_t234_qspi.xml" -c ./tools/kernel_flash/flash_l4t_t234_nvme_nepi_custom.xml --showlogs --flash-only --network usb0 p3509-a02+p3767-0000 nvme0n1p1
This command will take considerable time. You should eventually see a success message like the following:
Flash is successful Reboot device Cleaning up... Log is saved to Linux_for_Tegra/initrdlog/flash_1-2_0_20231127-154607.log]
NEPI Engine Root File System and User Storage Partition Setup
The l4t_initrd_flash.sh variant prepares the SSD Module and installs the NEPI Init and Main Root File System images in a single step as part of the NEPI Engine GPU Module Flashing
Flash the manufacture BSP according to manufacturer instructions for the Jetpack version matching your NEPI Engine Init Image file.
1) Unzip the NEPI Engine Init Image file you downloaded for your particular GPU carrier board hardware. Open a terminal and type:
unzip ~/Downloads/<The NEPI Engine Init Image file you downloaded>
Example:
unzip ~/Downloads/ nepi_xavier_nx_boson_jp4.6.1_ssd_init_rootfs.img.raw.zip
unzip ~/Downloads/nepi_xavier_nx_a203_jp4.6.1_ssd_init_rootfs.img.raw.zip
2) Put the Jetson in “Recovery Mode” button/jumper again as you did in step 1. As before, you may verify your Jetson is in recovery mode by typing the following in a terminal window on your USB connected PC:
lsusb
You should see an Nvidia entry in the list. If you do not, try again. Generally, you will also hear the fan spin up. Your screen should look similar to below:

3) Backup the original “system.img” file in your Jetpack SDK folder on your PC, then copy the uncompressed NEPI Engine Init Image file to that same folder and rename it to “system.img.raw” (overwriting the existing file with that name) by typing the following in a terminal window on your PC:
mv <path/to/your/Linux_for_Tegra>/bootloader/system.img <path/to/your/Linux_for_Tegra>/bootloader /system.img.manufacturer_bsp
mv ~/Downloads/<The unzipped NEPI Engine Init Image file you downloaded> <path/to/your/Linux_for_Tegra>/bootloader/system.img.raw
Example:
mv ~/Applications/Jetpack_4.6.1_Xavier_NX/Linux_for_Tegra/bootloader/system.img ~/Applications/Jetpack_4.6.1_Xavier_NX/Linux_for_Tegra/bootloader/system.img.manufacturer_bsp
mv ~/Downloads/ nepi_xavier_nx_boson_jp4.6.1_ssd_init_rootfs.img.raw ~/Applications/Jetpack_4.6.1_Xavier_NX/Linux_for_Tegra/bootloader/system.img.raw
4) Flash the NEPI Engine Init Image by typing the following in terminal on your PC:
sudo <path/to/your/Linux_for_Tegra>/flash.sh -r -k APP jetson-xavier-nx-devkit-emmc mmcblk0p1
You should see the following message when image flashing is complete

NEPI Engine Root File System and User Storage Partition Setup
The NEPI Engine Root File System partitions, both primary and backup, along with the NEPI user storage (nepi_storage) partiion reside on an SSD card installed on your hardware stack. The following instructions cover configuring the SSD card’s Root File System partitions and flashing the NEPI Engine Root File System images (main and backup).
NOTE: This installation tutorial uses an external SSD USB adapter to configure and flash your SSD card. An alternative approach is to install the SSD card into your GPU hardware stack at this point and perform the SSD partition and folder setup directly on your GPU hardware stack using “fdisk” or “parted” Linux command line tools in an SSH connected terminal. You can find a detailed tutorial on setting up an SSH connection to your NEPI device in the NEPI Engine tutorial “Accessing and Customizing the File System” at:
https://nepi.com/documentation/
1) Using an appropriate USB adapter for your SSD card, connect it to your PC, open a terminal window, and type the following:
sudo gparted
NOTE: If gparted is not installed, you may need to install it first with
sudo apt-install gparted
2) On the upper right side of the gparted application screen, select the /dev filesystem identifier associated with your USB SSD adapter, which will vary depending on your PC storage configuration. You can determine which identifier it is by looking for a new entry in this list after plugging the adapter into your PC. Beware, selecting the wrong identifier here can cause major harm to your Linux installation. Double check your selection! Work with the SSD identified by
- /dev/nvme0n1
and should erase any existing partitions and then create 3 new partitions:
- /dev/nvme0n1p1 (label = ROOTFS_A, size = 50GB, filesystem type = ext4)
- /dev/nvme0n1p2 (label = ROOTFS_B, size = 50GB, filesystem type = ext4)
- /dev/nvme0n1p3 (label = DATA, size = whatever remains on the SSD, filesystem type = ext4)
3) Create the first root Root File System partition by right clicking on the “unallocated” partition, select New, and create it using the values below. Numurus recommends 50000 MiB rootfs partitions to ensure sufficient space for additional software installation and system logging.
- New Size: 50000, File System: ext4, Label: ROOTFS_A
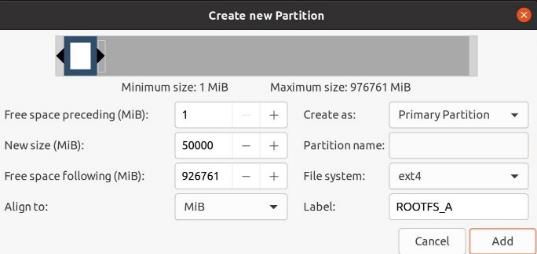
4) Create the second Root File System partition by right clicking on the “unallocated” partition, select New, and create it using the values below. Numurus recommends 50000 MiB rootfs partitions to ensure sufficient space for additional software installation and system logging.
- New Size: 50000, File System: ext4, Label: ROOTFS_B
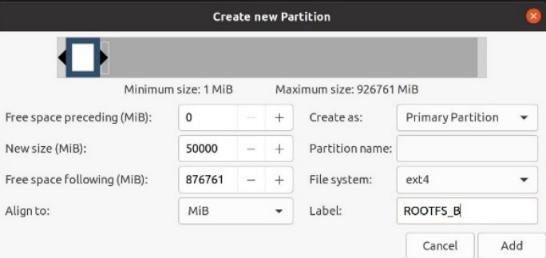
5) Create the user storage partition by right clicking on the “unallocated” partition, select New, and create it using the values below. This partition should be set to use remaining unallocated space on the SSD card.
- New Size: Use all remaining space, File System: ext4, Label: DATA
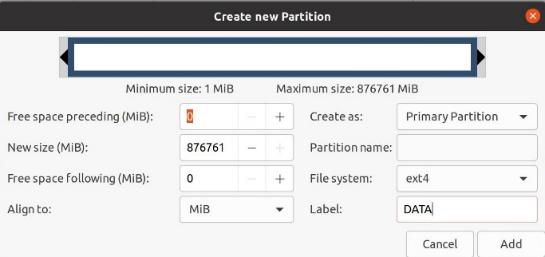
6) Click the “Check” icon at the top to apply changes
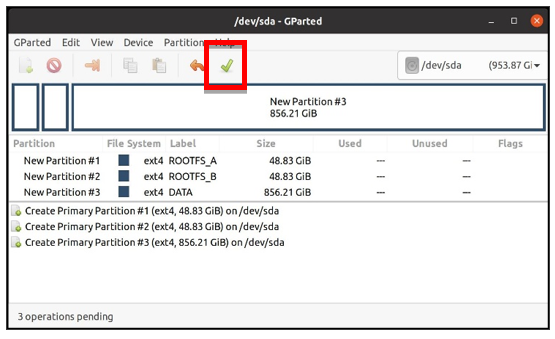
7) With all that done, your screen should look like the below. Click the green checkmark at the top to apply the operations.
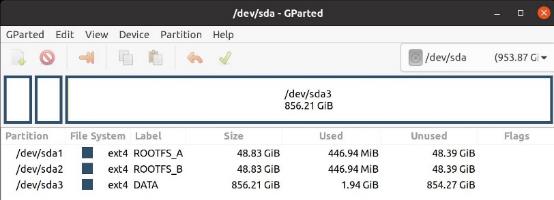
8) Close the gparted application window, then unplug and re-plug the SSD adapter to mount the new partitions.
9) Now we need to flash the custom NEPI image to the ROOTFS_A partition on the SSD, using the drive mappings revealed with the df -h command we just ran. This is likely to just be /dev/sdb1/ as in the example below the following, but if you get an error, you will need to replace /dev/sdb1 with whatever your host’s device mapping is. In your terminal window, type the following, replacing <image_name> with the name of the latest image from Dropbox:
sudo dd if=~/Downloads/<image_name> of=/dev/sdb1 bs=64M status=progress
Example:
sudo dd if=~/Downloads/nepi_2.0.2_s2x_bxn.img.raw of=/dev/sdb1 bs=64M status=progress
10) In similar fashion, flash the custom NEPI image to the ROOTFS_B partition, possibly located at /dev/sdb2 (but again, modify this if your host’s drive mappings are different). In your terminal window, type the following, replacing <image_name> with the name of the latest image from Dropbox:
sudo dd if=~/Downloads/<image_name> of=/dev/sdb2 bs=64M status=progress
Example:
sudo dd if=~/Downloads/nepi_2.0.2_s2x_bxn.img.raw of=/dev/sdb2 bs=64M status=progress
11) Depending on partition sizes you chose when partitioning the SSD and the size of the image file, you may need to expand the size of these filesystems to ensure they included all space in the partition.
Example:
sudo resize2fs /dev/sdb1
12) Repeat previous step for ROOTFS_B partition.
Example:
sudo resize2fs /dev/sdb2
13) After completing the Root File System and user storage partition creation processes, install the SSD card on the target GPU carrier board, connect your PC to your new NEPI enabled GPU, and power up the system. On bootup, NEPI will autopopulate the user storage drive with required subfolders.
14) Start an SSH session from your PC to your NEPI device by opening a terminal and entering the text below that uses the ssh key you downloaded in the “Setup Your PC for NEPI Engine Installation” section of this tutorial:
ssh -o StrictHostKeyChecking=no -i ~/ssh_keys/nepi_engine_default_private_ssh_key nepi@192.168.179.103
You can find a detailed tutorial on setting up an SSH connection to your NEPI device in the NEPI Engine tutorial “Accessing and Customizing the File System” at https://numurus.com/tutorials/.
15) Within the SSH connected terminal window, verify that the permissions for both the nepi_storage partition and its folders are now correct: ls -l /mnt ls -l /mnt/nepi_storage 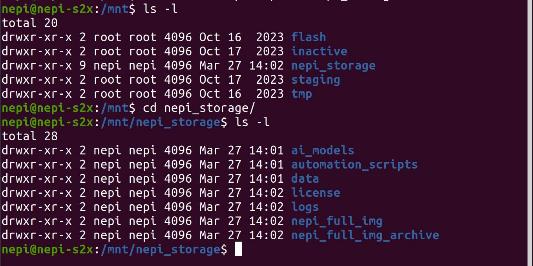
Test Your NEPI Engine Installation
Try to connect to the device’s NEPI RUI (Resident User Interface). Open a chrome browser on your PC and navigate to http://192.168.179.103:5003/ .
You can find a detailed tutorial on connecting to and using the NEPI RUI in the NEPI Engine tutorial “Connecting and Setup” at:
https://nepi.com/documentation/
Similarly, connect to the NEPI network storage drive and ensure you have can access the folders and have permission to create/delete/edit files in these folders.
NEPI Engine Device Configuration
NEPI Engine Software Configuration
1) SSH into your NEPI Engine’s file system: Connect your NEPI Engine installed Hardware Stack to your PC with an Ethernet cable and power the GPU hardware. Open a terminal on your PC and type the following to initiate an SSH connection to the device’s NEPI Engine software:
ssh -o StrictHostKeyChecking=no -i ~/ssh_keys/nepi_engine_private_ssh_key nepi@192.168.179.103
2) If you would like to give your NEPI device a unique serial number and device name, do the following from the ssh connected terminal window:
cd /opt/nepi/
nano sys_env.bash
After editing the contents, be sure to save the changes on exit.
3) If you plan to use your NEPI enabled device to upload data and download software to a remote server running Numurus’ NEPI Connect software, you will first need to create a NEPI Unique ID (NUID) number and corresponding public SSH key that NEPI Connect software will use for device setup and authentication. The following instructions will walk you through the setup from the ssh connected terminal window:
cd /opt/nepi/nepi_link/nepi-bot/devinfo
python3 change_identity.py -n <Your 10 digit NUID>
For security reasons, it is recommended that you use some random number generator to generate a random 10 digit NUID value.
Example:
python3 change_identity.py -n 3989789099
Press enter twice to skip a passphrase and press p to print out the key.
4) For any configuration changes to take effect, you must reboot your NEPI device:
sudo reboot
5) Test the serial number and NUID setup success by logging into the systems RUI user interface. Open the chrome browser on your PC and navigate to http://192.168.179.103:5003/ . Once in the RUI navigate to the Dashboard tab and check that the serial number has been updated. Next, navigate to the Application/CONNECT tab, enable NEPI Connect if disabled, and verify that your NUID has been updated.
6) For security reasons, it is highly recommended that you replace the default SSH key and Samba network drive credentials on our your NEPI device following the instructions in this links:
https://ubuntuforums.org/showthread.php?t=1687199
Learn More
To learn more about configuring and customizing your NEPI engine installation, see the tutorial “Accessing and Customizing the File System at:
https://nepi.com/documentation/
User Storage Configuration
In this section we will create some additional folders and populate some example AI and automation files that will allow you to start testing your system with real hardware, ai models, and automation solutions.
Add Additional User Storage Folders
While you created some nepi_storage folders as part of the NEPI installation instructions you performed in the last section, only the minimal folder structure was created that allows your NEPI device to boot. After rebooting your system and logging into your NEPI device’s user_storage drive, add any of the following folders that are missing from the list below, which also provides a description of each folders function.
Standard NEPI’s User Storage Folders and Descriptions
|
Folder Name |
Use Description |
|
ai_models |
AI image detection model library |
|
automation_scripts |
Automation script library |
|
data |
Onboard logged data folder |
|
databases |
Databases required for automation s |
|
docs |
Manuals and API documentation |
|
license |
System license files and license request |
|
logs |
System generated logs are stored |
|
nepi_full_img |
Install (upgrading) system image files |
|
nepi_full_img_archive |
Archived (backup) system image files |
|
user_cfg |
User and system configuration files |
Note: New NEPI versions commonly add additional folders to nepi_storage, so your folder list may differ somewhat from the table above.
Download Example User Storage Files
1) Numurus maintains a shared dropbox folder with some example user storage files that will let you start experimenting with NEPI’s built-in AI and automation applications. This folder includes example ai_models, automation scripts, databases, and more. You can download these files from:
https://www.dropbox.com/sh/z3m3hp4f3lx3s7m/AAAOJNV9mM-kLcDV6Iwq2sEEa?dl=0
Navigate to the user_partition folder that best matches the NEPI software version your device is running, open the folder, and download all the contents to your PC
2) You can download additional automation script examples from the NEPI GitHub repo at:
https://github.com/numurus-nepi/nepi_sample_auto_scripts
Download the automation scripts in this repo if you want additional automation scripts examples.
3) Connect to the NEPI network shared User Folder (nepi_storage) by opening a File Navigator on your PC. From the File Navigator, select “+ Other Locations” at the bottom of the left menu. Enter the device URL as shown in the screenshot below, ensuring that you preface with smb:// (e.g., smb://192.168.179.103/)and substituting a different IP address if your device is configured with an IP address different than the default value.

4) You will be presented with a login screen and need to provide the following NEPI user storage access credentials:
- Username: nepi Password: nepi
After entering credentials, you should see the subdirectories listed above. You can drag/drop, copy/paste locally, or delete files.
5) Copy all the files you downloaded to the nepi_storage/installs folder on your NEPI device. Unzip any files that are zipped, then copy the contents into the appropriate nepi_storage folder (i.e. nepi_storage/ai_models, nepi_storage/automation_scripts…)
6) Power cycle your NEPI device, then log into the NEPI RUI once the system boots up. Plug a USB or other
Test Your NEPI Example File Installation
Reboot the NEPI device and test the demo file installation success by logging into the system’s RUI user interface. Open the chrome browser on your PC and navigate to http://192.168.179.103:5003/ . Once in the RUI navigate to the Applications/AI tab and check that your AI models are available in the “Image Classifier” dropdown menu. Next, navigate to the Applications/Automation tab and check that your automation scripts are available in the automation script list.
Learn More
Learn how to quickly use these examples ai and automation scripts by reading some of the NEPI Engine AI and automation tutorials at:

