NEPI Engine – Connecting and Setup
Introduction
This tutorial covers connecting and configuring NEPI Engine software running on an NVIDIA Jetson or other edge-compute hardware. This tutorial assumes you have a working NEPI Engine enabled edge compute platform.What you will need
1) 1x NEPI-enabled device.
2) 1x PC with Ethernet network adapter and WiFi support. This tutorial uses a Windows 11 PC and a USB GigE Ethernet adapter.
3) 1x Ethernet Cable
Prerequisite (NEPI Lite Only)
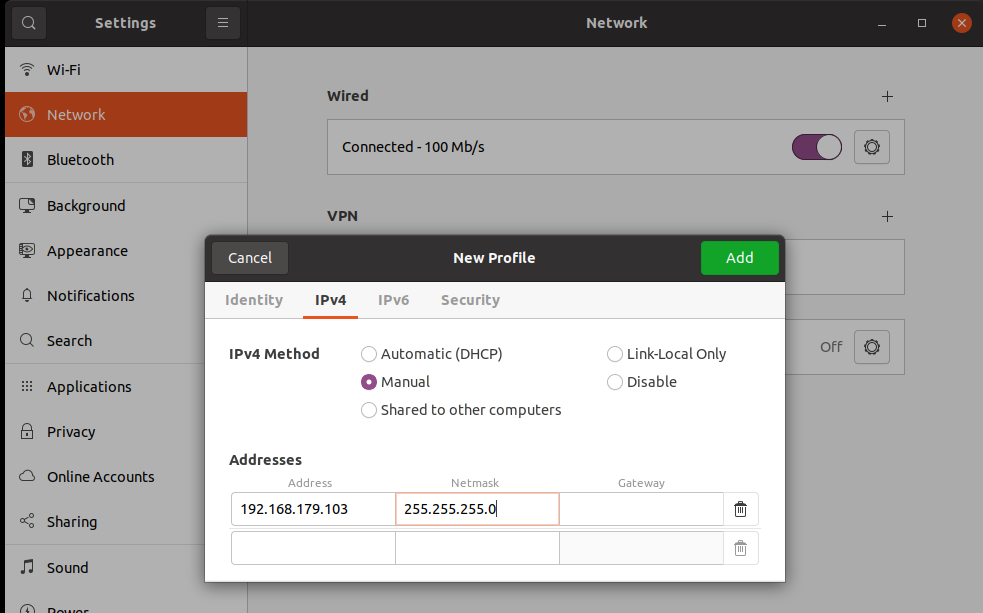
This step is required if you are running NEPI Lite. If your device is running NEPI Lite, you must manually set a static IP address before continuing. If you installed NEPI Full, you can skip this step.Your NEPI Device’s network adapter IPV4 settings must be set to ‘Manual’ with the following values ADDRESS = 192.168.179.103 NETMADK = 255.255.255.0 before proceeding.Configure the NEPI Device IP Address (NEPI Lite Only)
1) Navigate to the Network Settings and
2) Select your Wired connection. Click the gear icon to edit the connection.
3) Go to the IPv4 tab and set IPv4 Method to Manual.
4) Add an address with the following values:
Address: 192.168.179.103
Netmask: 255.255.255.0
5) Click Add or Save, then close the settings window.
 Your device is now configured with a static IP address and ready for the next step.
What you will need
1) 1x NEPI-enabled device and power supply.
2) 1x PC with Ethernet network adapter. This tutorial uses a Windows 11 PC and a USB GigE Ethernet adapter.
3) 1x Ethernet cable.
4) 1x USB camera or webcam.
Hardware Setup
1) Connect your NEPI device to your PC’s Ethernet adapter using an Ethernet cable, then power your NEPI device.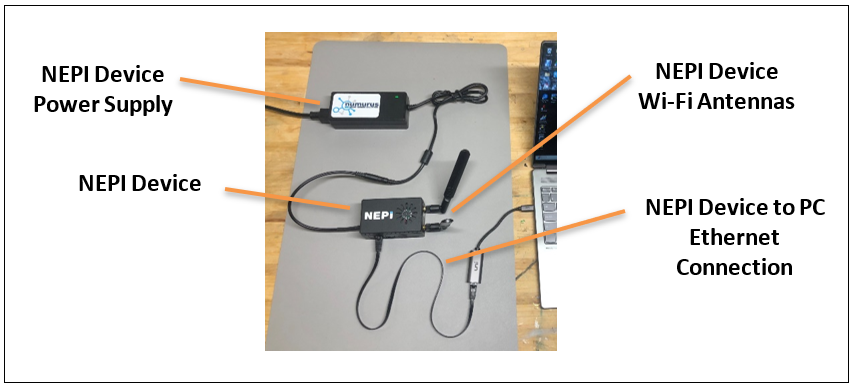
Connecting a PC to a NEPI Device
Connecting with a Network Cable on Windows
On the PC, you will need to configure the Ethernet network adapter with a static IPV4 address on the same subnet that your NEPI device following the steps below. The NEPI software uses a default subnet of 192.168.179.0/24 with the device configured for IP address 192.168.179.103.Example: PC Network Adapter Settings
IP Address: 192.168.179.5
Submask: 255.255.255.0
1) Right click on the “Connection” icon in your PC’s menu bar and select the “Network and Internet settings” option.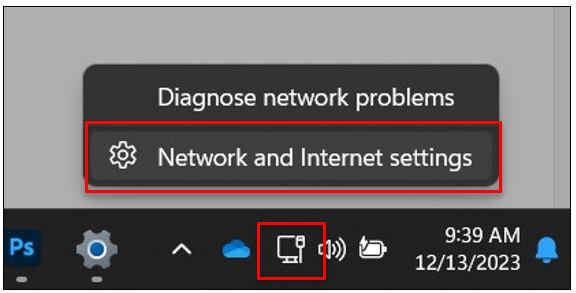 2) Select the “Ethernet” line from the list of options shown.
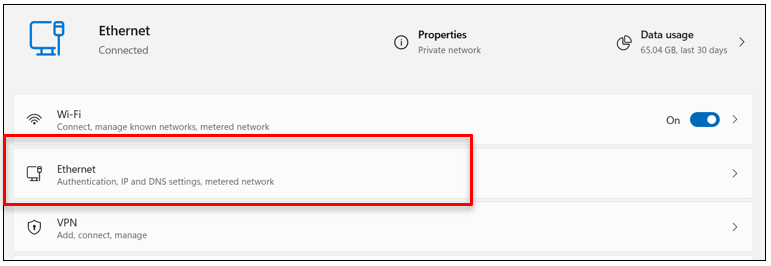
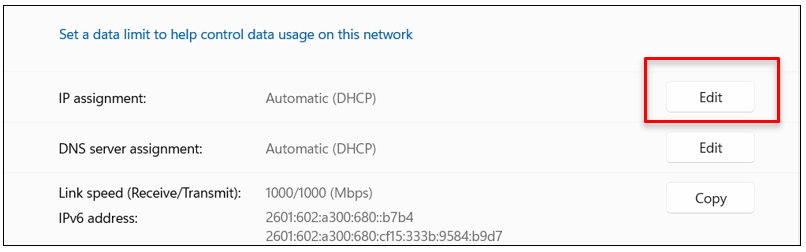
 3) Select the “Edit” button next to the “IP assignment” menu item
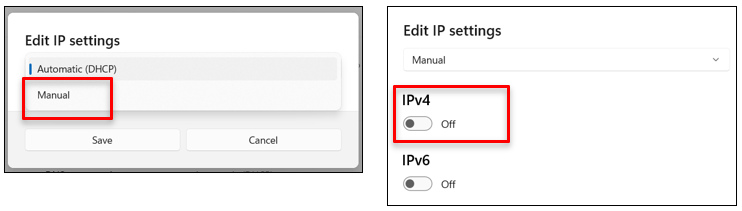
 4) Select the “Manual” option then turn on the “IPv4” switch in the popup window that appears.
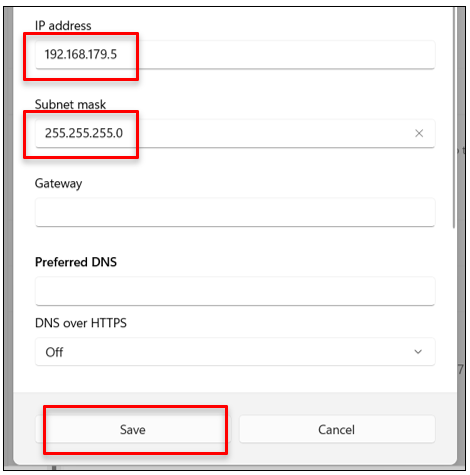
 5) Enter 192.168.179.5 in the “IP address” and 255.255.255.0 in the “Subnet mask” fields, then click the “Save” button.
 6) You can test your Ethernet connection to the NEPI device by opening a Command Prompt terminal from the windows “Start” menu, then typing “ping 192.168.179.103”. You should see a valid response like the one below. If not, try power cycling your PC.

Connecting with a Network Cable on MacOS
To connect your Mac directly to a NEPI device over Ethernet, you will configure your Mac’s Ethernet adapter with a static IPv4 address on the same subnet as the NEPI device. NEPI devices use the default subnet 192.168.179.0/24 and the device IP 192.168.179.103.Example Static Network Settings for macOS
IP Address: 192.168.179.5
Subnet Mask: 255.255.255.0
1) Open Network Settings: Open System Settings. Scroll and select Network from the sidebar.
2) Select Your Ethernet Interface: Choose Ethernet from the list of available network interfaces.
NOTE: If you do not see Ethernet listed, plug in your Ethernet adapter and reopen Network settings.

3) Open IP Configuration: Select the Details button next to Ethernet, then choose the TCP/IP tab.
4) Change IPv4 Configuration: Locate the Configure IPv4 dropdown menu and select Manually.
Fill in the NEPI-Compatible Static IP following fields (if not done automatically):
IP Address: 192.168.179.5
Subnet Mask: 255.255.255.0
Select OK, then close the window. Your Mac will now use the static address.

5) Test Connectivity: Open the Terminal app (found in Applications → Utilities → Terminal). Input the following command:
ping 192.168.179.103
NOTE: Press Ctrl + C to stop the ping process and return to the normal Terminal prompt.

Accessing and Navigating the NEPI Device’s RUI
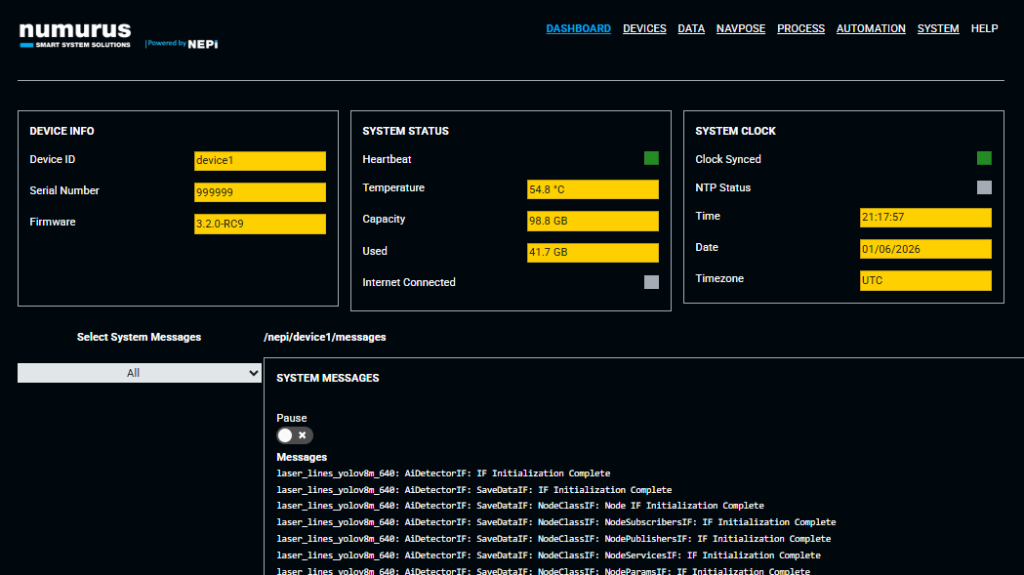
Now that the PC and NEPI device are communicating, we need to connect to the NEPI device’s Resident User Interface or RUI, which is a browser-based interface hosted on the NEPI device, that provides system monitoring and setup, since in most cases, the NEPI device will be embedded in a larger system with no display, keyboard, or mouse attached. 1) For this step, you just need to open a web-browser on our PC and enter the NEPI device’s IP address and RUI port number: http://192.168.179.103:5003 NOTE: The current version of the RUI does not include a self certified SSL certificate, so the link will display a “Not Secure” message.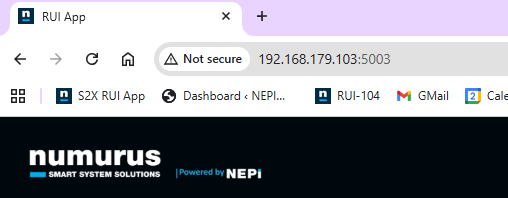 2) You should see the NEPI RUI dashboard page appear and a blinking Green heartbeat indicator at the top of the SYSTEM STATUS section that lets you know that the RUI is communicating with the NEPI backend software processes. This is a good way to check if you are actually connected to a live NEPI device, and not just looking at a browser cached screen image. You can select the address in the browser’s address bar and drag the NEPI RUI address into your favorites bar for easy access.
NOTE: On the initial power up of a NEPI device, you may need to wait a few seconds for the RUI to connect.
 3) You can navigate the NEPI RUI just like any webpage using the menu items in the header section of the page.
 4) Before getting into the NEPI system setup portion of this tutorial, it will be valuable to review some interface aspects of the NEPI RUI system. On the RUI Dashboard tab, you can see a combinations of yellow and white boxes. The yellow boxes are indicators, and the white boxes are input fields. There are Gray buttons that will turn Blue momentarily when clicked, indicating that the command was received and sent, Drop Down menus that show the selected items in Blue boxes, and Toggle Switches will turn Green when enabled.
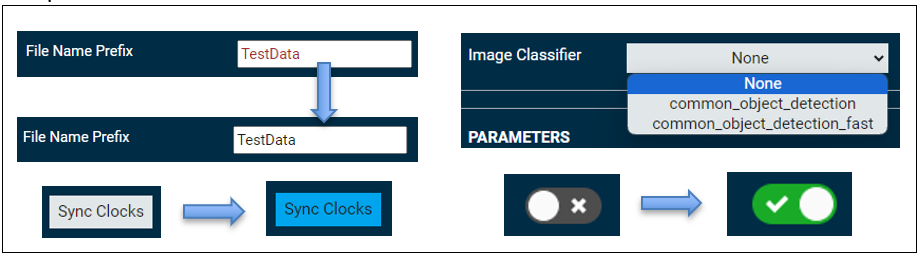
NOTE: It is critical that after entering an input field, you hit the enter key. Before hitting enter, the text in the field will be red. Once you hit the enter key, the RUI will send the input to the NEPI engine backend software and change the input to black text, indicating that it was accepted and sent.
NOTE: While the RUI provides a convenient user interface to the NEPI software system, all of the data and controls you see have documented backend API interfaces (ROS and HTML) for automation programming and interfacing to a connected system.