NEPI Engine – Connecting and Setup
Introduction
This tutorial covers connecting and configuring NEPI Engine software running on an NVIDIA Jetson or other edge-compute hardware. This tutorial assumes you have a working NEPI Engine enabled edge compute platform.
What you will need
1) 1x NEPI-enabled device.
2) 1x PC with Ethernet network adapter and WiFi support. This tutorial uses a Windows 11 PC and a USB GigE Ethernet adapter.
3) 1x Ethernet Cable
Hardware Setup
1) Connect your NEPI device to your PC’s Ethernet adapter using an Ethernet cable, then power your NEPI device.

Connecting a PC to a NEPI Device
Connecting with a Network Cable
On the PC, you will need to configure the Ethernet network adapter with a static IPV4 address on the same subnet that your NEPI device following the steps below. The NEPI software uses a default subnet of 192.168.179.0/24 with the device configured for IP address 192.168.179.103.
Example: PC Network Adapter Settings
IP Address: 192.168.179.5
Submask 255.255.255.0
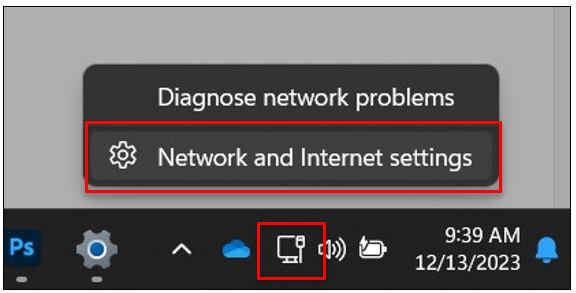
1) Right click on the “Connection” icon in your PC’s menu bar and select the “Network and Internet settings” option.
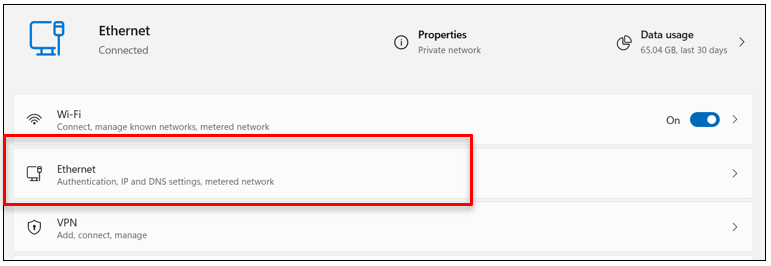
2) Select the “Ethernet” line from the list of options shown.
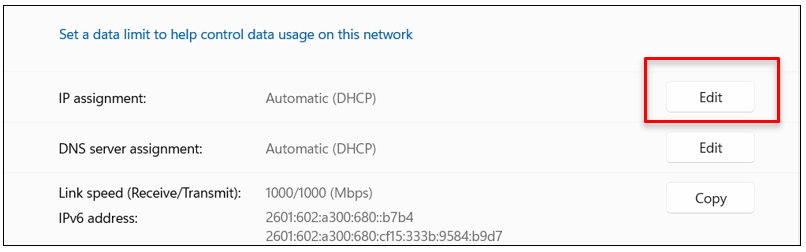
3) Select the “Edit” button next to the “IP assignment” menu item
4) Select the “Manual” option then turn on the “IPv4” switch in the popup window that appears.
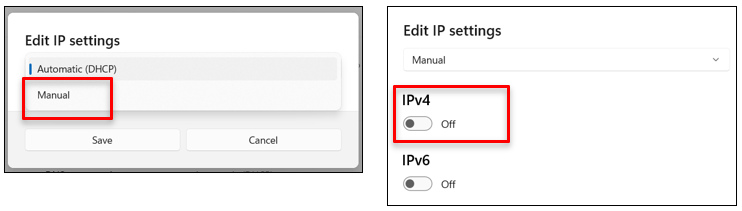
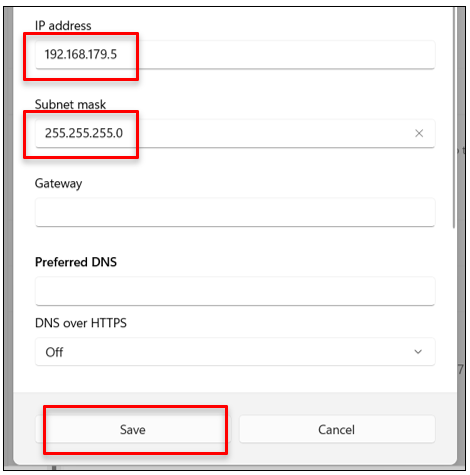
5) Enter 192.168.179.5 in the “IP address” and 255.255.255.0 in the “Subnet mask” fields, then click the “Save” button.
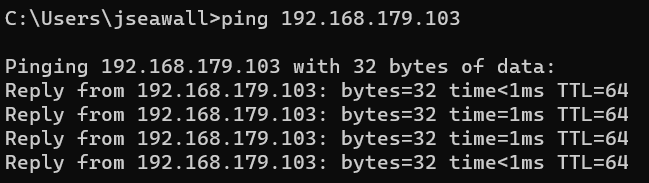
6) You can test your Ethernet connection to the NEPI device by opening a Command Prompt terminal from the windows “Start” menu, then typing “ping 192.168.179.103”. You should see a valid response like the one below. If not, try power cycling your PC.
Connecting Over WiFi
While you will initially need to connect to your NEPI device through a direct ethernet cable, if your NEPI device has WiFi support, you can configure a NEPI WiFi access point to connect to it in the future over WiFi. See the “Setting up a NEPI WiFi Access Point” section of this tutorial for instructions on setting up a WiFi access point on your NEPI device.
Accessing and Navigating the NEPI Device’s RUI
Now that the PC and NEPI device are communicating, we need to connect to the NEPI device’s Resident User Interface or RUI, which is a browser-based interface hosted on the NEPI device, that provides system monitoring and setup, since in most cases, the NEPI device will be embedded in a larger system with no display, keyboard, or mouse attached.
1) For this step, you just need to open a web-browser on our PC and enter the NEPI device’s IP address and RUI port number: http://192.168.179.103:5003
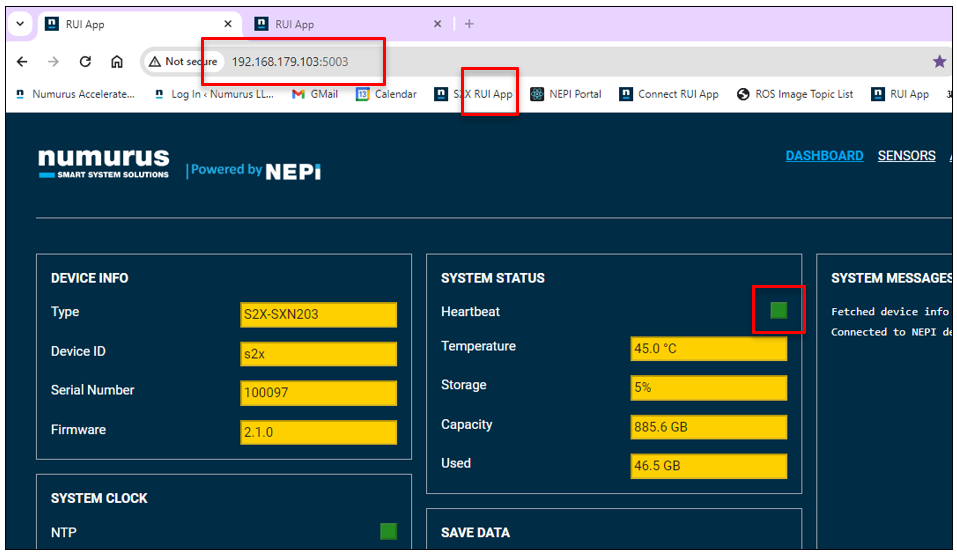
2) You should see the NEPI RUI dashboard page appear and a blinking Green heartbeat indicator at the top of the SYSTEM STATUS section that lets you know that the RUI is communicating with the NEPI backend software processes. This is a good way to check if you are actually connected to a live NEPI device, and not just looking at a browser cached screen image. You can select the address in the browser’s address bar and drag the NEPI RUI address into your favorites bar for easy access.
NOTE: The current version of the RUI does not include a self certified SSL certificate, so the link will display a “Not Secure” message.
NOTE: On the initial power up of a NEPI device, you may need to wait a few seconds for the RUI to connect.
Navigating the NEPI RUI
You can navigate the NEPI RUI just like any webpage using the menu items in the header section of the page. The NEPI RUI page is fully customizable, which is covered in the NEPI customization video demo series. The out of the box NEPI RUI system has 5 main menu items: This includes the Dashboard will bring up this page we’re on, the Sensors page is for configuring connected imaging and navigation sensors, Applications provides access to integrated NEPI applications such as AI and Automation applications, Controls is for configuring connected actuator and robotic control systems, and the System menu item provides user settings, communications, and software management tools.

Interacting with the NEPI RUI
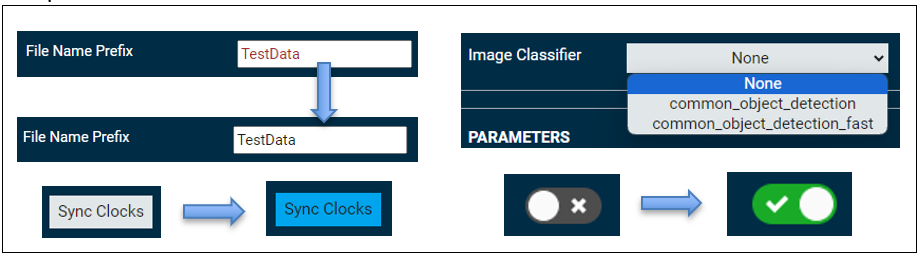
Before getting into the NEPI system setup portion of this tutorial, it will be valuable to review some interface aspects of the NEPI RUI system. On the RUI Dashboard tab, you can see a combinations of yellow and white boxes. The yellow boxes are indicators, and the white boxes are input fields. There are Gray buttons that will turn Blue momentarily when clicked, indicating that the command was received and sent, Drop Down menus that show the selected items in Blue boxes, and Toggle Switches will turn Green when enabled.
NOTE: It is critical that after entering an input field, you hit the enter key. Before hitting enter, the text in the field will be red. Once you hit the enter key, the RUI will send the input to the NEPI engine backend software and change the input to black text, indicating that it was accepted and sent.
NOTE: While the RUI provides a convenient user interface to the NEPI software system, all of the data and controls you see have documented backend API interfaces (ROS and HTML) for automation programming and interfacing to a connected system.
NEPI Clock Synchronization
In many applications, it is important to synchronize to an available system time clock and synchronize your NEPI-enabled device with this system clock available on a connected piece of hardware (PC, INS, sensor, etc.). This is particularly true for NEPI devices that do not include a battery-backed clock, since these devices boot up with a static, necessarily incorrect timestamp.
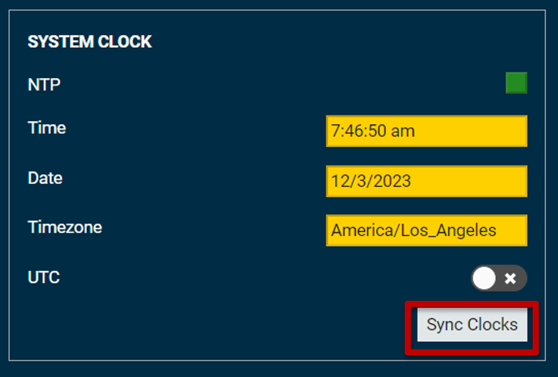
RUI Time Syncing
NEPI provides an alternative, yet less accurate time syncing solution through the NEPI RUI graphical user interface using an html-based sync solution. Connect to your NEPI’s RUI Dashboard tab from the time reference’s source computer (your laptop) in a web browser and select the “Sync Clock” button on the dashboard.
NTP Server Time Syncing
By default, NEPI looks for and will connect to a local NTP server broadcasting on IP address 192.168.179.5. Additional NTP server IP addresses can be added by publishing the IP address to the ROS topic “add_ntp_server“. For more information on configuring and connecting an local NTP server with your NEPI device, see the tutorial “Configuring NTP Time Syncing” available at: https://nepi.com/tutorials/
ROS Message Time Syncing
The NEPI system clock can be updated by sending a ROS “std_msgs/Time” message to the ROS topic “set_time“. This method of time synchronization has the most latency of the three options.
Connecting to the Internet
Ethernet Internet Connection Setup
If your NEPI device is connected to an internet connected switch through an Ethernet cable, you can configure the NEPI device’s Ethernet settings to enable internet connections in the RUI’s “System/Device” tab where you will find a section labeled “ETHERNET”. In this section you will see the NEPI device’s base IP address, a switch to enable DHCP support if you want your system to connect to the internet, a box and controls for adding or removing additional IP addresses that are added on top of the system’s base address, two network bandwidth usage indicators, and a control for limiting the systems max ethernet transmit bandwidth, which is useful if you are connecting over wireless or cabled network with limited bandwidth. A value of “-1” applies no limiting.

WiFi Internet Connection Setup
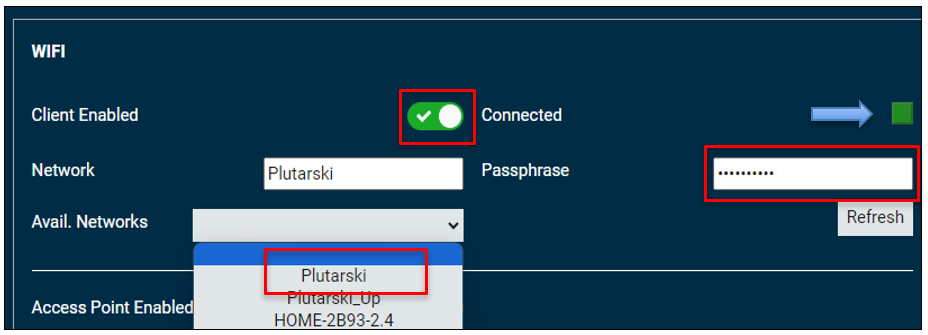
If your NEPI device has either an integrated WiFi board or you have a WiFi USB adapter attached, you will see a WIFI section available under the ETHERNET section on this page. If you want to connect to the internet through an available WiFi network, click the Client Enabled switch, wait for the “Available Networks” dropdown box to populate, then select the WiFi network you want to connect too, and enter the WiFi password in the “Passphrase” box. Be sure to hit return after entering the password. If the NEPI software was able to connect with the password you entered, you should see the “Connected” indicator turn Green. If the WiFi network you connected to has internet access, you should see the “Internet Connected” indicator above the “Ethernet” section turn Green as well.
PC Shared Internet Connection Setup
If your PC has internet access, either through a wired or WiFi connection, you can share that internet connection with your NEPI device by configuring a WiFi access point on your PC that is connected to your PC’s internet connection, then connect your NEPI device to the PC’s WiFi access point to connect to the internet. This is valuable when a WiFi hotspot requires addition login authentication not configurable through the NEPI devices WiFi settings.
1) Setup a mobile hotspot on your internet connected PC using the instructions in the following links:
Linux PC
https://www.makeuseof.com/create-wireless-hotspot-on-linux/
1) Open a terminal on your Linux PC connected to the internet and install the required software:
sudo add-apt-repository ppa:lakinduakash/lwh
sudo apt update
sudo apt install linux-wifi-hotspot
Then create the wifi hotspot by running:
sudo create_ap wlp2s0 wlp2s0 <HOTSPOT_NAME> <PASSWORD>
Example:
sudo create_ap wlp2s0 wlp2s0 guranto_PC ILoveCats
Windows PC
2) Open your NEPI device’s RUI “System/Device” tab, enable WiFi Client connection, find the newly create mobile hotspot access point in the “Avial. Networks” dropdown box

enter the password you configured in the mobile hotspot setup and hit Enter.

the entered Network and Passphrase will turn Black, and the Connected icon will turn Green

Check that your NEPI device is connected to the internet. When connected, the indicator next to the “Internet Connected” label on the top right of the RUI “System/Device” Tab will turn Green.

Setting up a NEPI WiFi Access Point
You can configure a NEPI WiFi access point to your NEPI device from the RUI “Settings/Device” tab by entering an access point connection name and passphrase, then clicking the “Access Point Enabled” switch, and connecting. If you want to connect to the internet through an available WiFi network, just click the Client Enabled switch. Your NEPI device is now accessible through a dedicated secure WiFi connection. You can now disconnect the Ethernet cable and use this connection to interface to your NEPI device, including the RUI, shared user drive, and SSH file system access.

NOTE: If your NEPI device’s WiFi hardware supports it, you can configure the WiFi for simultaneous WiFi internet connection and WiFi access point.
NOTE: If your PC is connected to an internet connection through another port or adapter, you may need to disable that connection to communicate over the NEPI access point.
Connecting to a NEPI WiFi Access Point
You can make sure your access point connection is good by disconnecting your wired Ethernet to the device checking that the “Heartbeat” indicator on the RUI Dashboard tab is blinking.
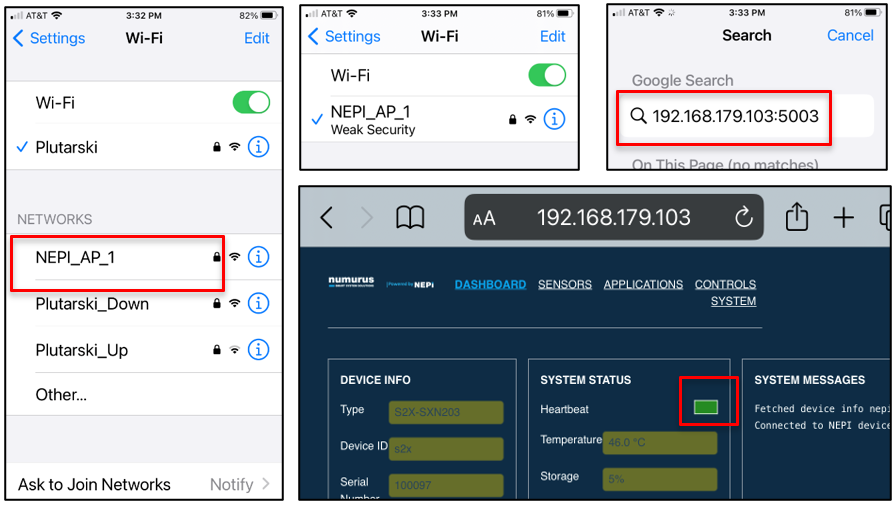
This access point can also be used by multiple devices (smartphones, tablets, laptops…) at the same time to provide a distributed interface to a team or crew. To connect to the RUI from a smartphone, just log into the NEPI device’s WiFi access point, open a web-browser, and enter your NEPI device’s IP address and RUI port number: http://192.168.179.103:5003
Saving NEPI Device Settings
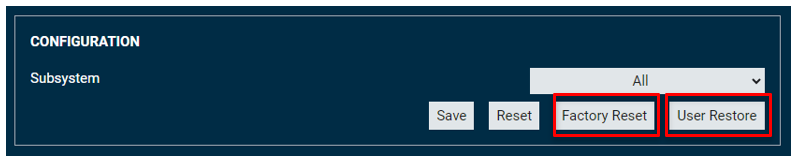
Once you have configured your systems settings, the last thing to do is to save those settings if you want them to be applied the next time you power up your NEPI device. In the “Configuration” tab on the RUI’s “System/Device” tab, click the “Save” button in the CONFIGURATION section of this tab. You can also select specific NEPI subsystem settings to save by selecting them from the dropdown menu. The default is all subsystems. The “Reset” Button will restore the last saved configuration in case you made a change you want to revert back.

Advanced Settings Controls
If you ever want to return to factory default values, you can click the “Advanced Settings Enable” switch above the Device section which will show a few additional options for managing and updating saved systems settings. If you have updated your NEPI software, you can apply your last saved user settings by selecting the “User Restore” button.