NEPI – Connecting to the Internet
This tutorial covers connecting and configuring internet connections for NEPI Device’s.
Ethernet Internet Connection Setup
If your NEPI device is connected to an internet connected switch through an Ethernet cable, you can configure the NEPI device’s Ethernet settings to enable internet connections in the RUI’s “System/Device” tab where you will find a section labeled “ETHERNET”. In this section you will see the NEPI device’s base IP address, a switch to enable DHCP support if you want your system to connect to the internet, a box and controls for adding or removing additional IP addresses that are added on top of the system’s base address, two network bandwidth usage indicators, and a control for limiting the systems max ethernet transmit bandwidth, which is useful if you are connecting over wireless or cabled network with limited bandwidth. A value of “-1” applies no limiting.

WiFi Internet Connection Setup
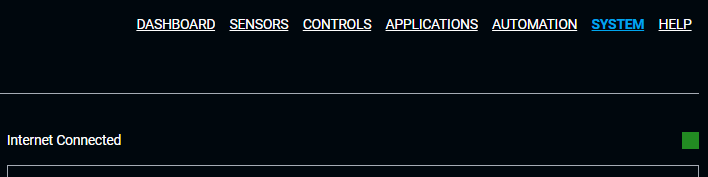
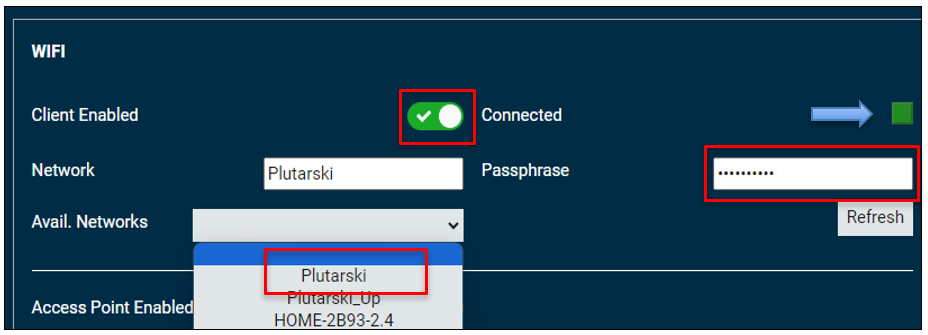
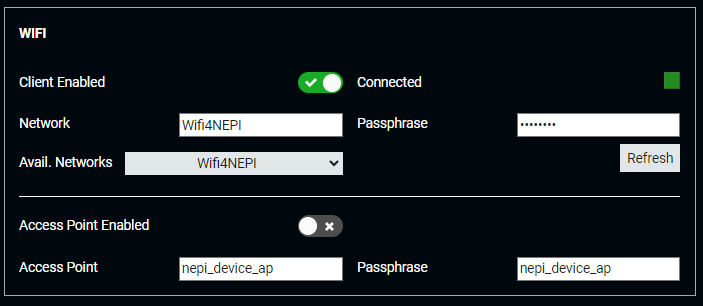
If your NEPI device has either an integrated WiFi board or you have a WiFi USB adapter attached, you will see a WIFI section available under the ETHERNET section on this page. If you want to connect to the internet through an available WiFi network, click the Client Enabled switch, wait for the “Available Networks” dropdown box to populate, then select the WiFi network you want to connect too, and enter the WiFi password in the “Passphrase” box. Be sure to hit return after entering the password. If the NEPI software was able to connect with the password you entered, you should see the “Connected” indicator turn Green. If the WiFi network you connected to has internet access, you should see the “Internet Connected” indicator above the “Ethernet” section turn Green as well.
PC Shared Internet Connection Setup
If your PC has internet access, either through a wired or WiFi connection, you can share that internet connection with your NEPI device by configuring a WiFi access point on your PC that is connected to your PC’s internet connection, then connect your NEPI device to the PC’s WiFi access point to connect to the internet. This is valuable when a WiFi hotspot requires addition login authentication not configurable through the NEPI devices WiFi settings.
1) Setup a mobile hotspot on your internet connected PC using the instructions in the following links:
Linux PC
https://www.makeuseof.com/create-wireless-hotspot-on-linux/
1) Open a terminal on your Linux PC connected to the internet and install the required software:
sudo add-apt-repository ppa:lakinduakash/lwh
sudo apt update
sudo apt install linux-wifi-hotspot
Then create the wifi hotspot by running:
sudo create_ap wlp2s0 wlp2s0 <HOTSPOT_NAME> <PASSWORD>
Example:
sudo create_ap wlp2s0 wlp2s0 guranto_PC ILoveCats
Windows PC
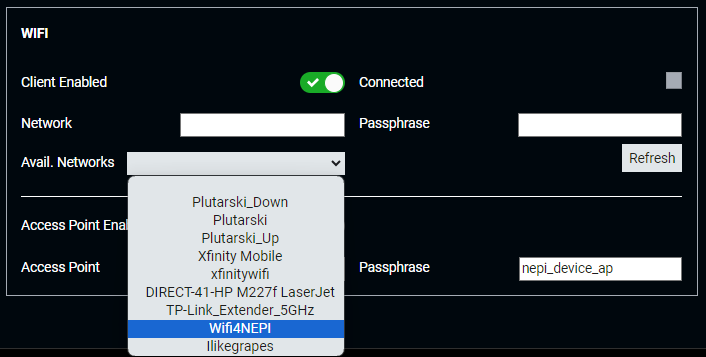
2) Open your NEPI device’s RUI “System/Device” tab, enable WiFi Client connection, find the newly create mobile hotspot access point in the “Avial. Networks” dropdown box
enter the password you configured in the mobile hotspot setup and hit Enter.
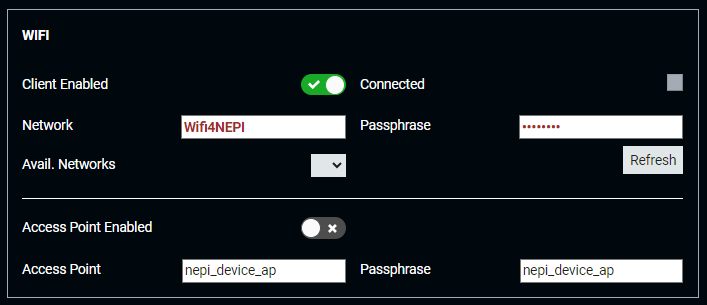
the entered Network and Passphrase will turn Black, and the Connected icon will turn Green
Check that your NEPI device is connected to the internet. When connected, the indicator next to the “Internet Connected” label on the top right of the RUI “System/Device” Tab will turn Green.