NEPI Engine – Connect Application
Introduction
This video will walk you through using a NEPI’s built-in CONNECT application to securely onnect and transfer messages, data, and files between NEPI-enabled devices and remote computers, servers, and cloud platforms running Numurus’ NEPI Connect server-side software. Device to server authentication and communications is made through NEPI’s Link communication system, which supports a variety of connectivity gateways (Ethernet, WiFi, cellular, RF, acoustic…) and data structures (two-way messaging, data and software file transfer, and live remote RUI and SSH access).
NOTE: This tutorial uses an Ethernet connection with access to the internet for communications between the NEPI Engine enabled device and NEPI Connect remote software installation.
NOTE: For details on the NEPI Engine Link authentication and communications technology, see the NEPI Engine Link Communications System API Manual available at: https://nepi.com/documentation/
What you will need:
1) 1x NEPI-enabled device with internet access. This tutorial uses an edge-compute processor box that includes an NVIDIA Jetson Xavier NX embedded GPU with NEPI Engine software installed.
NOTE: See available off-the-shelf NEPI enabled edge-compute options at: https://numurus.com/products-nepi-enabled-hardware/
2) 1x PC with internet access and configured to access the NEPI device’s RUI browser-based interface and user storage drive. This tutorial uses a Windows 11 PC and a USB GigE Ethernet adapter and Ethernet cable.
3) 1x Ethernet switch connected to the internet
4) 1x Access to the NEPI Portal user interface for a remote server running NEPI Connect software. For this tutorial we will be using a Numurus’ hosted NEPI Connect installation at www.nepi.io.
NOTE: If you would like to get a Numurus hosted NEPI Portal demo account for your organization, contact nepi@numurus.com.
5) (Optional) 1x USB Camera or other NEPI IDX supported imaging device if you want to test sending imagery to the remote NEPI Connect server.
Hardware Setup
1) Connect a NEPI IDX driver supported camera to your NEPI device.
2) Connect the NEPI device and PC to an internet connected network switch with Ethernet cables.
NOTE: Alternatively, you could connect the NEPI device directly to your PC and connect both systems to an internet connected WiFi network. Instructions for connecting a NEPI device to the internet WiFi are provided in the NEPI Engine Getting Started tutorial at:
https://nepi.com/nepi-tutorials/nepi-engine-connecting-and-setup/
3) Power your NEPI device.
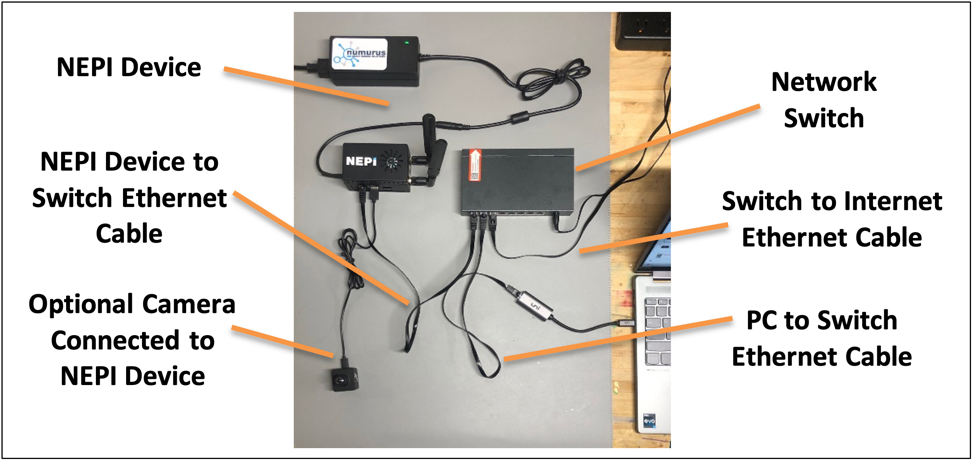
NEPI Device Setup
1) The default NEPI Connect server internet location typically configured on NEPI devices is the Numurus’ hosted NEPI Connect demonstration installation located at nepi.io
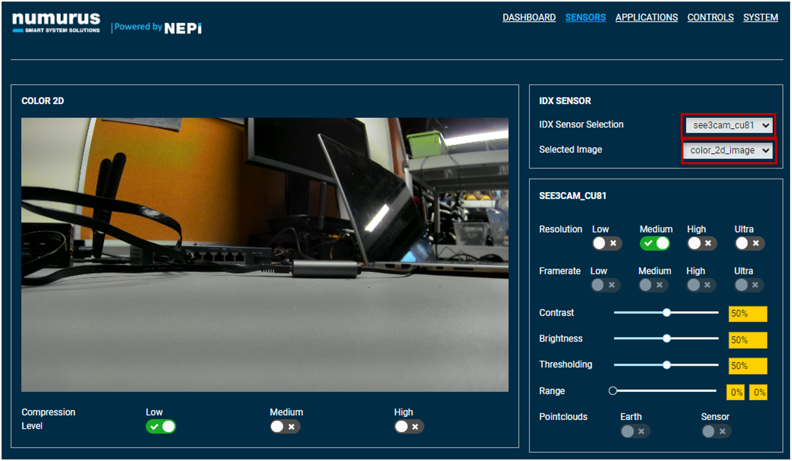
2) (Optional) If you have connected a camera to send image data as part of your testing, open the NEPI device’s RUI SENSORS/IMAGING tab and make sure your camera has been detected and working properly by selecting the camera from the “IDX Sensor Selection” drop down menu and one of the camera’s image streams from the “Selected Image” dropdown menu. You should see the image stream appear in the live 2D image view pane.
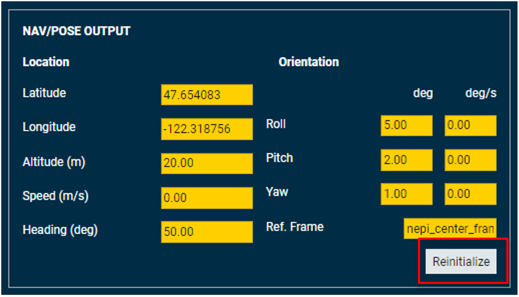
3) (Optional) If you would like to send location or orientation as part of your testing, either connect and configure NEPI NPX driver supported GPS and orientation data sources, or enable and set Fixed location or orientation values in the RUI SENSOR/NAVPOSE.
For this tutorial, we will set fixed values using the following instructions:
a) Open your NEPI device’s RUI SENSOR/NAVPOSE tab and enter any fixed values you want to use into the NAV/POSE SETUP section. Be sure not to hit enter until all values in red are updated to the new values you want.
NOTE: The values will turn back to all zeros after hitting enter.

b) In the NAV/POSE OUTPUT section of this RUI tab, click the “Reinitialize” button, and you should see the values you entered show up in the indicator boxes.
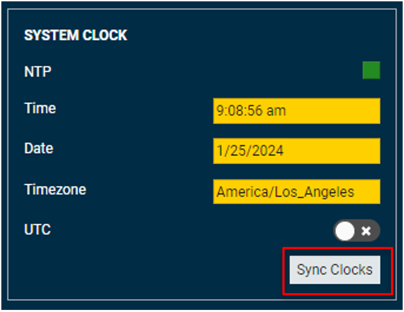
4) Sync your NEPI device’s clock using a connected NTP server or by opening the RUI DASHBOARD tab and selecting the “Sync Clocks” button. You should see the NEPI clock update to match the clock on the PC you are connected with.
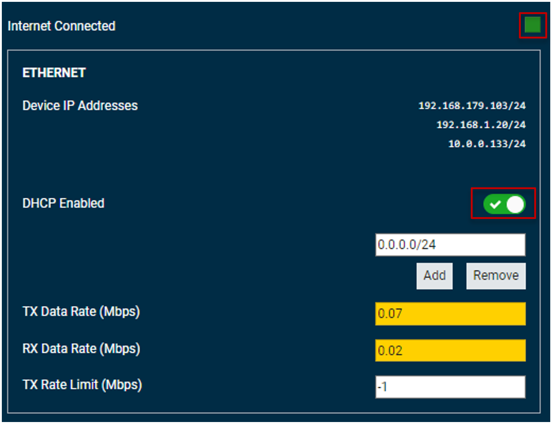
5) Connect your NEPI device to the Internet, either through a wired Ethernet connection or WiFi connection. For wired connections, you will need to enable DHCP from the RUI SYSTEM/ADMIN tab. You can verify that your NEPI device is connected to the internet by checking that the “Internet Connected” indicator at the top left of the screen has turned Green.
6) Configure your NEPI device’s CONNECT settings.
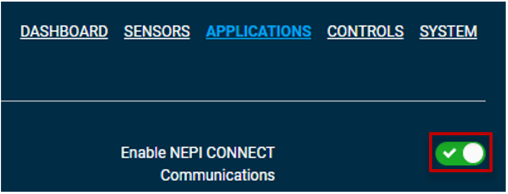
a) Open the RUI APPLICATIONS/CONNECT tab and enable NEPI COMMS at the top of the page if not already enabled.
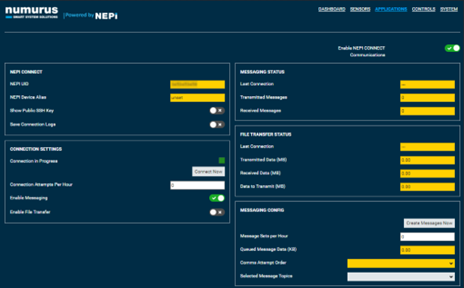
b) Select the data you would like NEPI to transmit when connections are made.
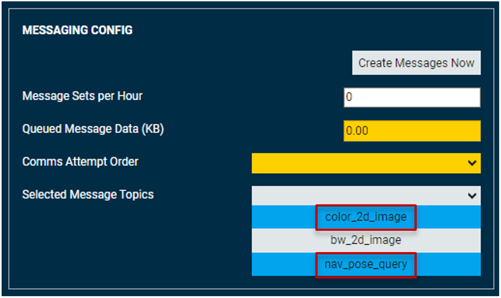
For this demo, we have selected “color_2d_image” data from our camera and “nav_pose_query” from the NEPI NavPose system. If you have andy NEPI AI or AUTOMATION applications running, you would see data topics from those availble for selection as well.
NOTE: If you want to save these settings, click the “Save” button in RUI SYSTEM/ADMIN tab’s “CONFIGURATION” pane.
c) Access the NEPI CONNECT box in the device’s RUI APPLICATIONS/CONNECT tab and find your device’s Unique NEPI ID number and after enabling the “Show Public SSH Key” switch, you will see your NEPI device’s Public SSH Key.
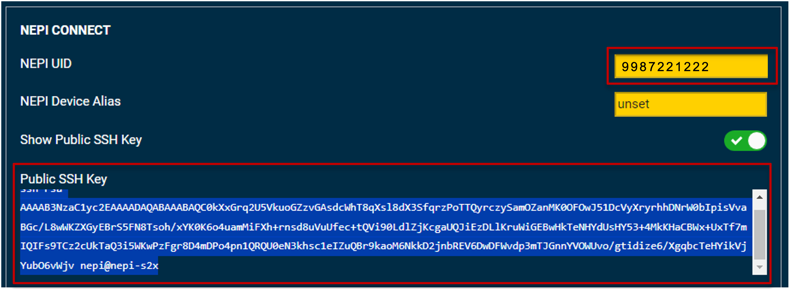
NOTE: If your 10 digit NUID is set to “9999999999” and/or the Public SSH Key box is empty, your system has not yet been configured for NEPI Connect communications. Also, if you are trying to connect to a NEPI Connect software installation on a different server or Cloud platform then “nepi.io”, you will need to modify the NEPI Connect config file settings on your device. To set up the NEPI Connect credentials on your device or change NEPI Connect server location, see the instructions provided in “Change NEPI CONNECT Configuration” section of the NEPI Engine tutorial “Customizing the NEPI File System” available at: https://nepi.com/tutorials/
d) Leave this RUI window open for later steps.
Server-Side Setup
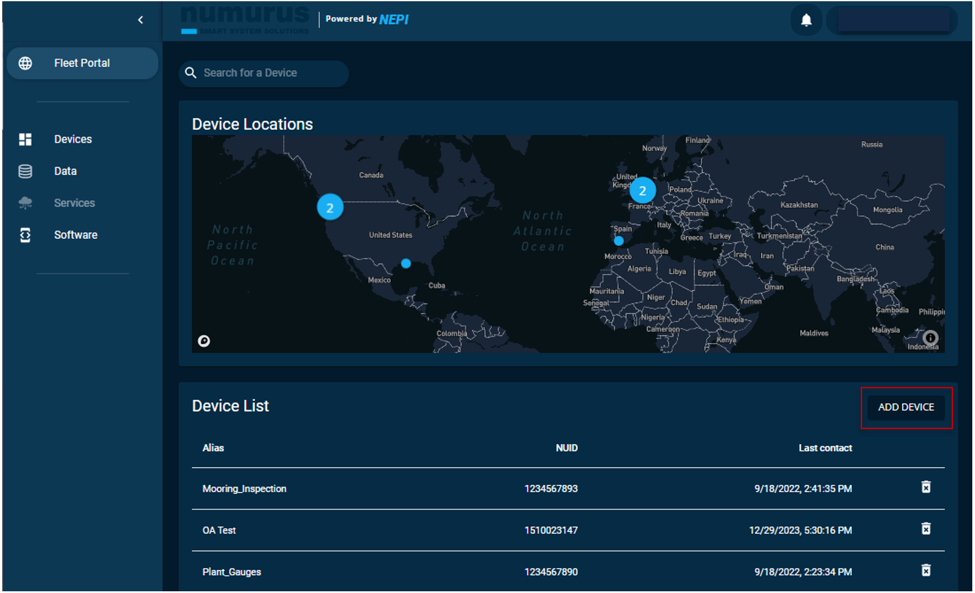
1) Form your PC, connect to the internet, open a web browser, and navigate to your organization’s NEPI Connect remote software installation, or Numurus’ hosted NEPI Connect installation at www.nepi.io and sign in using the login credentials provided. You should be brought to your organizations Fleet dashboard page where you can add, remove, and monitor devices registered in your account.
NOTE: If you would like to get a NEPI-PORTAL demo account for your organization, contact nepi@numurus.com.
2) Next step is to register your NEPI enabled smart sensor. From the Fleet dashboard page and select the “ADD DEVICE” button
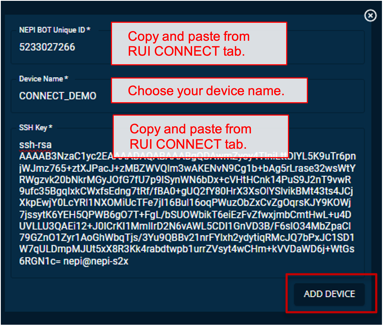
3) In the Add Device window that opens
a) Copy the NUID from the RUI tab in the previous section and paste in the “NEPI BOT Unique ID” box
b) Enter Device Name for the device you are registering. This name acts an Alias for the device you are entering. Examples might describe the device 3DX-C-N1, or a location CAM-LEFT-EXIT, or something else appropriate.
c) Copy the SSH key text from the RUI tab in the previous section and paste in the “SSH Key” box
d) click the “ADD DEVICE” button
4) Once your device is registered you can select it from the Fleet Dashboard’s “Device List” which will take you to the device’s “Device View” page.

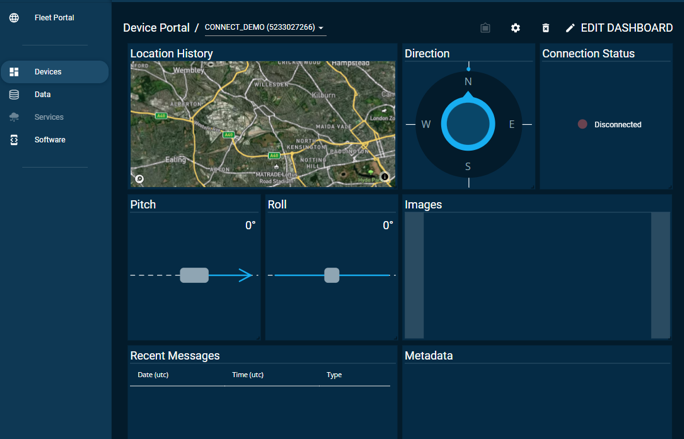
5) After selecting your newly registered device, a configurable “Device View” page should appear.
6) Leave this browser window open for testing your connection in the next section
Test your NEPI CONNECT Connection
You can test the connection between your NEPI Engine enabled device and remote NEPI Connect server installation (or Numurus’ hosted NEPI-Portal installation) by configuring the data you want to send, capturing some data, and initiating a connection between the NEPI Engine device and NEPI Connect software installation.
NOTE: All NEPI Link communications are initiated by the NEPI device, and all communications are authenticated by the NEPI Connect system using the supplied NUID and public key before any data transfer is permitted.
NOTE: NEPI supports manual, scheduled, and automation triggered Connect data collections. For this tutorial, we will use the manual option.
1) Capture and queue some data on your NEPI device to transmit.
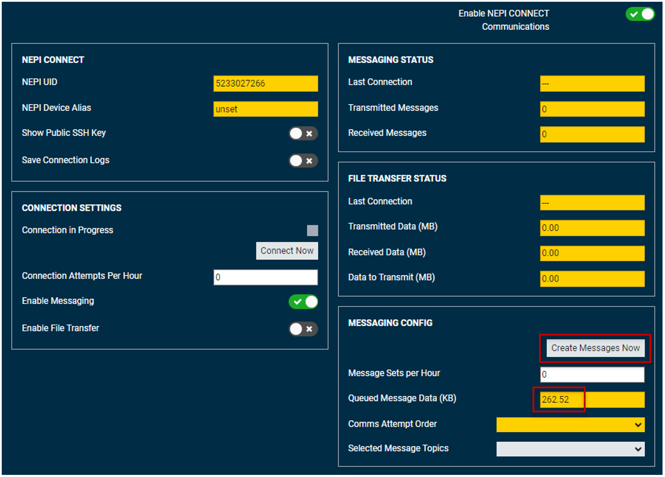
Open the NEPI device’s RUI APPLICATIONS/CONNECT tab and click the “Capture Messages Now” button in the “MESSAGING CONFIG” pane to capture and queue data to send to the NEPI Connect server installation. You should see the value increase in the “Queued Message Data (KB)” indicator box, which indicates that new data has been captured and is ready to send.
2) Next, setup a split screen view with your NEPI device’s RUI APPLICATION/CONNECT tab on the left side of the screen, and your NEPI Connect installation NEPI Portal’s “Device View” page on the right side of the screen. Select the “Connect Now” button in the “COMMS LINK SETTINGS” box in the RUI to transmit the data. You should see the “Connection in Progress” icon turn Green to indicate that the NEPI device is trying to connect and transmit data to the configured NEPI Connect server installation. If everything is configured properly on both sides, you should see the “Connection Status” indicator in the NEPI Portal’s “Device View” page blink Green as messages are being transferred from the NEPI device.
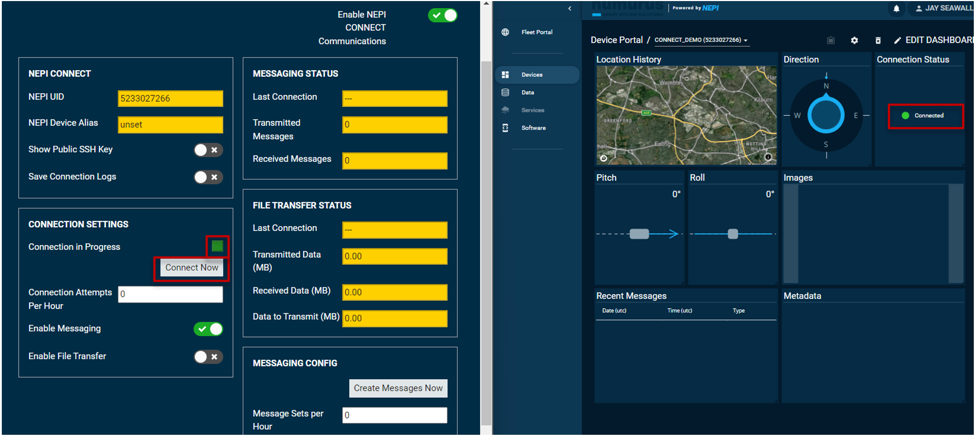
NOTE: If you see the “Connect Now” indicator in the RUI turn Green, but not the “Connection Status” indicator in the NEPI Portal, then there is a problem with the setup on either the NEPI device, NEPI Connect server, or both. Since the NEPI device sends the data as a UDP message to the configured NEPI Connect software on the remote server, it clears the queued data even if the NEPI Connect server side software failed to get it, or refused the connection. Some troubleshooting steps:
– Ensure that your NEPI device’s Clock is synced and that it still has an internet connection.
– Delete your NEPI device from the NEPI Connect software’s database by clicking the “Trashcan” icon next to the device in the NEPI Portal’s Fleet dashboard tab, then click on the “Add Device” icon and re-enter your NEPI device’s credentials.
3) When the connection completes, you should see several new messages appear in the NEPI Portal’s Device View “Recent Messages” box.
NavPose Date: If your NEPI device’s NavPose solution had any GPS, heading, or orientation data values other than “0” when you captured the data and initiated a connection, you should see the correct GPS location shown in the Device Location Map View, and heading/orientation data properly displayed in the associated NavPose widgets.
Image Data: You can use the Gray vertical boxes on the right and left of the Image pane to step forwards and backwards through your data.
MetaData: You can view metadata for each received message in the “Metadata” pane.
NOTE: NEPI Link communications include both status messages and associated data messages, so not all messages will have image or other data products.
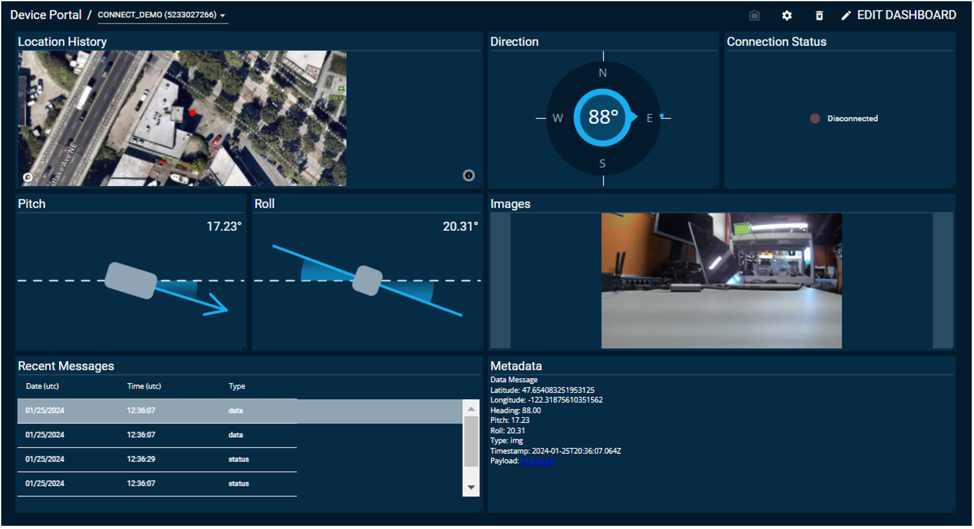
4) At this point, you should see the Connection in Progress RUI-NEPI tab indicator turn green, as well as the NEPI-PORTAL Device window Connection Status indicator toggle back and forth from green to grey as communications occur. If all went well, you should see some of the other Device indicators such as pitch and roll updated with transferred data.
Accessing Your Transmitted Data
You can access, download, and delete messages, data, logs, and software files transferred to and from a NEPI device.
1) Select the Data menu item on the left side of your NEPI-Portal window, then selecting the device.
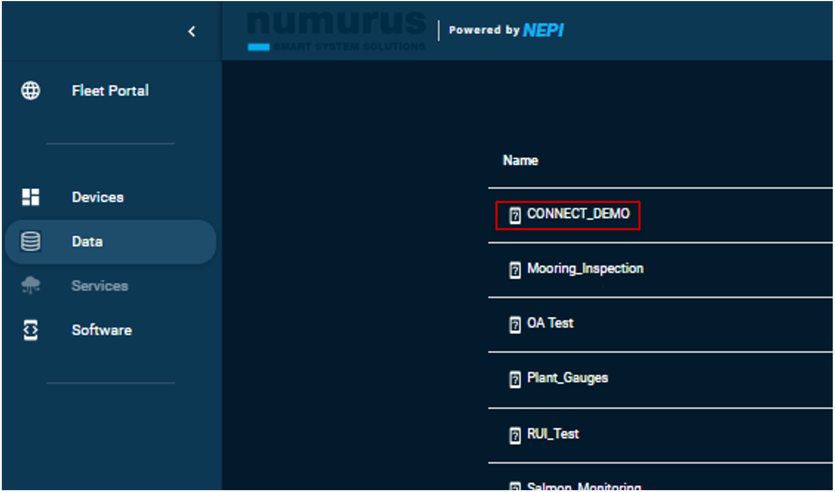
2) Select the folder for the type of data you want access to.
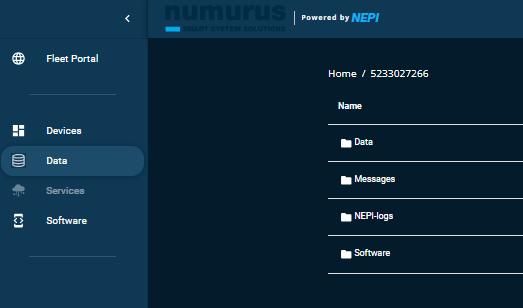
3) Once you find a file you want to download, just click on it.

