NEPI Engine – Resident User Interface Guide
Introduction
NEPI’s Resident User Interface (RUI) provides a customizable browser-based user interface hosted on the NEPI device for configuring, validating and monitoring AI and automation activities. The NEPI RUI is comprised of a top-level menu with additional submenus appearing under each top menu item as shown and described below:

DASHBOARD System status, time sync, and save controls
SENSORS Tabs for managing connected sensor hardware
- IMAGING View and control IDX supported imaging sensors
- NAVPOSE Configure NavPose NPX supported sensors inputs
APPLICATIONS Tabs for integrated applications
- IMAGE VIEWER View up to four system image streams at once
- AI Configure and start AI detection process
- AUTOMATION Manage system automation processes
- SEQUENCER Create sequenced image streams from multiple sensors
- CONNECT Configure and test remote Cloud data and messaging
CONTROLS Tabs for managing connected control hardware
- PAN/TILT View and control PTX supported pan and tilt actuators
SYSTEM Tabs for managing system and software configurations
- ADMIN Network, WiFi, license, and user settings management
- SOFTWARE NEPI software upgrading, backup, and cloning tools
Connecting to the RUI
A network-connected NEPI-enabled device’s RUI can also be accessed through an external network connected web browser at the fixed address http://192.168.179.103:5003 (or at any other custom IP address configured on the device). Live individual image sensor streams are also available at http://192.168.179.103:9091. Recommended Browser: Google Chrome or Microsoft Edge (Firefox has feature limitations that severely limit RUI usability)
Text Entry
Read-only (status) textboxes throughout the RUI have a yellow background, while editable status/control textboxes have a white background. These editable textboxes have the same control-flow behavior; while the user is editing, the text turns bold red. Once satisfied, the user must push the <Enter> key to transmit the update to the NEPI device, at which point the text will turn back to the default color. This avoids transmitting incomplete or unintended text to the device while editing.
In general, bold red text anywhere in the RUI (text box, buttons, etc.) indicates that a change is pending, and some action must be taken by the user to transmit the update to the NEPI device.
DASHBOARD Tab
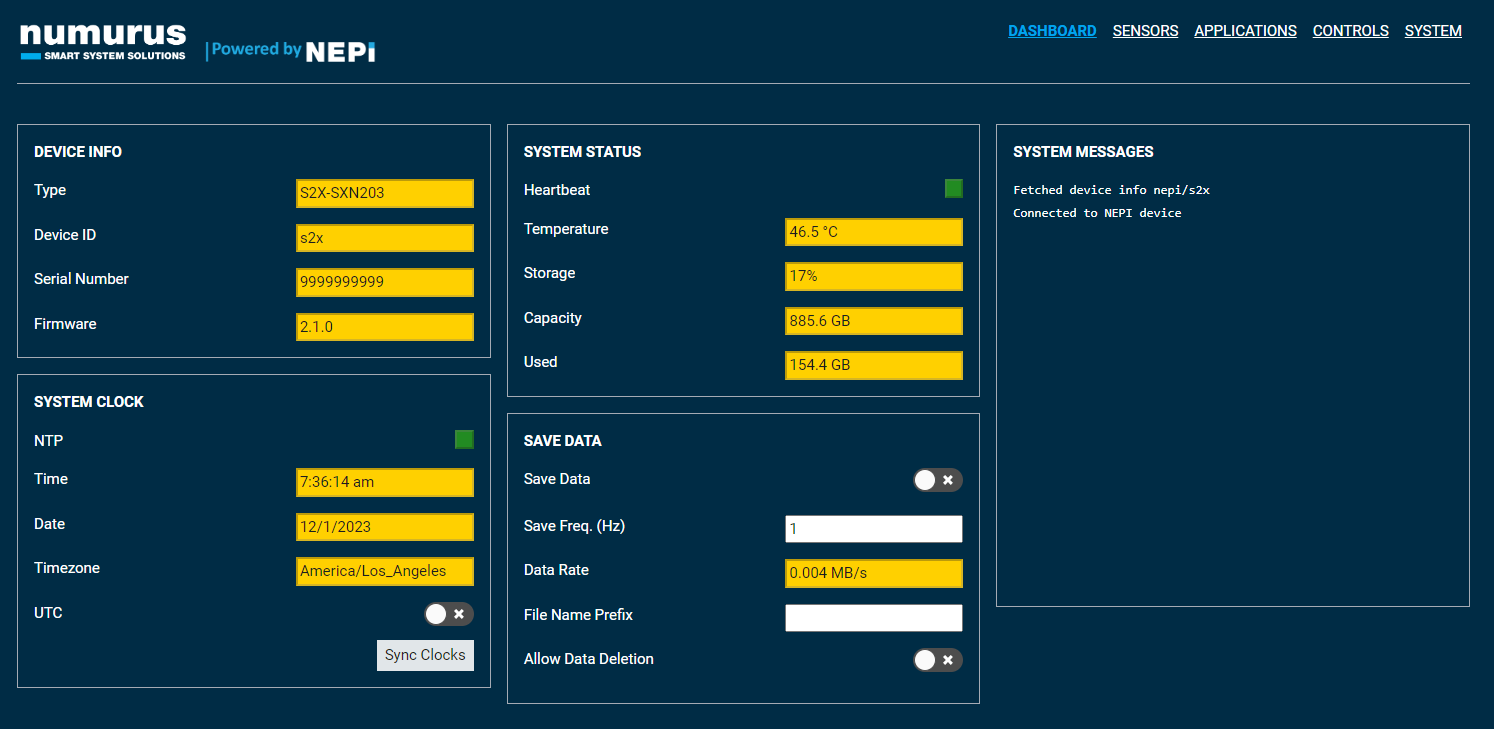
The RUI Dashboard tab provides general system status information, heading and position information, a ROS message viewing window, clock setting, and file saving settings. A save data switch allows for saving sensor data to the on-board storage. The Dashboard also has controls to synchronize the NEPI internal clock with applicable connected devices.
| Title | Note |
|---|---|
| Device Info | – Indicates the device type, serial number, device ID and firmware version. The device ID may be changed in advanced settings by the user, however the serial number cannot be altered via the RUI. |
| System Clock | – Indicates current timestamp of the NEPI device. For hardware platforms without battery-backed clocks, NEPI devices start with a default fixed timestamp, which must be updated to current time each time the device is powered up. Clock synchronization can occur via NTP (preferred) or via the Sync Clocks button, which transmits the browser system’s current time to NEPI device with no transmit latency correction. – ‘UTC’ toggles changes time between universal time display and local time zone. – NTP will illuminate only if NEPI system clock is synchronized to an NTP server. |
| System Status | – Indicates the state of the edge-compute chip temperature and the configured media’s storage state and capacity. The heartbeat flashes green once per second if the NEPI device is reachable and transmitting system status information properly. |
| Save Data | – ‘Save Data’ toggle will initiate saving data all data products at the specified frequency/rate. Steps: 1) Set frequency for desired data collection rate. 2) Data files can be denoted with a prefix by the user. If the user would like to store files within a specified directory within the data folder forward slashes can be implemented as follows: 3) The input will appear red until enter is pressed, at which point it will appear black and is logged by the system. The prefix or directory may be updated while data is being collected but will not change until enter is pressed. 4) Delete all onboard saved data with a two-factor control; select “Allow Data Deletion” to enable the “Delete All Data” button. |
| System Messages | – Important system messages display here with most recent messages listed first. |
SENSORS Menu
IMAGING Tab
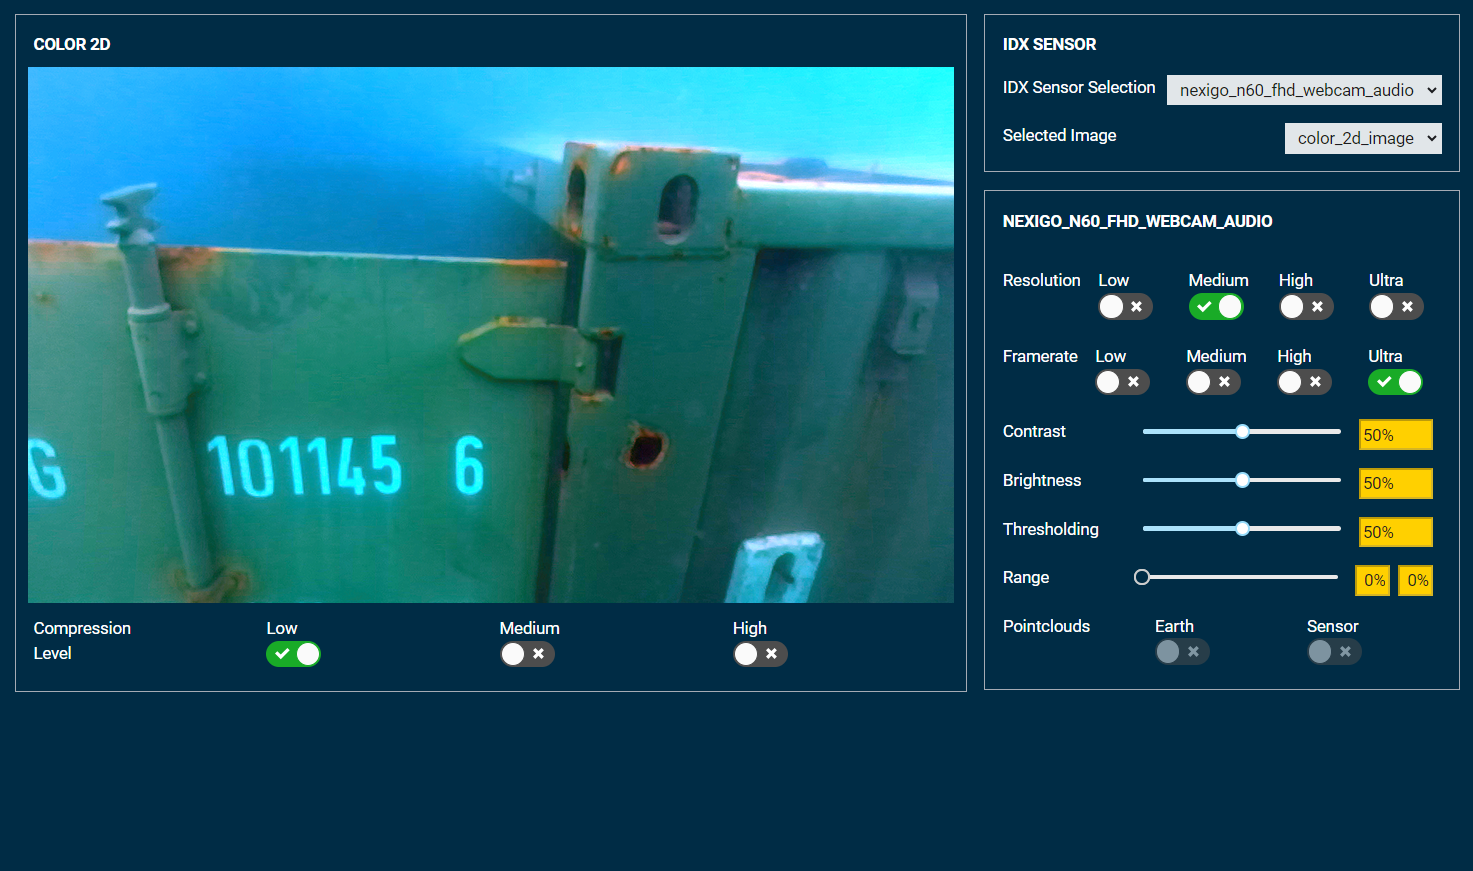
The RUI Sensors/Imagery tab displays selectable sensor image streams and provides a set of high-level abstracted sensor/imagery controls for NEPI IDX driver support imaging sensors. Abstracted controls include Imagery Resolution, Framerate, Contrast, Brightness, Thresholding limits and Range. If available for the selected sensor, dynamically color-mapped depth imagery is accessible via the “image_depth” Selected Image.
| Title | Note |
|---|---|
| IDX Sensor | – NEPI abstraction layer for imagery sensors exposing set of standard controls for 2D/3D imaging sensors and prebuilt driver and interface protocol support.– Supported sensors that implement the IDX sensor interface standard will appear in the dropdown selection of “IDX Sensor Selection”. For selected sensor, supported imagery types will be available in the dropdown menu of “Selected-Image”. |
| IDX Sensor Controls | – Allows the user to select the resolution, framerate, contrast, brightness, thresholding levels and range controls to filter the selected image topic.– The actual effects of each selection are sensor hardware dependent. For sensors that don’t support a specific control, the slider bar will be disabled.– In many cases, the resolution controls change the sensor hardware resolution setting. After changing resolution, the sensor may require reset and imagery freezes until it is back up and running.– 3D data (pointclouds, heatmaps, etc.) will be supported in an upcoming NEPI release. |
| Compression Level | – Controls the compression for HTTP image streams. This can help when working over a limited bandwidth connection. It does not affect the onboard sensor data that is stored to disk or passed through A/I or other processing pipelines. |
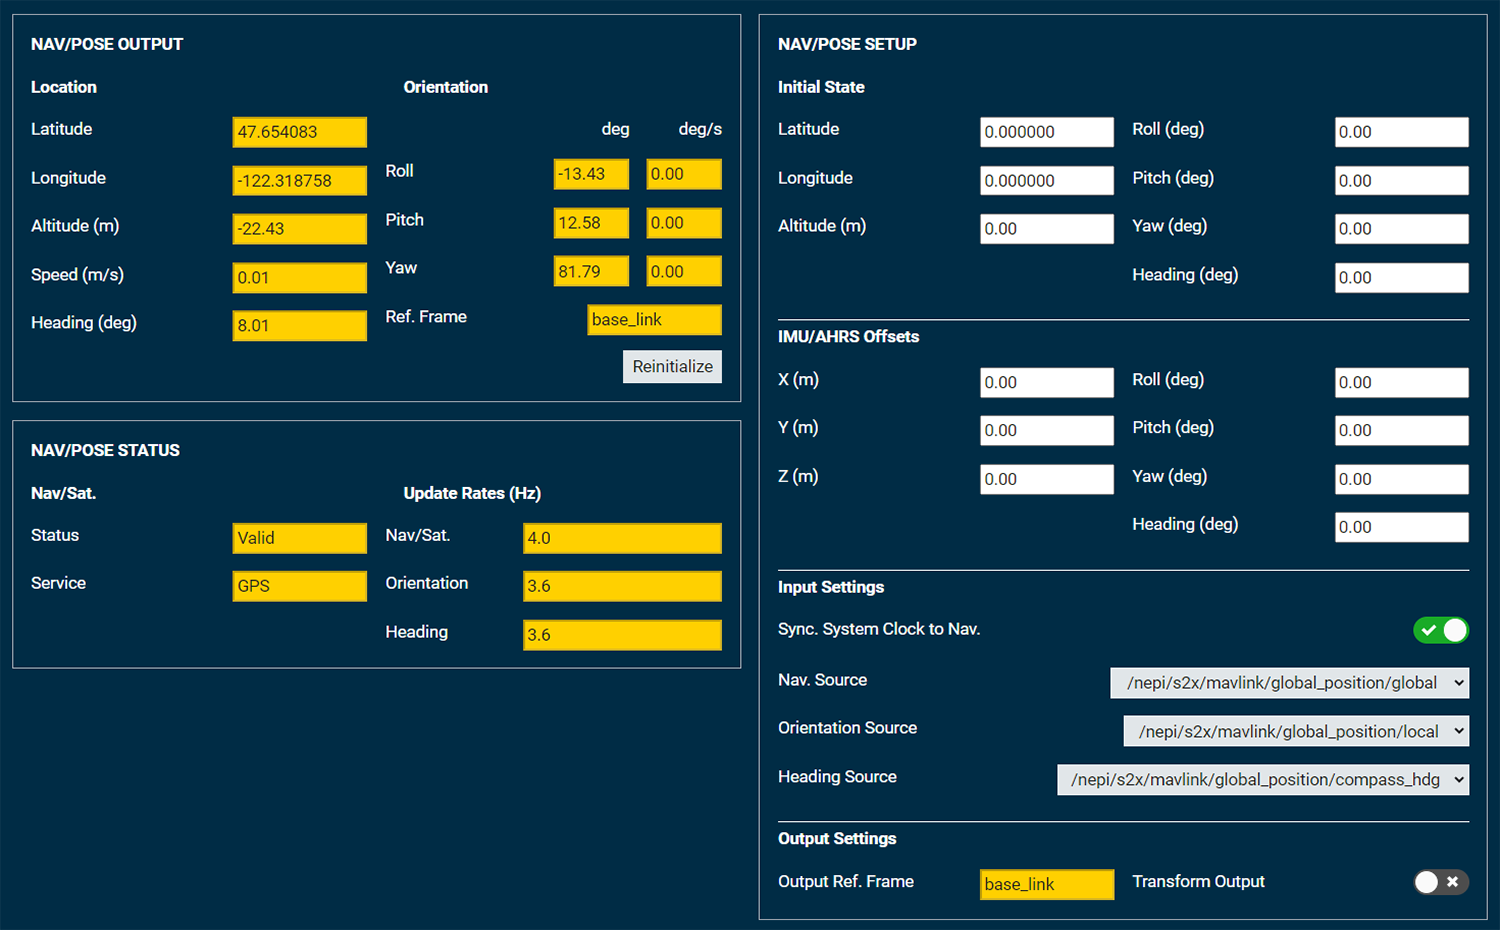
The RUI Sensors/NavPose tab allows users to set up fixed NavPose settings for assets that are deployed at a fixed location and/or orientation, or configure connections and offsets to external GPS/INS/Compass/IMU system data to NEPI’s NavPose solution system.
APPLICATIONS Menu
IMAGE VIEWER Tab
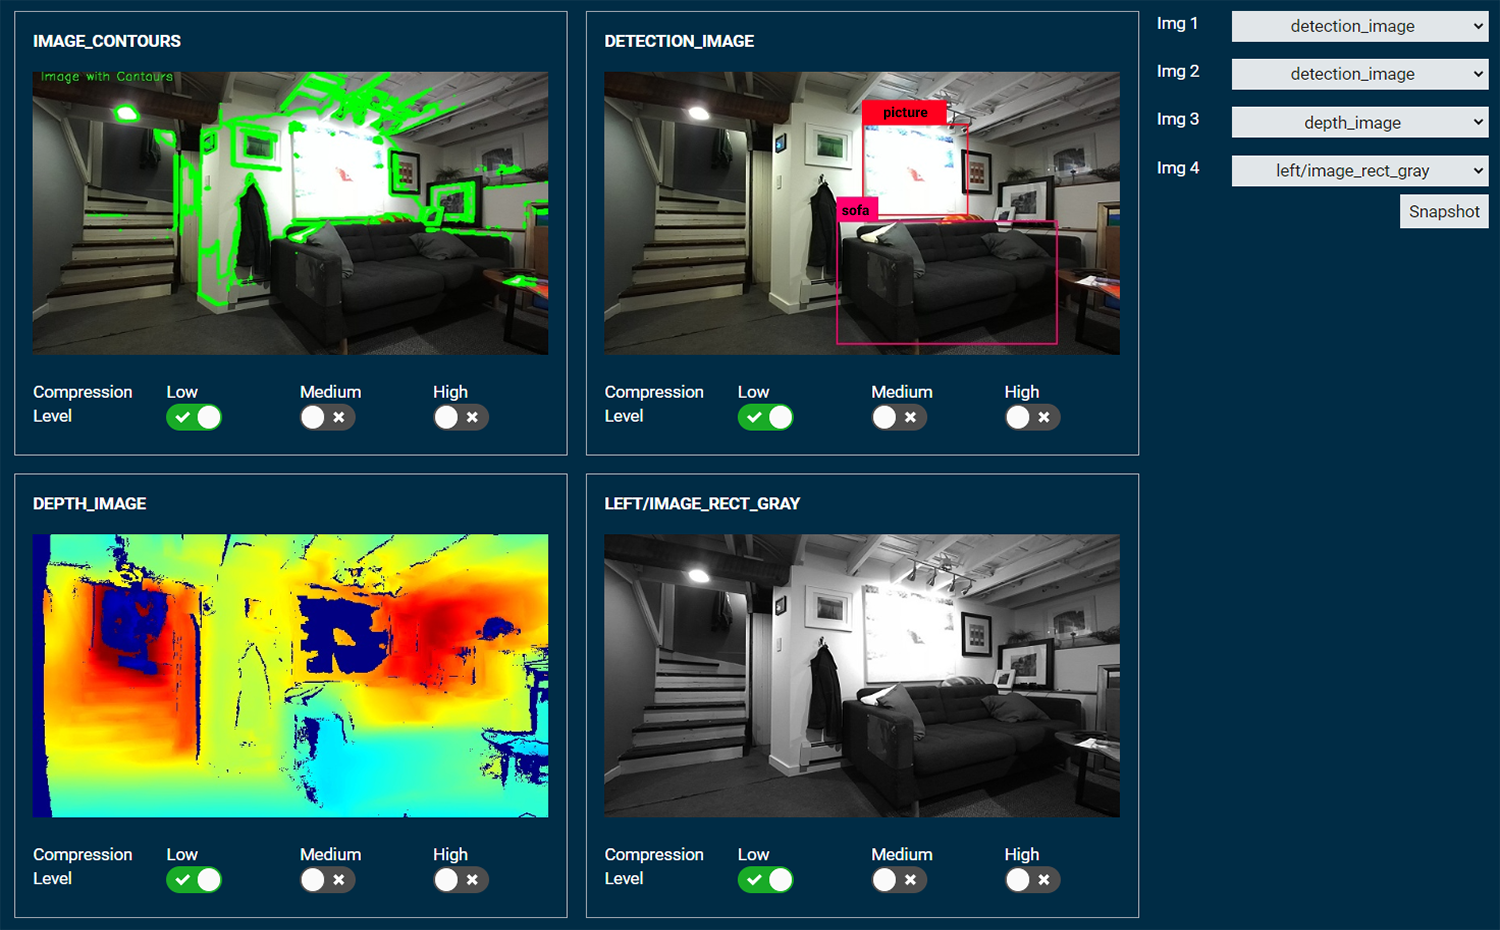
The RUI Applications / Image Viewer tab allows viewing up to four image streams at once and includes a “Snapshot” button that produces a system wide “snapshot event trigger” used for automation processes.
| Title | Note |
|---|---|
| Img1 – Img4 Dropdown Boxes | – Select which system image stream to map to that image view window |
| Snapshot button | – Produces a system wide “snapshot event trigger” used for automation processes. This button produces no other action |
ONVIF
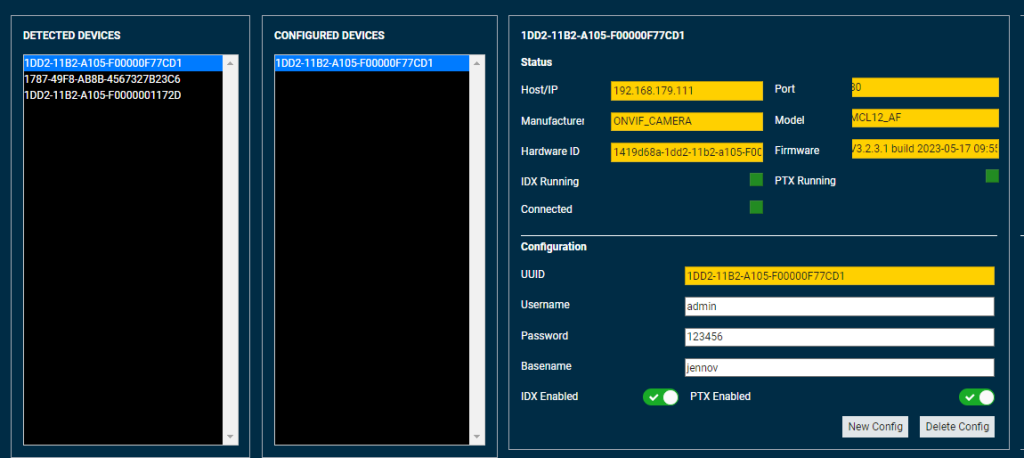
The RUI Applications/ONVIF tab provides autodetected device lists, device configuration, and status for connected ONVIF devices (Cameras and PanTilt systems). This application saves device configurations in an onboard data base and auto-connects to them if detected on startup.
| Title | Note |
| Detected Devices | – Displays a list of currently detected devices. NOTE: you must first add an IP address alias to your NEPI device for the autodetect system to find the device on a different subnet. |
| Configured Devices | – Displays a list of current device configurations saved in the NEPI system’s ONVIF device database. |
| Status | – Displays details for currently selected device |
| Configuration | – Allows adding login credentials and device naming for detected devices, as well as editing configuration values for existing device configurations. |
AI Tab
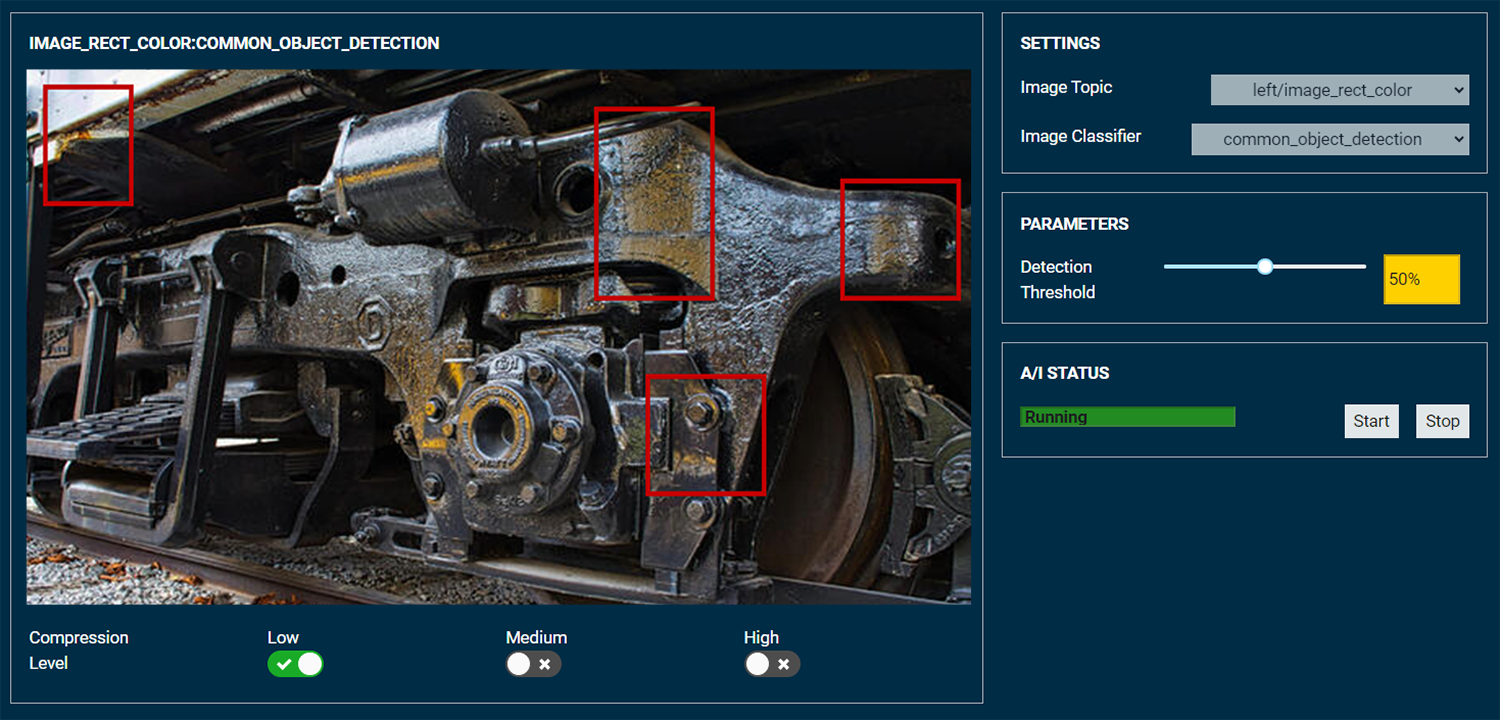
The RUI Applications / AI tab allows enabling and viewing output from a library of on-board AI classifiers. This involves selecting the image stream, the AI classifier, and adjusting the detection threshold.
| Title | Note |
| Settings | – Select any available image stream – Prior to starting the AI object detector, the selected image stream will appear in image window – Select between AI classifiers currently installed on the NEPI device – START current detector and load model – Enable/Disable range and bearing estimations to target (only available for image streams that have a corresponding depth map). |
| Parameters | – ‘Detection Threshold’ allows the user to lower or raise the threshold with which the device classifies objects. At a higher threshold, the classification process is more selective, only identifying those objects with high confidence. At a lower threshold the classifier is less selective, and may show more false positives. |
| A/I Status | – Indicates the status of AI model, either stopped, loading or running |
AUTOMATION Tab
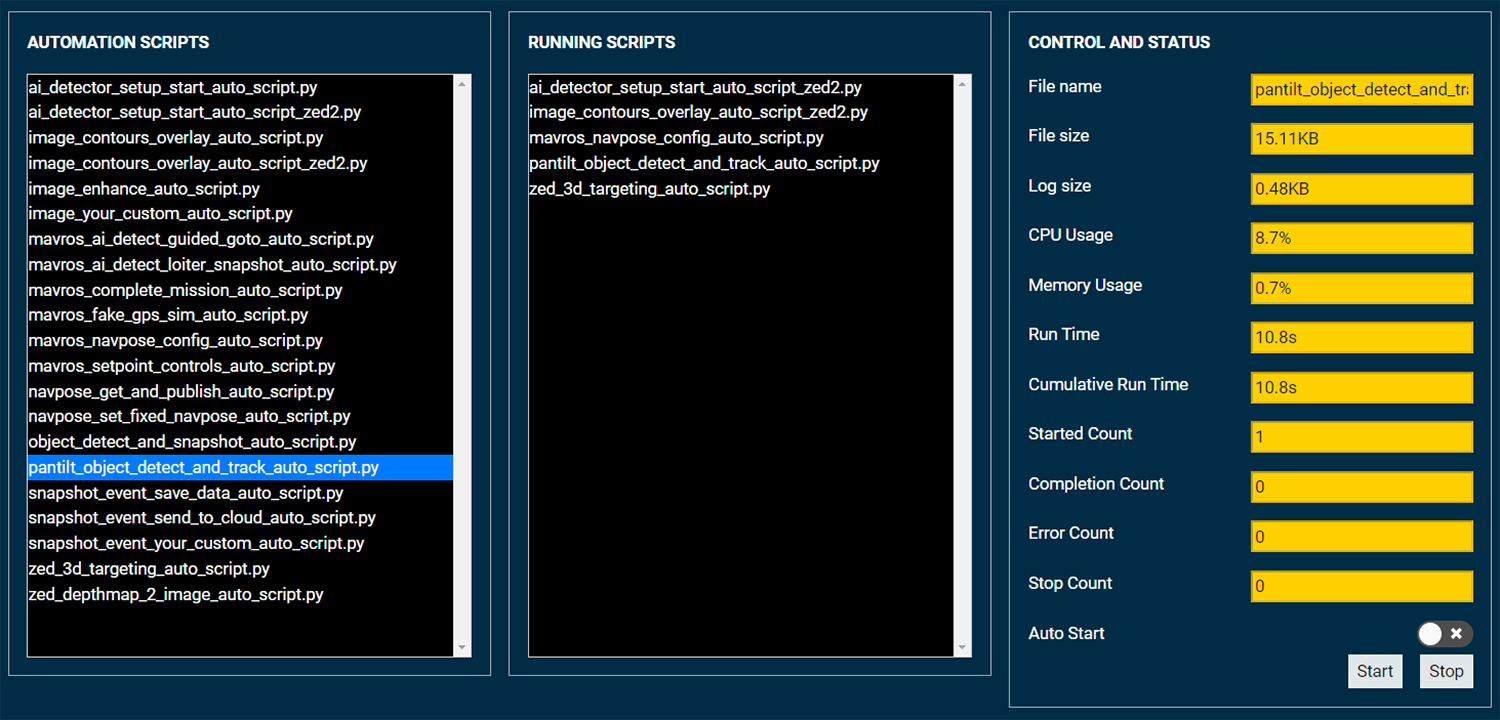
The RUI Applications / Automation tab allows users to configure and set up their custom automation scripts/applications to drive end-end system automation based on information available within the NEPI system. Automation scripts may be any executable file, including shell scripts (with proper shebang), python scripts (with proper shebang), binary executables properly compiled for the target hardware, etc. Automation scripts may interact with the rest of the NEPI software ecosystem via any available API (e.g., ROS) and/or may interact directly with the underlying Linux system. For example, an automation script could define an input trigger (event) based on any programmatically accessible information present in the system and execute an action like sending a command to external device or robotic control system via a separate API. Automation scripts may run to completion or persist through the entire NEPI device uptime at the script developer’s discretion.
| Title | Note |
| Automation Scripts | – Available automation scripts loaded onto the NEPI device will automatically appear in the Automation Scripts list – Scripts appearing in this column are not running until selected and commanded to START or configured to Auto Start (i.e., start automatically on system boot) – Scripts can be selected and configured to run simultaneously – Selecting a script will display its relevant status and metrics in the Control and Status table |
| Running Scripts | – Scripts selected and commanded to START will transition to the “Running Scripts” column – Scripts can be manually STOPPED by selecting script from “Running Scripts” column and STOPPED back to “Automation Scripts” |
| Control and Status | – Indicates status and running metrics for selected automation script – Auto Start selector controls if a script should start automatically after system boots – Start / Stop buttons start and stop automation scripts manually |
SEQUENCER Tab
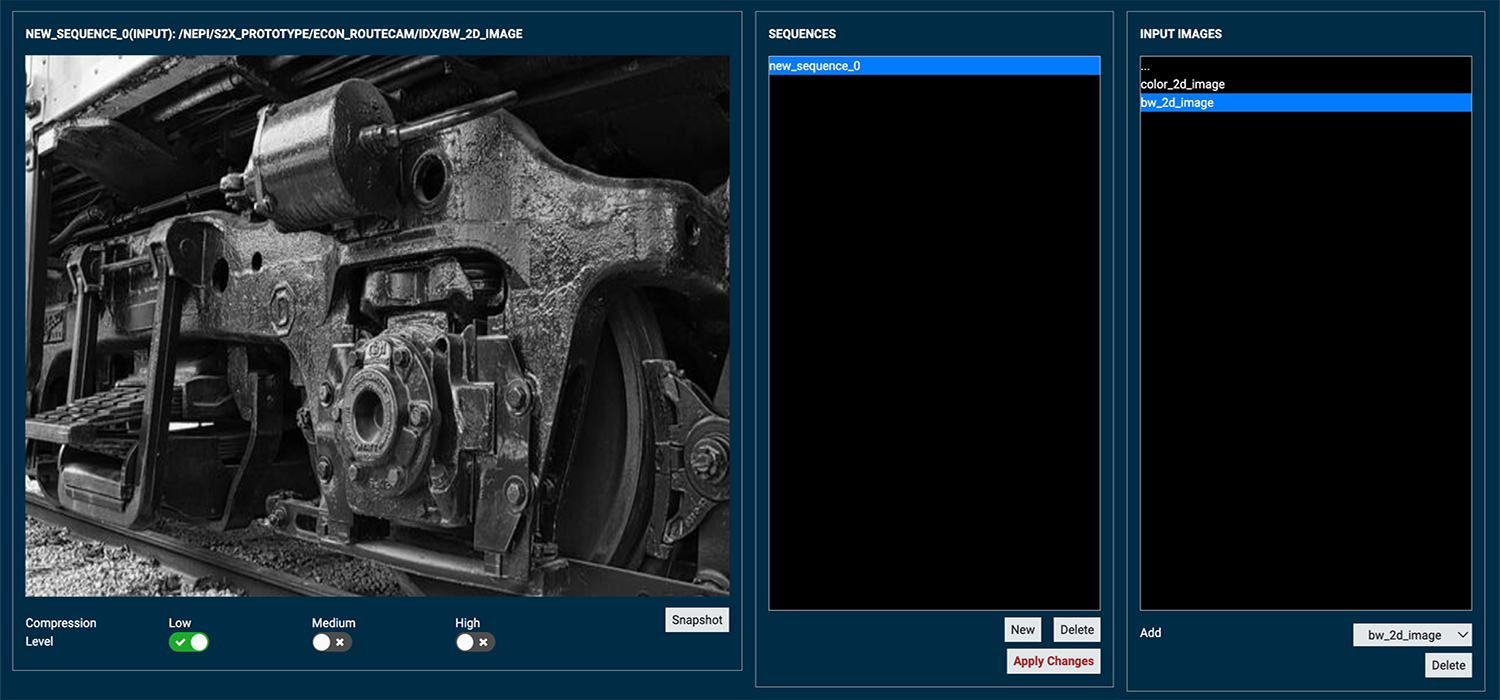
The RUI Sensors / SEQUENCER tab allows for creating a merged multi-sensor imagery feed which cycles through all selected imagery streams at user-configured rates. The order and duration of each selected stream can be adjusted by users, allowing for a single feed consisting of repeated cycling through the selected input sensor streams. This output stream is useful, for example, for scenarios with multiple cameras where users need to view and manage all sensor streams in a sequence.
| Title | Note |
|---|---|
| Sequence Settings | – Create a single sequenced imagery stream with sequenced input from multiple imagery feeds, naming each sequenced imagery stream independently – Apply Changes to save sequenced imagery with the provided name – Sequenced imagery is created with cycling through multiple cameras in a round robin manner – Saved sequenced imagery is available in NEPI system and can be applied to a variety of use cases, including applying as input to AI models to cycle AI through multiple cameras |
| Image Settings | – Select individual imagery streams in the sequence required (eg. Front color_img, right B&W_img, left color_img, etc.) – Customize duration settings for each camera imagery in the sequenced imagery – Apply Changes to save |
| Enable Sequence | – Activate/Deactivate available sequences – Select each sequence from the Sequence List and enable/disable individual sequences |
CONNECT Tab
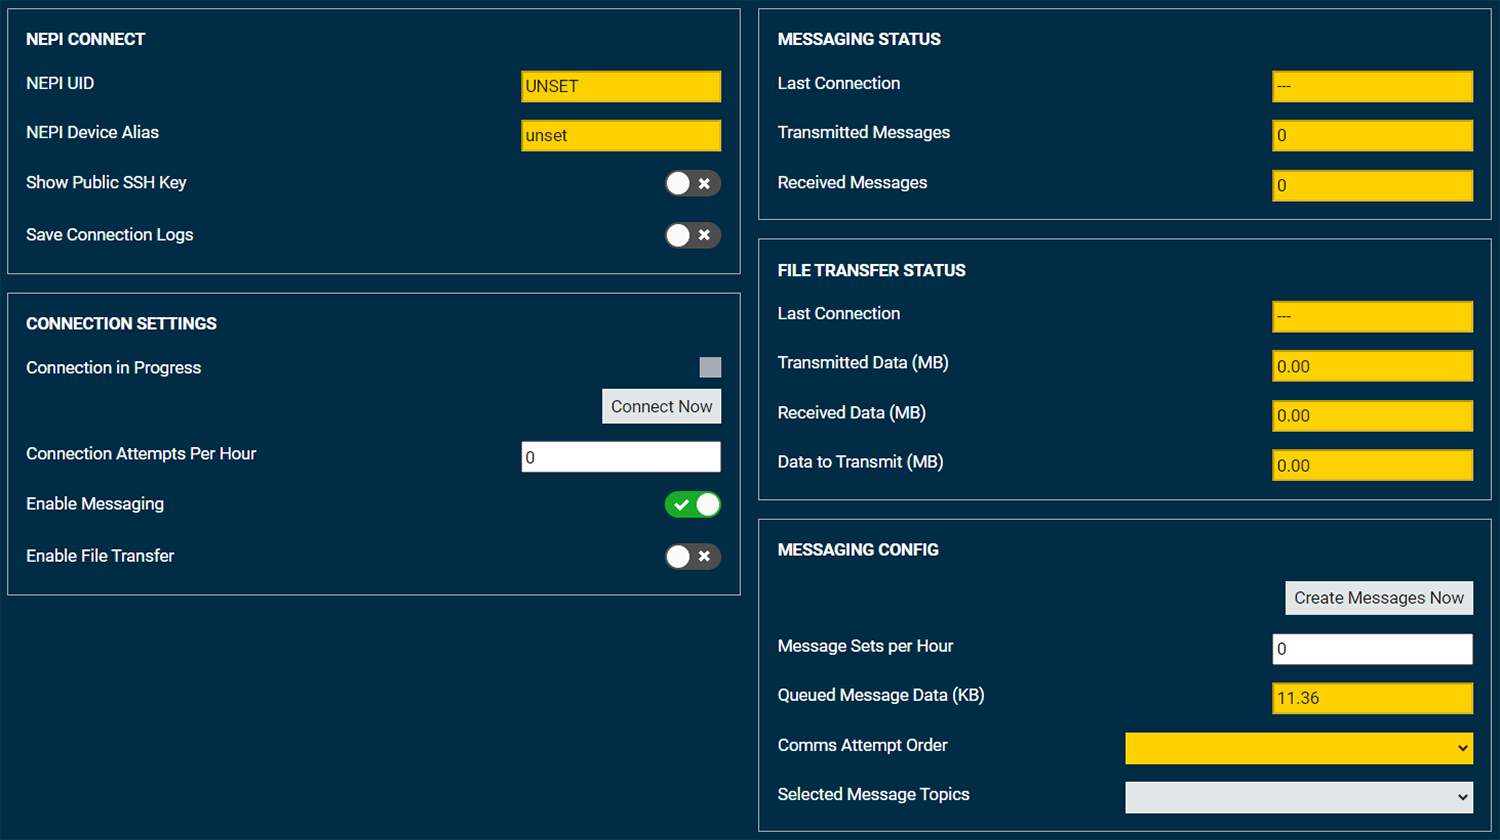
The RUI Applications / CONNECT tab provides controls and information for the NEPI remote system interface subsystem, which provides authentication, data uploading, and software updating with a remote computer, server, or cloud platform running the NEPI-Connect software. The CONNECT tab will only function after configuring a valid NEPI-Connect remote system IP address and registering the NEPI-Engine in the remote systems database.
| Title | Note |
| Connection Settings | – ‘Connection In Progress’ acts as an indicator for an active connection to the NEPI server – ‘Connect Now’ Connects the NEPI subsystem to the NEPI cloud immediately independent of the configured connection schedule – ‘Auto Rate’ sets the number of attempts to connect to the NEPI server per hour – ‘Enable Messaging and ‘Enable File Transfer’ both enable usage of their respective links (Messaging and File Transfer). – ‘Enable HB Auto Data Offloading’ sets the NEPI subsystem to send any data in the NEPI data folder over the high bandwidth (HB) link at the specified ‘Auto Rate.’ |
| Messaging Status | – Indicates information about the message transfer link – ‘Transmitted Messages’ indicates the number of messages that have been successfully transferred from NEPI device to cloud. – ‘Received Messages’ indicates the number of messages that have been successfully transferred to NEPI device from cloud. |
| File Transfer Status | – Indicates information about the high bandwidth link – ‘Device Originated Data’ indicates the amount of data that has been sent from the NEPI via the file transfer link. – ‘Device Terminated Data’ indicates the amount of data that has been received by the NEPI via the file transfer link. – ‘Data to Transmit’ indicates the amount of data waiting to be sent to the NEPI cloud. |
| Messaging Config | – ‘Capture Data Now’ creates a snapshot of data immediately based on the topics in the “Selected Message Topics” dropdown. – ‘Queued Message Data’ indicates the total quantity of data that has not yet been processed for serialization or prioritization. – ‘Comms Attempt Order’ indicates the order in which the system’s configured cloud communication methods are attempted. – ‘Data Topics’ provides the configurable list of available data products that can be captured and processed as data messages. |
CONTROLS Menu
Lights
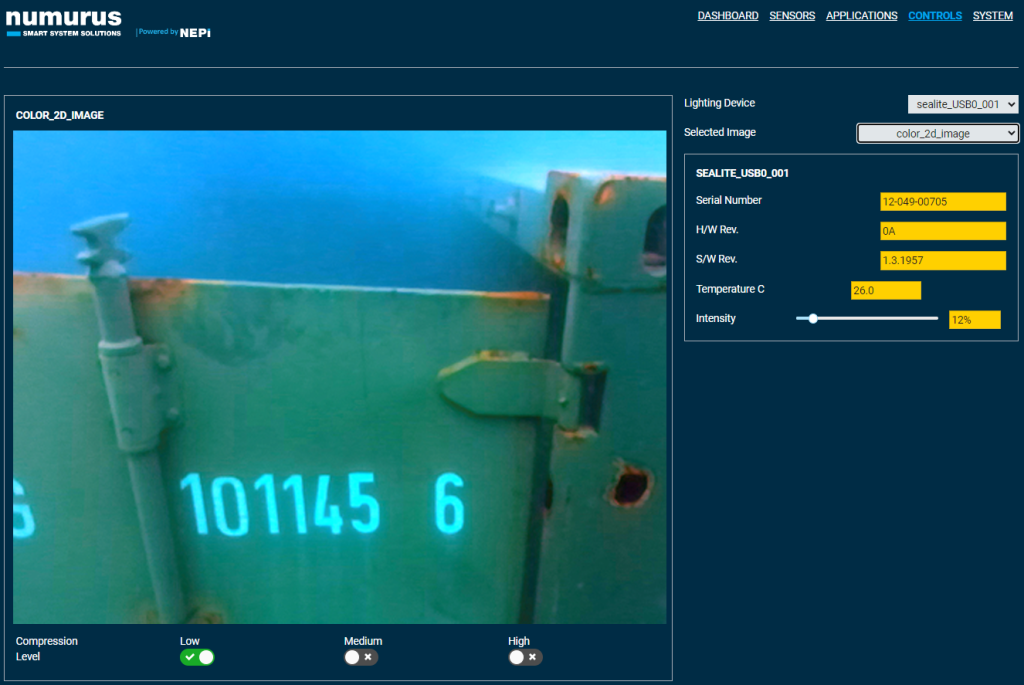
The RUI Controls/LIGHTS tab provides controls and feedback information for the NEPI LSX driver supported light and strobe systems. Allows viewing imagery from a connected imaging sensor.
| Title | Note |
| Lighting Device Dropdown | – Select from list of connected LSX driver supported light and strobe devices |
| Selected Image Dropdown | – Select image to display from available system image streams |
| Indicators | – Shows regularly updated device information |
| Controls | – Intensity: Adjust output power level |
PAN/TILT Tab
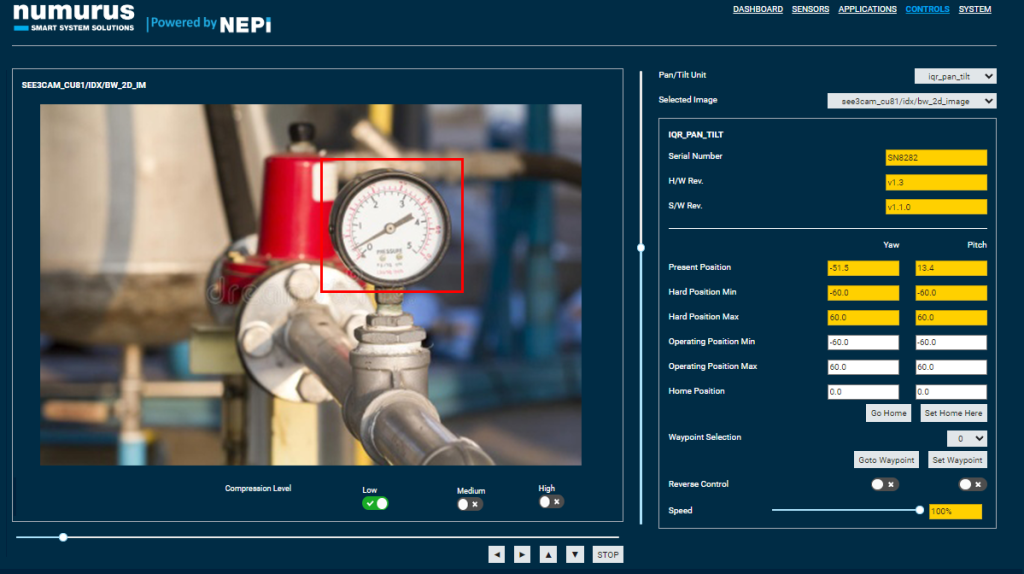
The RUI Controls / PAN/TILT tab provides controls and feedback information for the NEPI PTX driver supported pan and tilt actuators. Allows viewing imagery from a connected imaging sensor.
| Title | Note |
| Pan/Tilt Unit Dropdown | – Select from list of connected PTX driver supported pan and tilt sensors |
| Selected Image Dropdown | – Select image to display from available system image streams |
| Indicators | – Shows current position feedback and home position settings for Pan/Tilt device in degrees |
| Controls | – Set software pan/tilt limits and home position in degrees – Set actuator speed in % max value – Go Home and Stop buttons – Absolute position slider controls (Only supported on PT with absolute feedback) – Jog position controls that move the PT axis while pressed (No feedback required) |
SYSTEM Menu
ADMIN Tab
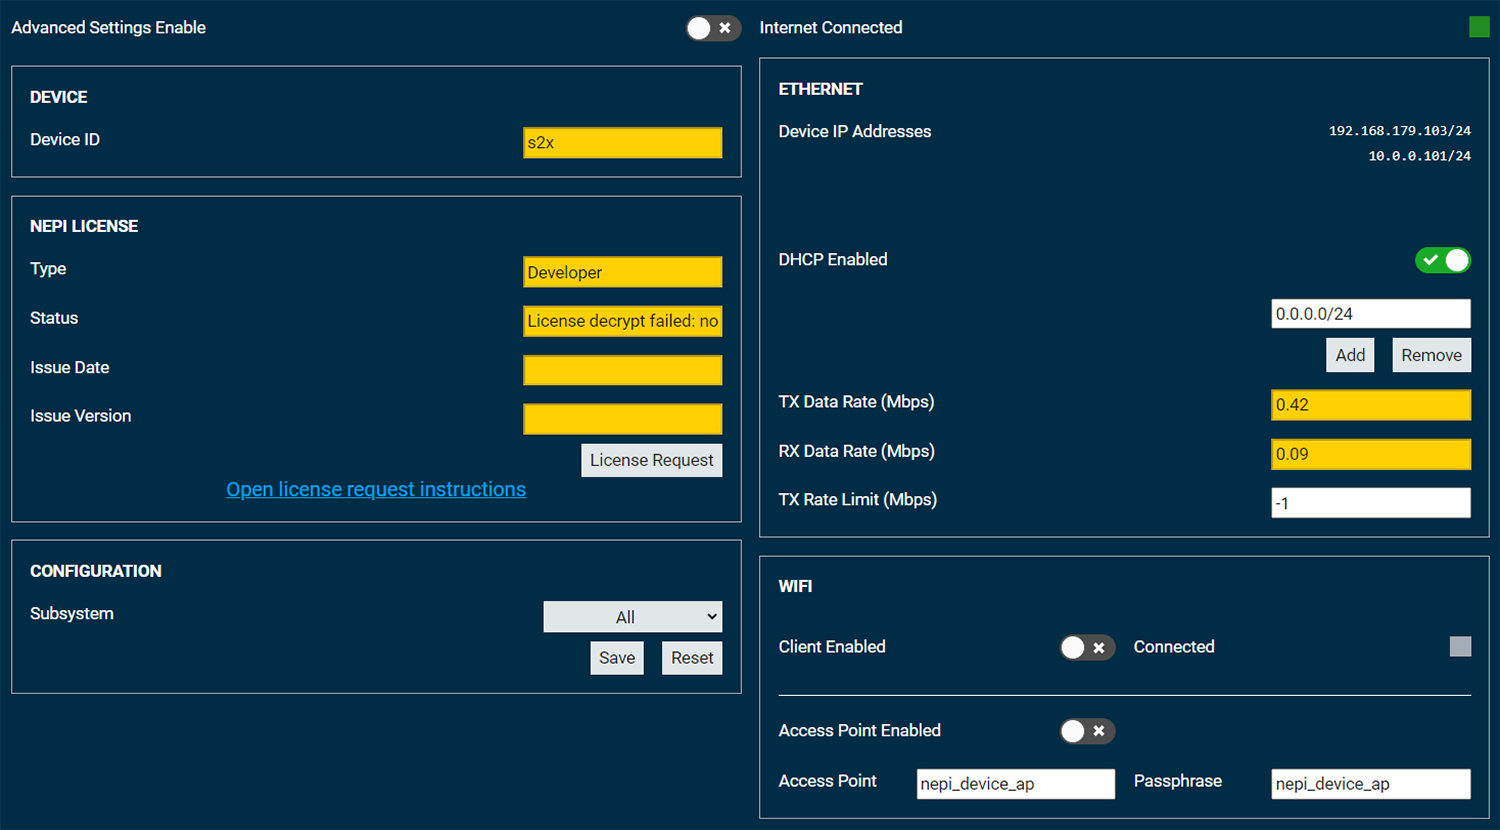
NEPI includes a large set of user-configurable parameters, which can be modified with or without saving the changes as defaults for future sessions. Each system ships with a factory configuration and the ability for users to restore the system to factory defaults both at the individual module level and for all modules globally. User modifications from the factory settings are stored in separate user configuration files. The RUI System/Admin tab allows users to adjust RUI and systems settings.
| Title | Note |
| Advanced Settings Enable | – Allows the user to toggle between advanced and standard settings. When toggled to advanced the user may enter a unique Device ID, backup and restore user and system settings, and reset the device back to factory settings. |
| DEVICE | – Indicates the Device ID. If the Device ID is changed the system must be rebooted for it to complete the change |
| NEPI LICENSE | – Shows current license type details. Provides process for updating license type |
| CONFIGURATION | – Allows the user to save any configuration changes to any configurable NEPI subsystem or to save globally for all subsystems simultaneously via the ‘All’ selection. Saved changes are automatically reapplied on next system boot. – ‘User Reset’ reverts all currently applied but unsaved settings back to their state at last boot. – ‘Factory Reset’ reverts all settings back to their original factory values – ‘User Restore’ restores user settings from user save files in the user_cfg folder on the nepi_storage drive |
| ETHERNET | – Display the device IP address and lets the user add a new IP alias for interfacing between subsystems without changing the original IP address. – The Dynamic Host Configuration Protocol (DHCP) is a network management protocol used on … address by a network administrator or must assign itself an APIPA address (which will not enable it to communicate outside its local subnet). This checkbox enables the main NEPI device ethernet interface to act as a DHCP client. |
| WIFI | – Search and connect to local Wi-Fi networks and the Internet – Setup a Wi-Fi access point that allows local systems to connect to the devices RUI and File System |
ONVIF Tab
NEPI’s RUI ONVIF tab provides a convenient process for autodetecting ONVIF cameras and pan tilt systems, as well as adding login credentials for the connected hardware.
NOTE: In order for NEPI to autodetect your ONVIF device and attempt to login with your provided credentials, you must first add an Ethernet IP address alias on the same same subdomain as your ONVIF device using the “Add” ip address button on the NEPI device’s RUI SYSTEM/ADMIN tab.

| Title | Note |
| DETECTED DEVICES | ONVIF autodetected devices on your NEPI device’s base or aliased IP addresses. |
| CONFIGURED DEVICES | Devices that you have added log in credentials for. |
| DEVICE INFO | Information collected on autodetected ONVIF devices. |
| CONFIGURATION | Allows the user to add and save settings and login credentials for a detected ONVIF devices. – Login Username and Password credentials – User defined device name – Select IDX imaging and/or PTX pan tilt driver support – Save a new configuration or delete an existing one |
SOFTWA
SOFTWARE Tab
NEPI allows for software upgrading, cloning and backup of NEPI systems locally on-device and remotely when NEPI-enabled device has internet connectivity. In the System/Software RUI page, press CHECK to query the onboard NEPI folder for availability of a new NEPI system image. The user would have to have downloaded any new NEPI software version on their host machine or directly on an external flash media on board NEPI device.
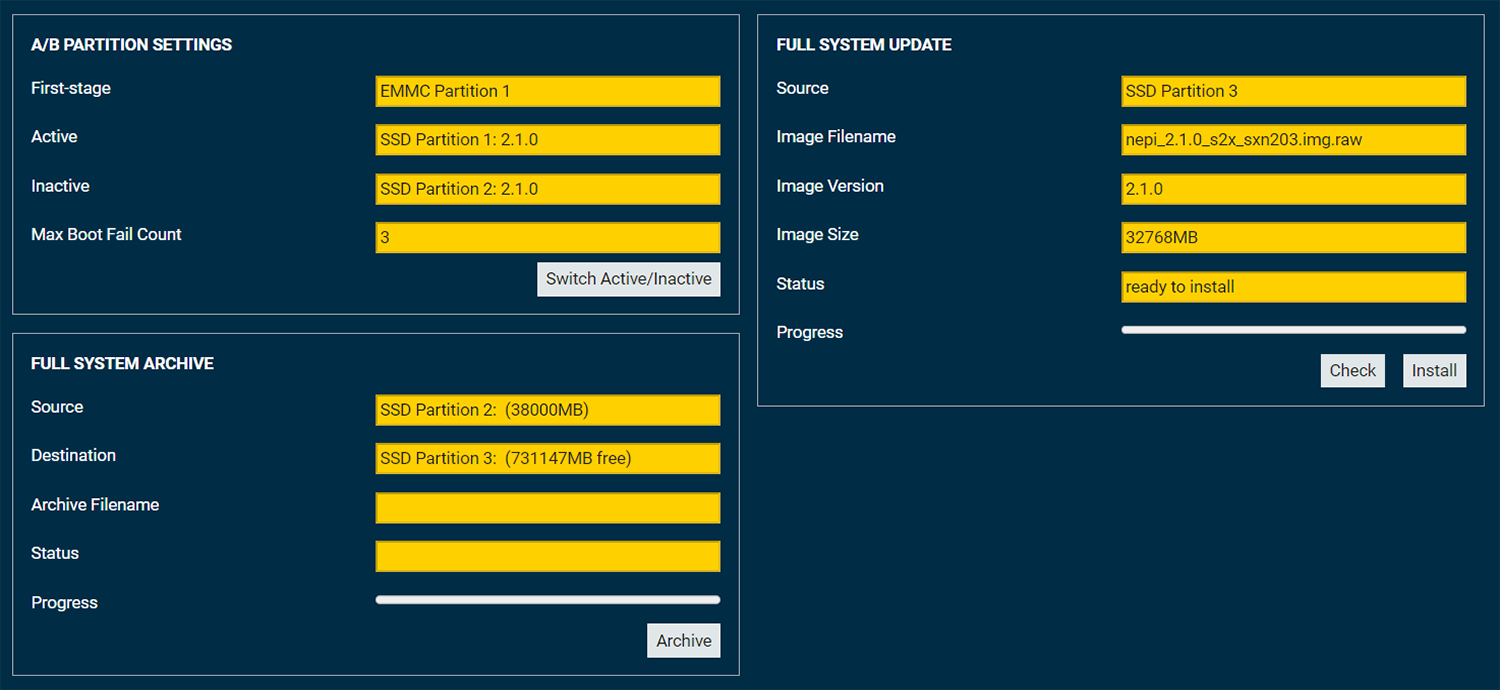
| Title | Note |
| A/B Partition | – ‘First-stage’ indicates which media is used on initial boot before handing over to the ‘active’ partition – ‘Active’ and ‘Inactive’ indicate system’s active and inactive partitions (i.e., which partition is used actively on boot-up) and which NEPI s/w version resides on each partition. – Press SWITCH ACTIVE/INACTIVE to swap the active/inactive partitions. Text will turn red and after a NEPI system reboot, the role of active and inactive partitions will be switched and indicated on this page. |
| Full System Archive | – ‘Source’ indicates which media and partition will be archived and how large that partition is. This will always match the ‘Inactive’ partition. It is not possible to archive the active partition, so a preliminary ‘Switch Active/Inactive’ and reboot may be required to ensure the desired filesystem is archived. – ‘Destination’ indicates which (user-configured) media and partition the archive will be written to along with the free space. Ensure that the free space is larger than the ‘Source’ space to avoid filling the media and/or failing to properly archive the filesystem. – After pressing ‘Archive’ button, the ‘Progress’ bar will display the current progress and ‘Archive Filename’ and ‘Status’ will be updated |
| Full System Update | – New software version queried by CHECK button appears in this section. If no proper NEPI system image is detected on the ‘Source’ media and partition, ‘Status’ will indicate that. – Press INSTALL to proceed to install available software version into the inactive partition. ‘Progress’ bar indicates the progress of the install. – Upon completion of the install, the ‘Status’ box will provide additional instructions; typically a system reboot is required |

