NEPI Engine – Saving and Accessing Data
Introduction
This tutorial covers saving, monitoring, and accessing data using NEPI Engine software running on an NVIDIA Jetson or other edge-compute hardware. This tutorial assumes you have a working NEPI Engine enabled edge compute platform and are familiar with basic NEPI user interfacing like accessing the NEPI RUI (Resident User Interface) and the NEPI network shared User Storage drive.
What you will need
1) 1x NEPI-enabled device. This tutorial uses an edge-compute processor box that includes an NVIDIA Jeston Xavier NX embedded GPU with NEPI Engine software installed.
NOTE: See available off-the-shelf NEPI enabled edge-compute options at:
https://numurus.com/products-nepi-enabled-hardware/
2) 1x PC with internet access and configured to access the NEPI device’s RUI browser-based interface and user storage drive. This tutorial uses a Windows 11 PC and a USB GigE Ethernet adapter and Ethernet cable.
NOTE: Instructions for configuration a PC and connecting to a NEPI device’s RUI and user storage drive are provided in the NEPI Engine Getting Started tutorial at:
https://nepi.com/nepi-tutorials/nepi-engine-connecting-and-setup/
3) 1x NEPI IDX supported 2D camera. This tutorial uses a USB webcam.
NOTE: To see a list of current NEPI IDX supported cameras at:
https://nepi.com/documentation/nepi-engine-hardware-driver-support-tables/
NOTE: See the NEPI Engine Hardware Interfacing tutorial “Imaging Sensors” for details on connecting a camera to your NEPI device at:
https://nepi.com/tutorials/
Hardware Setup
1) Connect a NEPI IDX supported camera to your NEPI device.
2) Connect the NEPI device to your PC’s Ethernet adapter using an Ethernet cable, then power your NEPI device.

Saving Data
NEPI Engine’s data management system provides built-in functionality for saving various types of data in standardized formats to a NEPI device’s on-board user storage drive. Data types include navigation and positioning data NEPI’s NavPose management system, 2D and 3D data from NEPI IDX driver supported imaging sensors, and NEPI’s AI application.
NEPI Data Source and Type Naming Conventions
| Type | File Name Source and Type Convention |
| NavPose Data | nav_pose_mgr_nav.txt |
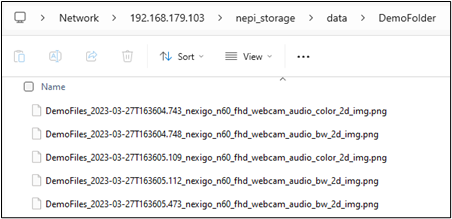
| Image Data | SensorName_DataType.png |
| Pointcloud Data | SensorName_pointcloud.pcd |
| AI Detection Data | Classifier_bounding_boxes.txt |
Data saving is managed by three controls; a start/stop saving signal, a save rate setting, and a save prefix setting. While these controls can be set for each data source separately through automation scripts, this tutorial leverages the NEPI device’s RUI interface.
1) Open a web-browser on your PC and enter the NEPI device’s IP address and RUI port number:
http://192.168.179.103:5003
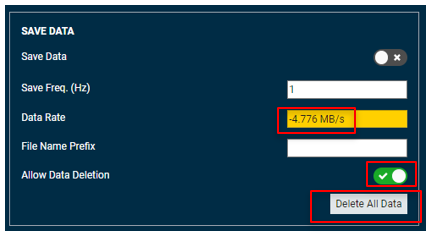
This should open the RUI “DASHBOARD” tab. On the Dashboard tab, find to the “SAVE DATA” section of the page.
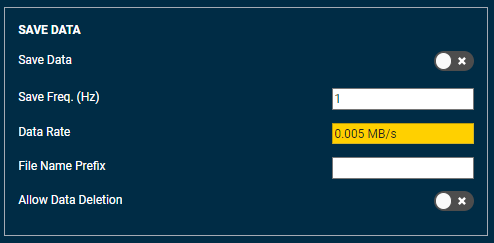
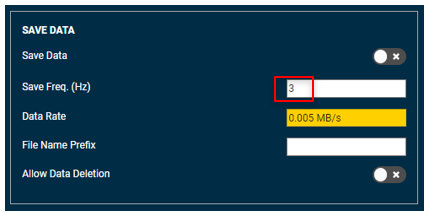
2) Adjust the max data save rate by changing the value in the “Save Freq (Hz)” input box and hitting enter. The text will turn from Red to Black indicating the input was received.
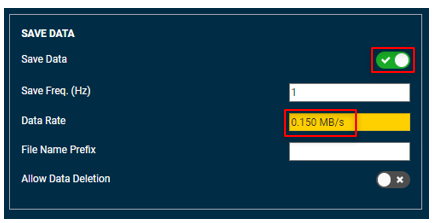
3) Start and Stop saving data by clicking on the “Save Data” switch. When data saving is enabled, the switch will turn Green with a check icon, and you should see the data save rate increase to some value based on the data and rates you have configured.
4) Add a file name prefix, a subfolder location to save data to, or both by entering a string value in the “File_Name” input box and hitting enter. The text will turn from Red to Black indicating the input was received. The string format options are shown in the table below along with the resulting file and folder save configuration
NEPI Data Source and Type Naming Conventions
| String Input | Result |
| EMPTY | Resets to “data” folder |
| prefix_string | Adds the prefix string entered to the beginning of all saved data file names. |
| folder_string/ | Creates a subfolder using the folder string entered in the “data” folder and saves all data in the folder. |
| folder_string/ prefix_string | Creates a subfolder in the “data” folder and saves all data in the folder and adds the prefix to the beginning of all saved data file names. |
NOTE: The prefix value can be set even if data saving is enabled, resulting in new data saved to the updated filename prefix and save folder.
Example:
File Name Prefix set to EMPTY

saves data in the data folder with the standard Date_Time_Source_Type filename format.
Example:
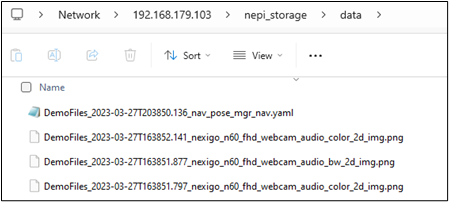
File Name Prefix set to DemoFiles_
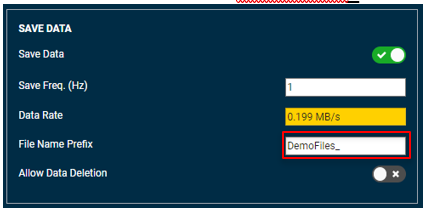
Saves data in the data folder with the filenames prefixed with “DemoFiles_”.

Example:
File Name Prefix set to DemoFolder/DemoFiles_
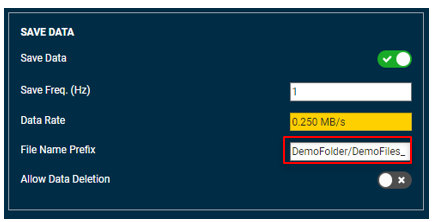
Creates a new subfolder in the data folder named “DemoFolder”
and saves data in that subfolder with the filenames prefixed with “DemoFiles_”.
5) While you can manually access and delete data in your user storage drive, it is much faster to have NEPI delete the data folder contents by clicking on the “Allow Data Deletion” switch to allow bulk data delete, then clicking the “Delete All Data” button. If you have data in the folder, you will see a negative value in the “Data Rate” indicator box while files are being deleted.
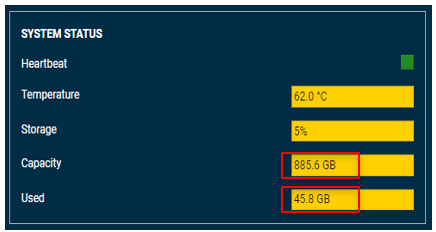
Monitoring On-Board Storage Usage
Disk usage information is available in the “SYSTEM STATUS” section of the RUI “DASHBOARD” tab. You can monitor both the capacity of your NEPI user storage drive and the amount of space currently used.
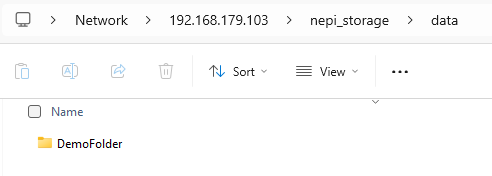
Accessing Saved Data
NEPI saves all data to a network shared user storage partition NEPI device’s SSD drive.
You can find instructions for accessing your NEPI device’s user storage drive in the NEPI Engine Software Manual and Getting Started tutorials provided at:
https://nepi.com/nepi-tutorials/nepi-engine-user-storage-drive/
The base folder name for saved data is “data”.
