NEPI Engine – Accessing the NEPI File System
Introduction
This tutorial will walk you through connecting to a NEPI device’s File System through an SSH connected terminal from a PC.
What you will need
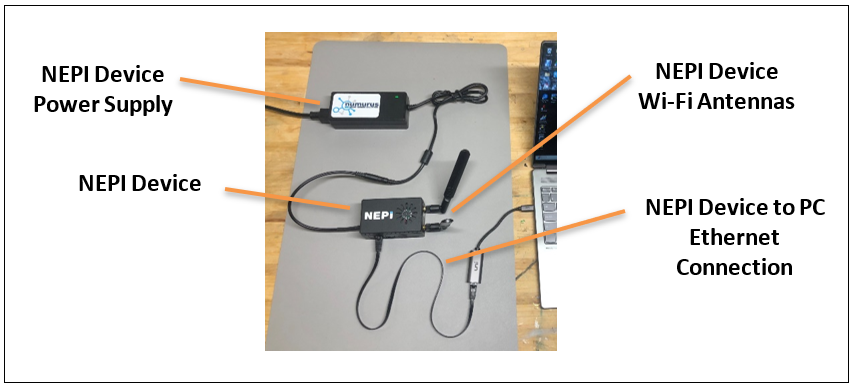
1) 1x NEPI-enabled device with internet access. This tutorial uses an edge-compute processor box that includes an NVIDIA Jetson Xavier NX embedded GPU with NEPI Engine software installed.
NOTE: See available off-the-shelf NEPI enabled edge-compute options at: https://numurus.com/products-nepi-enabled-hardware/
2) 1x PC with internet access and configured to access the NEPI device’s RUI browser-based interface. This tutorial uses a Windows 11 PC and a USB GigE Ethernet adapter and Ethernet cable.
NOTE: Instructions for configuration a PC and connecting to a NEPI device are provided in the NEPI Engine Getting Started tutorial at: https://nepi.com/nepi-tutorials/nepi-engine-connecting-and-setup/
Hardware Setup
1) Connect the NEPI device to your PC’s Ethernet adapter using an Ethernet cable, then power your NEPI device.
Accessing the NEPI File System
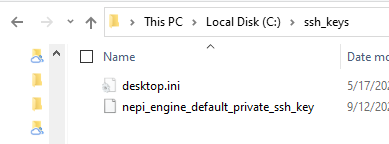
Download the NEPI default SSH Key
1) Download the default NEPI private SSH key “nepi_engine_default_private_ssh_key” from:
https://github.com/nepi-engine/nepi_engine/blob/ros1_main/nepi_env/ssh_keys/nepi_engine_default_private_ssh_key
The NEPI default SSH account credentials are:
– username: nepi
– password (for sudo): nepi
Setting up and using your NEPI SSH Key
SSH password login is disabled for NEPI devices, so you’ll need to install the NEPI device’s private SSH key and configure your PC following the instructions in this section.
For Linux and Mac PCs
Both Linux and Mac PC operating systems support direct SSH connections from system terminals. Follow the instructions below to SSH into your NEPI system from either of these platforms.
- Create a new folder on your PC to store the NEPI ssh key you downloaded and copy the ssh key into that folder (the remaining instructions assume “~/ssh_keys”), then copy the downloaded key to that new folder, then open terminal in the folder you copied the key to, directory and change permissions for the key
mkdir ~/ssh_keys
cd ~/ssh_keys
wget 'https://www.dropbox.com/scl/fi/t1qcizpfjohqhlwls8il7/nepi_engine_default_private_ssh_key?rlkey=tunjq4u0qim6u2qzfwjnizui3&st=t6m7a6fe&dl=0' -O nepi_engine_default_private_ssh_key
sudo chmod 600 nepi_engine_default_private_ssh_key
3) in the same terminal, start an SSH session to your NEPI device by entering the text below:
ssh -o StrictHostKeyChecking=no -i ~/ssh_keys/nepi_engine_default_private_ssh_key nepi@192.168.179.103
You can add useful aliases to your system that make connecting faster and easier with the following instructions:
4) Add the following line to your PC’s “hosts” file by opening a terminal on your PC and typing:
sudo nano /etc/hosts
a) Add the following line to your file, replacing the items in yellow with your actual system values:
<IP Address of your NEPI-enabled device> <Name of your NEPI device>
b) The factory IP address for NEPI devices is “192.168.179.103”
192.168.179.103 nepi
NOTE: If you have multiple nepi devices on the network with different IP addresses, add a line for each with a unique name (i.e.
192.168.179.103 nepi-robot1
192.168.179.104 nepi-robot2
d) Press “Ctrl-x”, then “Y”, then “enter” to save and exit.
5) Open your terminal shell startup file
b) Then add the following lines to the file to the end of your ‘.bashrc’ file..
For Linux: sudo nano ~/.bashrc
For Mac: nano ~/.zshrc
- Add the following lines to the end of the file:
# Load Nepi Aliase File.if [ -f ~/.nepi_aliases ]; then. ~/.nepi_aliasesfi
b) Change to your home folder and download the ‘nepi_pc_aliases’ sh file using the commands below:
cd ~/
wget 'https://www.dropbox.com/scl/fi/psgzxxd99o6za30bnpha1/nepi_pc_aliases?rlkey=uwuw8p6xw4fsy7u6cz3thelnb&st=zwq3oy1y&dl=0' -O .nepi_aliases
source ~/.bashrc
- Type ‘nepi’ at the command line to see a list of available terminal aliases
nepi
NOTE: While the nepi_aliases script has a number of available aliases, the ones that are related to connecting to the nepi device are listed below for reference:
export NEPI_SSH_KEY_PATH=~/ssh_keys/nepi_engine_default_private_ssh_key
alias sshn="ssh -o StrictHostKeyChecking=no -i $NEPI_SSH_KEY_PATH nepi@nepi"
alias scpn="scp -o StrictHostKeyChecking=no -i $NEPI_SSH_KEY_PATH nepi@nepi"
alias sftpn="sftp -o StrictHostKeyChecking=no -i $NEPI_SSH_KEY_PATH nepi@nepi"
NOTE: If you have multiple nepi devices on the network with different names in the /etc/hosts file, add the last three lines for each changing both the alias names and nepi host name (i.e:
alias sshn_r1="ssh -o StrictHostKeyChecking=no -i $NEPI_SSH_KEY_PATH nepi@nepi-robot1"
alias sshn_r2="ssh -o StrictHostKeyChecking=no -i $NEPI_SSH_KEY_PATH nepi@nepi-robot2"
6) Open a new terminal and the test ssh and sftp shortcuts:
sshn
sftpn
NOTE: While the ‘sftpn’ function will log in at the nepi home folder, their are a number of specific sftp shortcuts that will log in to a specific folder on the device, making it easier to ‘get’ ‘put’ files located in common nepi folders. A few of these are listed below:
Common Nepi User Driver Folders
cfg = /mnt/nepi_storage/user_cfg
ai = /mnt/nepi_storage/ai_models
auto = /mnt/nepi_storage/automation_scripts
data = /mnt/nepi_storage/data
installs = /mnt/nepi_storage/installs
src = /mnt/nepi_storage/nepi_src
tmp = /mnt/nepi_storage/tmp
Common Nepi File System Folders
aifs = /opt/nepi/ros/share/nepi_aifs
api = /opt/nepi/ros/lib/python3/dist-packages/nepi_api
apps = /opt/nepi/ros/share/nepi_apps
drivers = /opt/nepi/ros/lib/nepi_drivers
etc = /opt/nepi/ros/etc
lib = /opt/nepi/ros/lib
managers = /opt/nepi/ros/lib/nepi_managers
ros = /opt/nepi/ros
nfi = /mnt/nepi_storage/nepi_full_img
nfia = /mnt/nepi_storage/nepi_full_img_archive
python = /opt/nepi/ros/lib/python3/dist-packages/
rui = /opt/nepi/nepi_rui/src/rui_webserver/rui-app/src
sdk = /opt/nepi/ros/lib/python3/dist-packages/nepi_sdk
For Windows PCs
If you need to access NEPI file system on Windows, you will first need to install a remote terminal application like Putty and make a Putty compatible ssk key from the provided “nepi_engine_default_private_ssh_key” private key file. Instructions for installing Putty creating Putty compatible keys is detailed below.
NOTE: There are many alternative SSH-capable terminal emulators on Windows that do not require the key-translation step. These include git-bash, cygwin, wsl2, and many terminal emulators included in software IDEs.
1) Create a new folder on your PC to store the NEPI ssh key you downloaded and copy the ssh key into that folder (the remaining instructions assume “C:\ssh_keys”), then copy the downloaded key to that new folder.
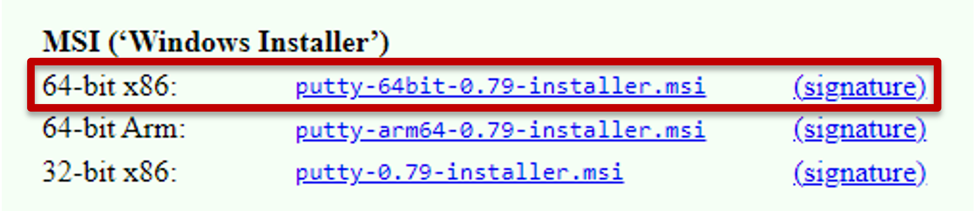
2) Download Putty from: https://www.chiark.greenend.org.uk/~sgtatham/putty/latest.html and install the software using the default install instructions.
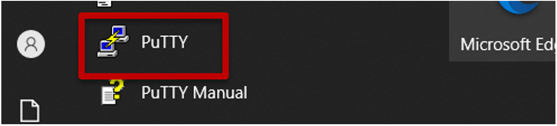
3) From your Windows Start menu next to the Search box, select the PuTTygen applications, which you will use to convert the NEPI key you downloaded to a Putty compatible key.
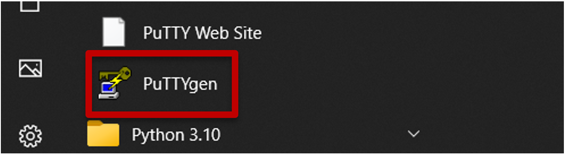
4) From the PuTTYgen application window, click the “Load” button.

From the open popup window, do the following:
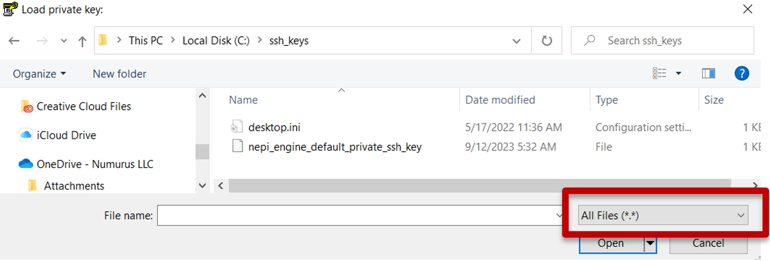
a) Navigate to your new ssh_keys folder.
b) Select the “All Files (*.*) option in the drop-down menu just above the “Open” button.
c) Select the “nepi_engine_default_private_ssh_key” in the file list and hit the “Open” button.
d) Click the “OK” button
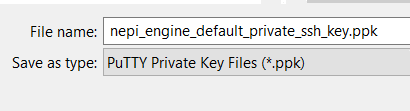
e) Next, select the “Save private key” button, and click “Yes” in the popup window.

f) From the save popup window, enter the following file name to save your new Putty compatible ssh key as “nepi_engine_default_private_ssh_key.ppk”, and click the “Save” button, and hit “Yes” in the popup window.
You can now close the PuTTYgen applications now.
5) Open the Putty application from your Window’s Start menu.
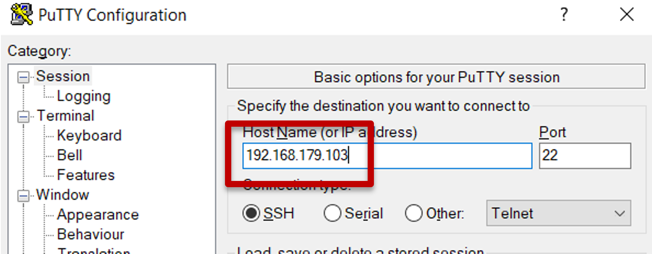
a) Enter the IP address of your NEPI device in the “HostName” entry box. NEPI default IP address is “192.168.179.103”.
b) From the left menu list, expand the “SSH” then “Auth” menu items and click on the “Credentials” option, Then click the “Browse” button and select the newly saved key from your ssh_keys folder.
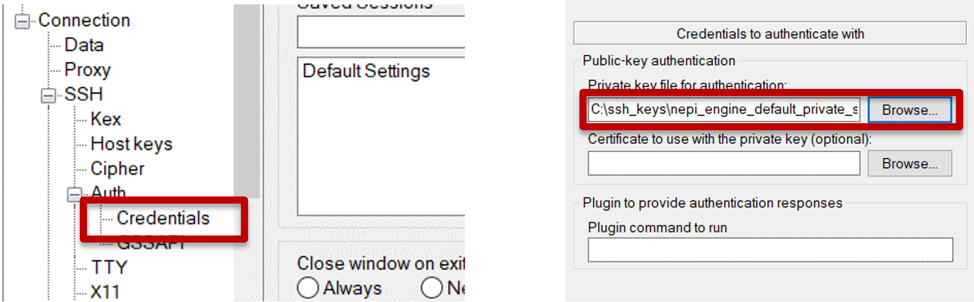
c) Click the “Session” option at the top of the left menu list, enter the name “NEPI” into the Saved Sessions entry box, and click the “Save” button to save your NEPI putty configuration. Click the “Open” button at the bottom of the application to open an SSH connected terminal to your NEPI device. The default NEPI password is “nepi.”

You now have an SSH connected terminal to your NEPI file system.
NOTE: Instructions for navigation and customizing a NEPI device’s File System are provided in the NEPI Engine – Solution Development – Customizing the NEPI File System tutorial at: https://nepi.com/nepi-tutorials/
Navigating the File System
The majority of the NEPI file system files you would want to work with are located in a few key folders on the NEPI device.
NEPI File System Locations
| NEPI Folder | Description |
| /mnt/nepi_storage | The NEPI network shared user storage drive containing folders for AI models, automation scripts, logged data, user config files, NEPI image install and archiving to name a few. |
| /opt/nepi | The main NEPI software package installation folder containing the NEPI ROS environment, NEPI Resident User Interface (RUI) files, and NEPI Link remote server communication subsystem used for the NEPI Connect application. |
Navigating the NEPI File System
!!! This step should be done on your NEPI DEVICE in an ssh connected terminal
a) SSH into your NEPI device and take a look at your NEPI device’s pre-configured aliases by typing the following command:
nepi
NOTE: nepi_aliases are located in the ~/.nepi_aliases file on your NEPI device
b) You can navigate to common NEPI folders using the following command line aliases within your ssh session.
Example: Typing ‘api’ in an SSH connected terminal will take you to the NEPI file system ‘/opt/nepi/ros/share/nepi_apps’ folder
Common Nepi User Driver Folders
cfg = /mnt/nepi_storage/user_cfg
ai = /mnt/nepi_storage/ai_models
auto = /mnt/nepi_storage/automation_scripts
data = /mnt/nepi_storage/data
installs = /mnt/nepi_storage/installs
src = /mnt/nepi_storage/nepi_src
tmp = /mnt/nepi_storage/tmp
Common Nepi File System Folders
aifs = /opt/nepi/ros/share/nepi_aifs
api = /opt/nepi/ros/lib/python3/dist-packages/nepi_api
apps = /opt/nepi/ros/share/nepi_apps
drivers = /opt/nepi/ros/lib/nepi_drivers
etc = /opt/nepi/ros/etc
lib = /opt/nepi/ros/lib
managers = /opt/nepi/ros/lib/nepi_managers
ros = /opt/nepi/ros
nfi = /mnt/nepi_storage/nepi_full_img
nfia = /mnt/nepi_storage/nepi_full_img_archive
python = /opt/nepi/ros/lib/python3/dist-packages/
rui = /opt/nepi/nepi_rui/src/rui_webserver/rui-app/src
sdk = /opt/nepi/ros/lib/python3/dist-packages/nepi_sdk
Customizing the File System
See the tutorials below for information about customizing your NEPI File System and Resident User Interface (RUI):
https://nepi.com/nepi-tutorials/nepi-engine-customizing-the-nepi-file-system/
https://nepi.com/nepi-tutorials/nepi-engine-customizing-the-nepi-rui-system/