NEPI Engine – User Interface System
Architecture
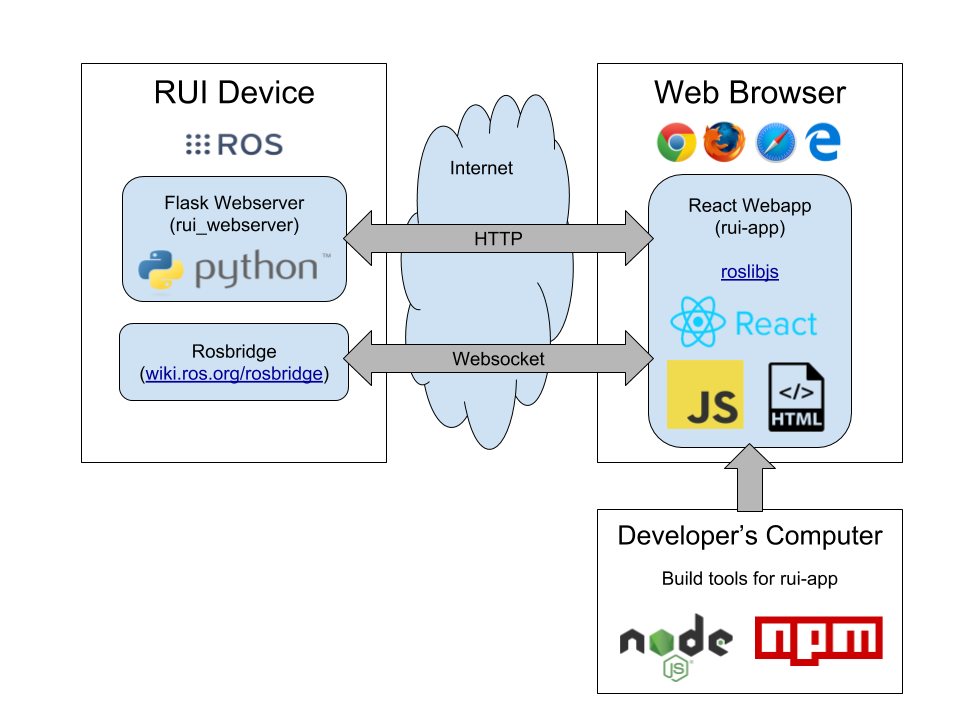
NEPI’s web-browser supported Resident User Interface (RUI) system is built on JavaScript and React, a JavaScript-based UI development library. The RUI interacts with the NEPI ROS-based application system through a custom ROS-HTML Bridge Node that converts data back and forth between the two environments. All data and controls available on the RUI have a ROS based interface, and vice versa.
 The RUI codebase is made up of a “front-end codebase” that controls the look and feel of the RUI interface using JavaScript and React tools, and a “back-end codebase” that provides the bridge between the NEPI RUI interface and the NEPI ROS interface. The RUI codebase is easily customizable with a few examples below. Be sure to recompile the application after making any changes to your RUI codebase following the instructions in the last part of this section.
Components
The NEPI Engine RUI source-code files are located in the “nepi_rui” source-code repo’s src folder at:
nepi_rui/src/rui_webserver/rui-app/src
NOTE: The NEPI RUI source-code is available in the NEPI Engine GitHub repo. To request access to NEPI Engine source-code repositories, visit:
Source Code Files
NEPI Engine RUI components are built from a combination of standard and custom JavaScript and React files described in the table below.
NEPI RUI Source Files
| File Name | Description |
| Store.js | Contains the interface definitions between the js system and NEPI’s html ROS bridge. Any NEPI ROS messages or services must be defined in this file before they are accessible to the remaining js system. |
| Nav.js | Contains custom UI functions used acros the RUI js system. |
| App.js | Contains the top-level menu code. |
| nepi-rui-typography-theme.js | Contains the RUI theme settings. |
| Remaining Files | Combination of utilities and RUI page HTML source code. |
Installation
Installing From Source-Code
NEPI Engine software is available in source-code format, downloadable pre-built system images for select hardware platforms, and pre-installed hardware solutions from both Numurus and its edge-compute hardware partners. This document provides instructions for building NEPI Engine entirely from source. Use cases that would influence a source-code build over one of the alternative options include:
- Users may prefer complete control over system bring-up
- Users may be developing a NEPI solution on a hardware platform not currently supported by one of the other options.
For instructions on building and deploying NEPI Engine from source-code on new hardware, see the NEPI Engine – Source-Code Access, Build, and Installation Instructions at:
https://nepi.com/documentation/nepi-engine-source-code-build-and-installation/
Customization
The NEPI RUI user interface system source-code is fully contained within the “nep_rui” GitHub repository. The following instructions walk through the process of cloning, editing, moving, and compiling the “nepi_rui” source-code.
NOTE: For detailed examples of customizing the NEPI Engine RUI, see the tutorials in the NEPI Engine – NEPI Customization section at:
1) Clone and Modify Source Code
a) Instructions for cloning the NEPI Engine source-code can be found in the NEPI Engine – Software File System developer’s guide located at:
https://nepi.com/documentation/nepi-engine-nepi-file-system/
2) Make Changes to the RUI Source Code
The NEPI RUI source-code is located in the nepi_engine_ws code repo under the /src/nepi_rui/ folder.
a) Make your changes to the source code.
b) Deploy your updated RUI code to the NEPI device following the deploy instructions in the NEPI Engine – Software File System developer’s guide located at:
https://nepi.com/documentation/nepi-engine-nepi-file-system/
3) Compile the Changes
a) Open an SSH terminal to your NEPI device and enter the following commands to first create a virtual environment to work from by entering:
cd /opt/nepi/nepi_rui/
source devenv.sh
NOTE: This only needs to be done once for a given SSH connection. You can rebuild the RUI multiple times after setting up this virtual dev environment.
b) Rebuild the RUI front end by entering:
cd src/rui_webserver/rui-app
npm run build
If the compilation process has errors, fix the errors in the code on your PC, the repeat step 2 to sync the code to your NEPI device, and run the catkin build command again. Continue until your software builds without errors.
4) Test Your Changes
a) In order to view your changes, open a web-browser on your PC to the NEPI device’s RUI page or refresh an already open page.