< All Topics
Print

NEPI Engine – Software File System

Introduction

This document describes NEPI Engine’s Root File System (rootfs) structure at a conceptual and instructional level. This document also describes the procedure used to update and customize the NEPI software on the edge device. It is intended for NEPI developers and integrators; specifically, those working on NEPI system customization and porting to new hardware stacks.

Architecture

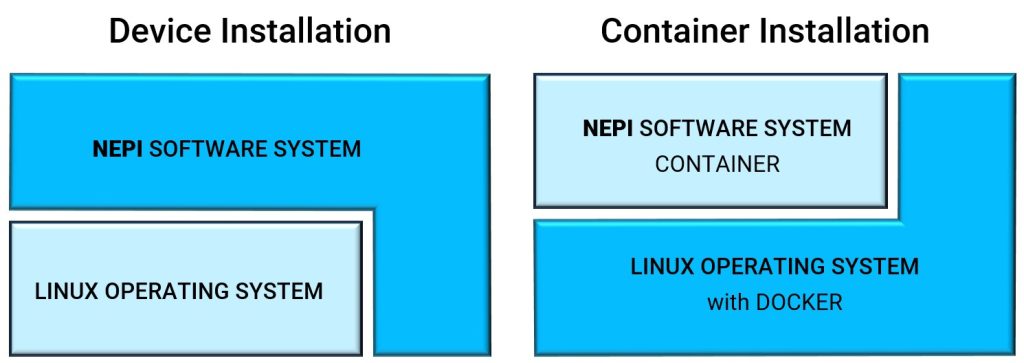
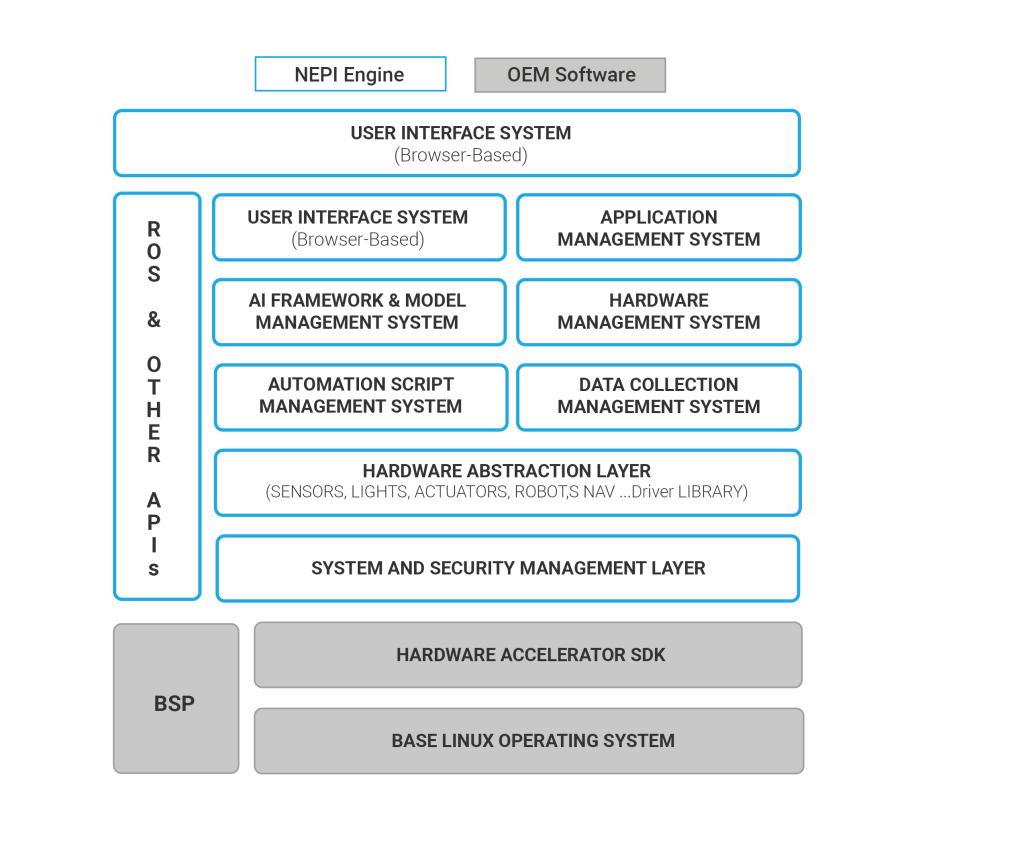
NEPI Engine installs on top of the base operating system and software provided by edge-compute board and chip manufacturers creating a feature-rich environment for edge-AI and robotic automation development.
A screenshot of a computer software Description automatically generated

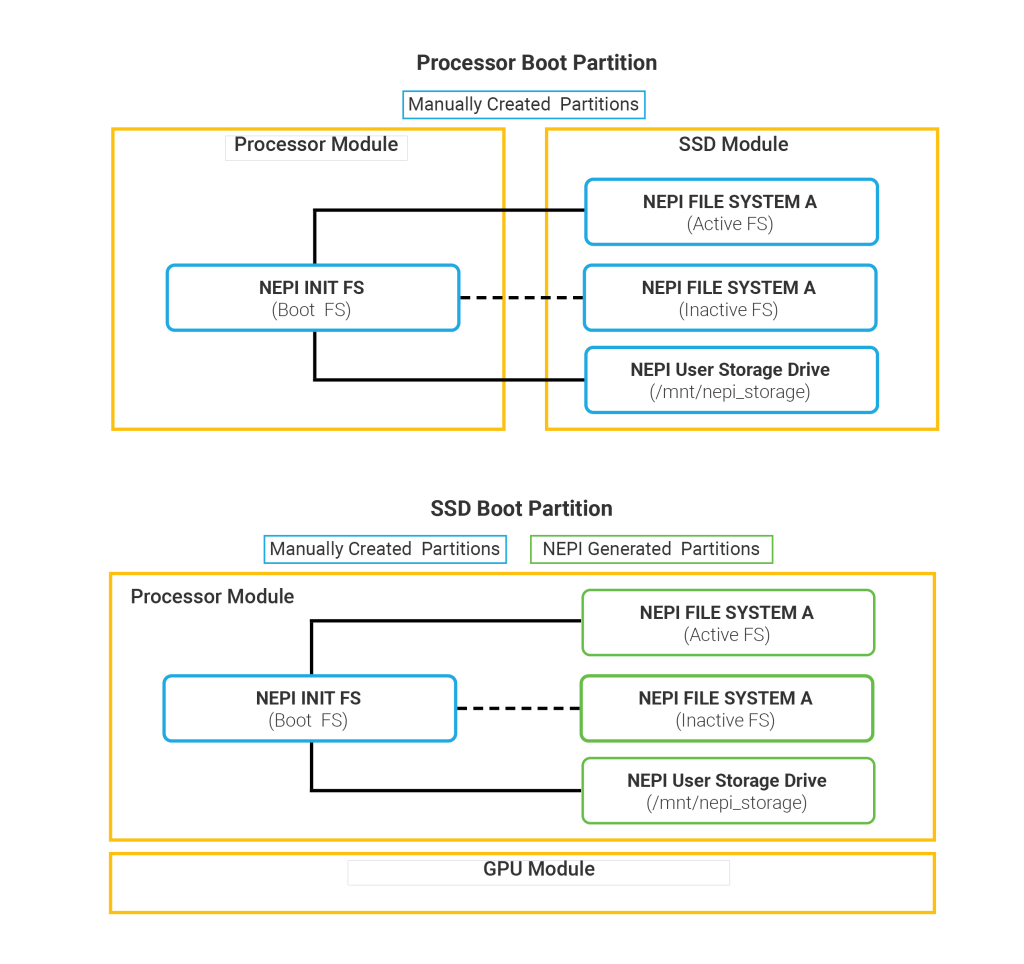
The NEPI Engine software is made up of four components that include an Init File System that manages NEPI core boot processes and mounts/connects to one of the Root File System partitions (A or B), then mounts/connects to a User Storage partition with Samba network drive sharing support. Only one of the Root File System partitions is mounted and active at any given time, allowing NEPI’s software management system to provide updating, backup, and cloning services on the inactive Root File System partition.

NEPI File System Partition Table
Partition NameDescription
Init File SystemNEPI boot file system. Connects to FS A or B on startup
Root File System ADefault active NEPI file system
Root File System BDefault inactive NEPI file system
User StorageNetwork shared partition for user data and software

Components

A NEPI-enabled device provides the complete NEPI Engine suite of tools and applications. Most of these components can be enabled and disabled during installation, through system configuration, and many can also be started and stopped at run-time as needed.  This section provides an overview of NEPI Engine’s software components and source-code repositories.

NOTE: The source-code for each of these software components is available in the NEPI Engine GitHub repo. 

https://nepi.com/github/

Top-Level Repositories

NEPI Engine software components and source-code are organized across five top-level repositories described in the table below.

NEPI Top-Level Repositories
 Repo NameDescription
nepi_rootfs_toolsCollection of scripts and documentation for preparing a base system. This includes setting up for the NEPI fully redundant system image software update scheme and installing all dependencies (including platform-specific dependencies where applicable).
nepi_engine_wsSuperproject for primary NEPI Engine SDK, including sensor and motion control drivers, system configuration tools, ROS nodes and interfaces, and test-and-development utilities. This is the nuts-and-bolts of the NEPI Engine. Most of the operative code is distributed to Git submodules within this top-level repo.

Core Submodule Repositories

While most of the top-level repositories are self-contained, the “nepi_base_ws” repository contains the bulk of NEPI Engine’s capabilities organized in a number of functional submodule repositories describe in the table below.

nepi_base_ws Submodule Repositories
 Submodule Repo NameDescription
nepi_automation_mgrThis repository provides the nepi_automation_mgr ROS node and support files. The nepi_automation_mgr allows users to upload executables in the form of scripts (Python, Bash, etc.) or target-compiled binaries that can be started and stopped automatically on boot-up or at will via the NEPI ROS API.
nepi_edge_sdk_aiThis repository runs NEPI’s AI Model Management (AIM) system, which provides a framework for storing, connecting, and running AI models from an onboard AI model library, as well as publishing AIM results to downstream consumers like a NEPI automation script of connected control system. The AIM system manages which of the available AI models is active at a given time, which sensor stream is provided as input to the active model, and any additional parameters related to AI model execution.
nepi_edge_sdk_baseThis repository contains foundational NEPI Engine ROS and support modules. In particular, abstract base classes, ROS-independent “drivers”, full system and device command and control nodes, and anything that doesn’t serve a very specialized purpose in the NEPI edge ecosystem is included in this repository. Along with _nepi_ros_interfaces_, the present repository can be considered the foundation of the NEPI edge ecosystem, with most other submodules in the ecosystem relying heavily on this one.
nepi_edge_sdk_genicamThis repository hosts code and support files related to the NEPI integration of Video for Linux (genicam)-supported cameras.
nepi_edge_sdk_lsxThis repository hosts the NEPI LSX driver and ROS nodes to support autodetection, status, and controls for light and strobe systems with NEPI devices.
nepi_edge_sdk_nav_poseThis repository hosts the NEPI nav_pose_mgr ROS node to support GPS and IMU integration for NEPI devices. It also includes the submodule _num_gpsd_, which is a lightly modified GPSD fork to include some custom NMEA sentences and a GPSD-to-ROS bridge node to convert GPSD-served nav and pose to ROS topics and services.
nepi_edge_sdk_onvifThis repository hosts the NEPI ONVIF driver and ROS nodes to support autodetection, status, controls, and data streaming for ONVIF cameras with NEPI devices.
nepi_edge_sdk_ptxThis repository hosts the NEPI PTX driver and ROS nodes to support autodetection, status, controls, and data streaming for pan and tilt actuator systems with NEPI devices.
nepi_edge_sdk_v4l2This repository hosts the NEPI IDX driver and ROS nodes to support autodetection, status, controls, and data streaming for Video for Linux (v4l2)-supported cameras with NEPI devices.
nepi_link_ros_bridgeThis repository hosts code and support files for the nepi_link_ros_bridge node, which connects the nepi-bot on-device cloud interface with the rest of the NEPI ROS on-device infrastructure (by way of the _nepi_edge_sdk_link_ interface library). This allows ROS topics and services to become data sources for the cloud and to configure events and rates at which that cloud interface is enabled and executed.
nepi_ros_interfacesThis repository contains the public API for the NEPI ROS Interface. All NEPI-custom message and service definitions that are exposed to external applications are contained in this repo, along with ROS support files (e.g., rviz-config files).
zed-ros-wrapperThis repository includes StereoLab’s zed-ros-wrapper package that provides a ROS interface for ZED stereo camera systems. It outputs the camera’s left and right images, depth map, point cloud, pose information and supports the use of multiple ZED cameras.  It is used by NEPI’s IDX driver system to interface with ZED stereo camera systems.
nepi_ruiNode.js project for the browser-based, NEPI-device-hosted Resident User Interface for setup, configuration, and observation of NEPI-enabled devices.
nepi-botPython application for NEPI-device cloud/server connectivity, configuration, and control. The primitive interface to this application is fully file-based, but see nepi_edge_sdk_link for an alternative programmatic interface.
nepi_edge_sdk_linkC and Python library that allows on-device applications to configure and control nepi-bot. The NEPI Engine ROS interface to nepi-bot (nepi_link_ros_bridge) leverages this library, and custom applications can, too.

Operation

The NEPI on-device filesystems are structured to satisfy the following requirements across a wide swath of hardware architectures:

– Provide for arbitrarily large rootfs partitions by employing external media rootfs support when necessary, eliminating limitations imposed by small embedded storage

– Provide for easy over-the-air rootfs updates as complete system images

– Provide for redundant A/B rootfs with individual automatic fallback for a rootfs that fails to load properly

– Provide for easy on-device archiving of complete rootfs images for backup and mirroring to additional NEPI devices

While many hardware vendors provide product-specific software to achieve some or all of these requirements, NEPI takes a hardware-agnostic approach to maintain a consistent user experience across all NEPI-enabled hardware.

The NEPI rootfs structure involves 3 separate rootfs structures deployed to a device at any given time:

1) INIT rootfs: A bare-bones filesystem that is loaded first (somewhat akin to an initramfs, but consisting of a full O/S installation)

a) Primary responsibility is to check for existence of and hand over control to one of the “Main” rootfs according to user-specified configuration

b) In the event that the current configured Main rootfs fails to load properly, fallback to the backup rootfs after a configurable number of failed boot-up attempts

c) In the event that neither Main rootfs is bootable, provide users a minimal but usable workable system for additional debugging

d) Typical installation: < 8GB.

2) Main rootfs A: A complete NEPI system residing on a partition on user-configurable embedded or external storage media

a) Runs the full NEPI on-device software stack

b) Includes software provisions for over-the-air updates

c) Typical installation: 16-32GB

3) Main rootfs B: A second complete NEPI system residing on a partition on user-configurable embedded or external storage media; not necessarily the same media as Main rootfs A

a) Runs the full NEPI on-device software stack; not necessarily the same version or configuration as Main rootfs B

b) Includes software provisions for over-the-air updates

c) Typical installation: 16-32GB

Active and Inactive Main rootfs

At any given time one of the Main rootfs A/B is considered active and the other is considered inactive. The A and B designation is independent of the notion of active and inactive; A and B represent specific physical media partitions (typically fixed for the life of the device), while Active and Inactive represent a current configuration and routinely switch between A and B over the lifetime of the device as part of normal software updates.

The Init rootfs holds the config file that determines which of A or B is active at any given time. This config. file is stored on the Init rootfs at

/opt/nepi/nepi_rootfs_ab_custom_env.sh

At boot time, the Init rootfs reads nepi_rootfs_ab_custom_env.sh to determine which of A or B to mount and hand over control to.

The Init rootfs may automatically edit the nepi_rootfs_ab_custom_env.sh to swap Active and Inactive when boot failure for the current Active rootfs is detected over a consecutive (configurable) number of boot cycles. Under normal circumstances, users need only edit this file once during initial system bring-up.

Besides providing a fallback in case of failure, the Inactive rootfs plays two other significant roles:

– NEPI full system archive always archives the Inactive rootfs

– NEPI full system update always updates the Inactive rootfs, then automatically switches role of Active and Inactive for the next boot cycle

These are each required due to limitations in interacting at a binary image level with a running rootfs. Only the inactive rootfs can be reliably archived or overwritten while the system is running. In practice, this means that it is sometimes necessary for a user to swap the Active and Inactive rootfs configuration before performing an archive or update, depending on the desired end-state of the device. For example, to archive the current Active rootfs requires first making it the Inactive rootfs and rebooting, so that the desired file system is archived. Following that, another swap must occur to restore back to the desired Active rootfs. The NEPI RUI and ROS API provides an easy way to execute this swap.

Boot Sequence

The NEPI boot sequence is as shown in the following flowchart:
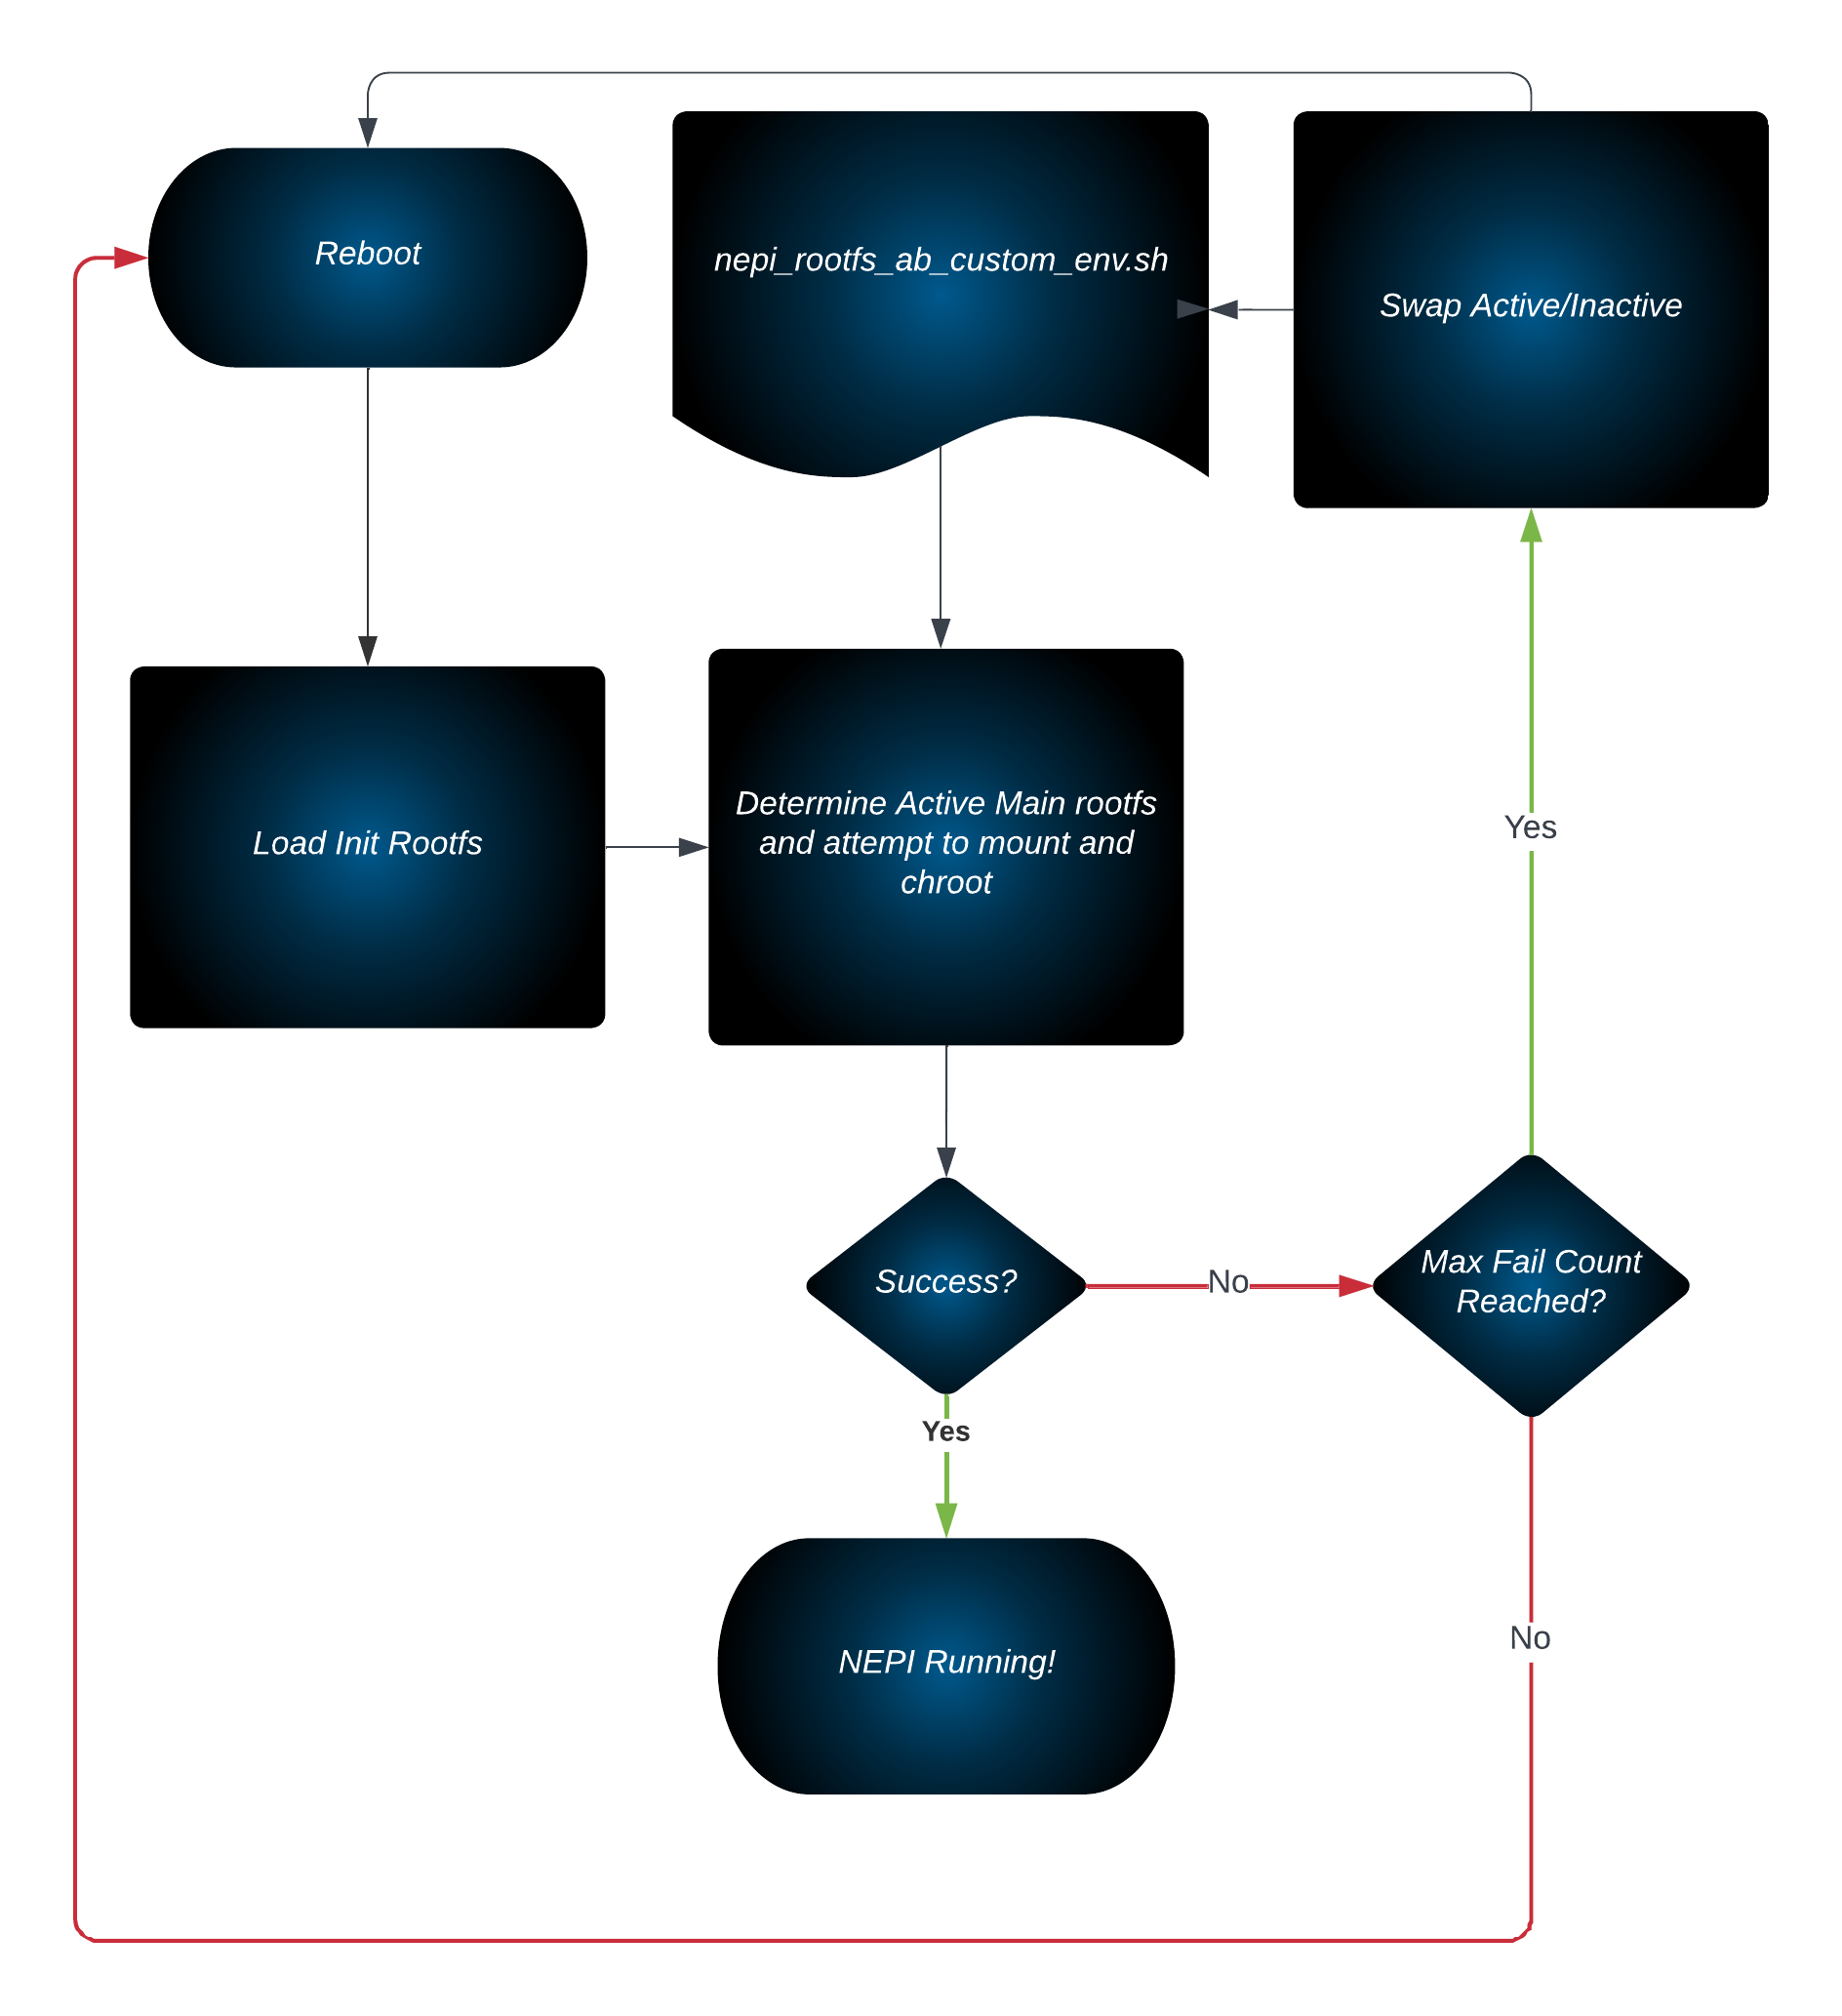
A diagram of a flowchart Description automatically generated Figure 1- NEPI Boot-up Flowchart

Note that at this time there is no automatic reboot as part of the boot-up sequence. In each case the user must perform a soft reboot or power cycle.

Installation

Installing From Source-Code

NEPI Engine software is available in source-code format, downloadable pre-built system images for select hardware platforms, and pre-installed hardware solutions from both Numurus and its edge-compute hardware partners. This document provides instructions for building NEPI Engine entirely from source. Use cases that would influence a source-code build over one of the alternative options include:

  1. Users may prefer complete control over system bring-up
  2. Users may be developing a NEPI solution on a hardware platform not currently supported by one of the other options.

For instructions on building and deploying NEPI Engine from source-code on new hardware, see the NEPI Engine – Source-Code Access, Build, and Installation Instructions at:

https://nepi.com/documentation/nepi-engine-source-code-build-and-installation/

Installing From Pre-Built Images

While the NEPI Engine software is available in source-code format and pre-installed hardware solutions from both Numurus and its edge-compute hardware partners, Numurus maintains NEPI ready software images for some of the leading edge-compute solutions on the market to further accelerate our customers’ journey and get them up and running in the least amount of time.

For instructions on downloading and installing NEPI Engine from pre-built images for supported hardware, see the NEPI Engine – Pre-Built Image Download and Installation instructions available at:

https://nepi.com/documentation/nepi-engine-pre-built-image-download-and-installation/

Updating, Backing Up, and Archiving Images

After initially preparing the device with Init, A, and B images, over-the-air full system rootfs image updates to the NEPI device are possible. NEPI includes a flexible system for updating, backing up, and cloning the NEPI Engine software system. Typical steps for a updating, backing up, and cloning complete system images are provided below. During the NEPI Engine boot process, the NEPI Engine init boot system mounts/connects to one of the two Root File System partitions (A or B) on your NEPI device’s SSD card. Only one of the Root File System partitions is mounted and active at any given time, allowing NEPI’s software management system to provide updating, backup, and cloning services on the inactive Root File System partition.

For instructions on updating, backing up, and archive NEPI Engine rootfs software images, see the NEPI Engine – Software Updating, Backup, and Cloning instructions at:

https://nepi.com/documentation/nepi-engine-software-updating-backup-and-cloning/

Customization and Compiling

The bulk of the NEPI software environment is contained in the nepi_base_ws submodules, that make up the NEPI Engine SDK, including sensor and motion control drivers, system configuration tools, ROS nodes and interfaces, and test-and-development utilities. This is the nuts-and-bolts of the NEPI Engine. Most of the operative code is distributed to Git submodules within this top-level repo. Other than changes to the NEPI RUI user interface system (nep_rui repo) and NEPI Connect communications system (nepi_bot and nepi_link_ros_brigde repos), the nepi_base_ws and its submodules is the core repository for NEPI software customization.

NOTE: For detailed examples of customizing the NEPI Engine software system,

see the tutorials in the NEPI Engine – NEPI Customization section at: 

https://nepi.com/tutorials/

NOTE: For instructions for customizing the NEPI RUI user interface system source-code, see the NEPI Engine – User Interface System developer’s guide located at:

https://nepi.com/documentation/nepi-engine-user-interface-system/

Software Setup

The following section assumes you have set up a NEPI ssh key on your PC and successfully connected to your NEPI device with an SSH connected terminal as described in NEPI Engine – Accessing the NEPI File System tutorial available at:

https://nepi.com/nepi-tutorials/nepi-engine-accessing-the-nepi-file-system/

Assuming you have set up an SSH alias as described during the SSH setup process, just open a terminal on your Linux PC connected to your NEPI device and type:

sshn

NOTE: Both Linux vi and nano editors are installed in the NEPI file system. While this document uses the vi editor in examples, some might find the nano editor easier to use.

Command Line Shortcut Aliases

If you would like to set up useful short cut commands for your NEPI device SSH terminal, do the following from an SSH connected terminal window:

sudo vi ~/.bash_aliases

then add any aliases to simplify your work.  The following aliases and source commands are pre-installed on most NEPI images:

alias rosstop=”sudo systemctl stop roslaunch”

alias rosstart=”sudo /opt/nepi/ros/etc/roslaunch.sh”

alias auto=”cd /mnt/nepi_storage/automation_scripts/”

alias data=”cd /mnt/nepi_storage/data/”

alias ai=”cd /mnt/nepi_storage/ai_models/”

alias src=”cd /mnt/nepi_storage/nepi_src/”

alias nfi=”cd /mnt/nepi_storage/nepi_full_img/”

alias nfia=”cd /mnt/nepi_storage/nepi_full_img_archive/”

alias nuid=”cd /opt/nepi/nepi_link/nepi-bot/devinfo/”

alias connect=”cd /opt/nepi/nepi_link/nepi-bot/lb/data/”

Clone, Build, Deploy, and Test Instructions

The bulk of the NEPI software environment is contained in the nepi_engine_ws repository and its submodules, which make up the NEPI Engine SDK, including sensor and motion control drivers, system configuration tools, ROS nodes and interfaces, web-based graphical interfaces, device-side NEPI Connect components, and test-and-development utilities. Collectively, this is the nuts-and-bolts of the NEPI Engine. Most of the operative code is distributed to Git submodules within the top-level nepi_engine_ws repo.

1) Clone The nepi_engine_ws Repository

a) On a Linux PC with Git installed, open a terminal window and enter the following commands to clone the latest nepi_engine_ws and submodule source-code from the development branch:

git clone git@github.com:nepi-engine/nepi_engine_ws.git
cd nepi_engine_ws
git checkout ros1_main
git submodule update --init --recursive

NOTE: If you are building or developing for a ROS2 system, replace ros1_main with ros2_main in the command above.

NOTE: Code modification intended to be merged upstream via pull request should proceed in a development branch, e.g., ros1_develop, so check out a develop branch in that case.

NOTE: If you just need to update to the latest code, use:

git pull
git submodule update --init

b) Leave this terminal window open for step 3 below.

NOTE:  Only the top-level repository has development branches, submodules only have a main/master branch.

NOTE: It is possible to clone source code repositories and do all development directly from the NEPI device filesystem, adapting these instructions as applicable. However, the recommended approach is to use a development PC to provide a more complete and customized development environment, then deploy your changes as described below in order to build/install/run nepi-engine from the NEPI device.

2) Edit The Source-Code <Optional, as Necessary>

a) On the Linux PC, open and modify any of the repo’s source-code or add new custom folders, files, and projects in the cloned NEPI Engine cloned source-code repo.

<Your Git Code Folder>/nepi_engine_ws/src/

b) Save any changes. 

3) Deploy the source code

a) Deploy the source code to the NEPI device using the deploy_nepi_engine_source.sh script in nepi_engine_ws.

./deploy_nepi_engine_source.sh

NOTE: The script relies on a collection of environment variables that must be set. You can find an example set of environment variables and values in the sample_deploy_env_vars.sh script in the same directory, which you can copy and edit for your custom setup and source, or simply add valid definitions for these environment variables directly to your ~/.bashrc.

sudo vi ~/.bash_aliases

NOTE: The deploy_nepi_engine_source.sh script is relevant even if you have cloned repos directly to the NEPI device, as it will

copy nepi_rui source code to the proper filesystem location.

b) Once these environment variables are properly configured, you can run the deploy script:

NOTE: you may get an error about the SSH key with some instructions on how to fix the issue the first time. Fix the error and try again.

c) The deploy script will copy all the file changes to your NEPI device’s nepi_src folder on the network shared user storage drive located at;

smb://192.168.179.103/nepi_storage/nepi_src

or accessed from within the NEPI device terminal (SSH or native) at:

/mnt/nepi_storage/nepi_src

4) Stop the nepi-engine ROS executables

To reduce processor load on the NEPI device before building, stop the nepi-engine ROS process.

a) Open a new SSH terminal to your NEPI device and type the following commands:

rosstop

NOTE: NEPI root default password is “nepi”

5) Update NEPI’s Clock

Before compiling the code in the next step, you need to make sure that your NEPI device’s clock is up to date using one of the two methods provided below:

a) Open the NEPI RUI on your PC and click the “Sync  Clock” button on the dashboard. 

b) Start an ntp server on your PC which will resync the NEPI clock every time you connect to the system.  NEPI automatically looks for an ntp server running at 192.168.179.5.  Set you network adapter for this IP address and run the following from a command line on your PC:

sudo apt install ntp

sudo systemctl restart ntp

NOTE: You can check that your NEPI device’s clock is up to date by opening an SSH terminal to the NEPI device and typing:

date

6) Compile And Deploy The Changes

a) Open an SSH terminal to your NEPI device and enter the following commands:

cd /mnt/nepi_storage/nepi_src/nepi_engine_ws

./nepi_engine_build_complete.sh

NOTE: This command will build and install all nepi-engine components (i.e., submodules of nepi_engine_ws). You can provide command line arguments to skip specific components. See the build script for details.

NOTE: The script will check that certain preconditions are met before building each component. If any of these checks fails, an error message and pointer to an appropriate README will be printed before moving on to the next component in the list.

NOTE: If the compilation process has errors, fix the errors in the code on your PC, the repeat step 2 to sync the code to your NEPI device, and run the catkin build command again.  Continue until your software builds without errors.

NOTE: After a first build, you may find it more efficient to build individual components that you are modifying. You can use the build script’s -s option to skip particular components, or refer to the specific build/install instructions for each component in its README file and run just the relevant commands.

b) The build script will install all components in the correct filesystem location (/opt/nepi), so following successful build there is nothing additional that you need to do.

7) Start ROS

In order for your changes to take effect, you need to restart NEPI Engine ROS components at the command line.  This process also has the added benefit of displaying NEPI env print and error statements real-time at the console for debugging an issue with your code updates.

a) Type the following commands:

rosstart

NOTE: NEPI root default password is “nepi”

Table of Contents