NEPI Engine – Imaging Sensors
Introduction
This tutorial covers connecting NEPI IDX driver supported imaging sensors to edge-compute hardware running NEPI Engine AI and automation software. NEPI’s IDX driver abstraction layer provides plug and play integration and common API interface for all connected 2D and 3D imaging devices, regardless of their native software interface, making downstream edge-processing applications easy to build, maintain, and reuse across all types of imaging sensor devices.
NOTE: For a list of NEPI IDX supported sensor interfaces and tested manufacturer hardware solutions, see the NEPI Hardware Driver Support tables available at: https://nepi.com/documentation/nepi-engine-hardware-driver-support-tables/
NOTE: For details on IDX driver supported controls and data streams, see the NEPI Engine – Hardware Interfacing Guide available at: https://nepi.com/documentation/
What you will need
1) 1x NEPI-enabled device. This tutorial uses an edge-compute processor box that includes an NVIDIA Jetson Xavier NX embedded GPU module with NEPI Engine software installed. (Optional) If you are connecting to your NEPI device through a NEPI configured access point, your NEPI device will also need Wi-Fi support.
NOTE: See available off-the-shelf NEPI enabled edge-compute options at: https://numurus.com/products-nepi-enabled-hardware/
2) 1x PC configured to access the NEPI device’s RUI browser-based interface and user storage drive. This tutorial uses a Windows 11 PC with built-in WiFi support.
3) 1x or more NEPI supported imaging sensors. This tutorial uses an USB3 2D camera, a USB3 Stereo Camera, and an ONVIF IP camera.
Hardware Setup
1) Connect a NEPI IDX driver supported camera to your NEPI device.
NOTE: Your camera may also require an additional PEO or custom external power supply.
2) Connect the NEPI device to your PC through a NEPI Wi-Fi access point set up on your device, or a wired Ethernet cable (this may require a switch if you are connecting an IP camera as well), then power your NEPI device.
NOTE: Instructions for configuration a PC and connecting to a NEPI device’s RUI and user storage drive are provided in the NEPI Engine Getting Started tutorial at: https://nepi.com/nepi-tutorials/nepi-engine-connecting-and-setup/

Camera Specific Software Setup
This section covers any special NEPI software setup requirements for different camera interface protocols:
Standard USB 2D Cameras
No special software setup required. 2D USB cameras will be auto-detected.
ONVIF USB 2D Cameras
Before NEPI can connect and configure the IDX interface for ONVIF cameras, you must first add the camera’s ONVIF access credentials (username & password) to the NEPI device’s ONVIF credentials database.
1) Add your ONVIF camera’s credentials by opening the NEPI device’s RUI APPLICATION/ONVIF tab, enter the credentials, then click the “Add” button.
ONVIF IP 2D Cameras
Before NEPI can connect and configure the IDX interface for ONVIF cameras, you must first add an IP address alias on the same subdomain as your camera, then add the camera’s ONVIF access credentials (port, username, & password) to the NEPI device’s ONVIF credentials database.
1) Add an IP address alias by opening the NEPI device’s RUI SYSTEM/ADMIN page enter the IP address and netmask you want to add, then click the “Add” button.
2) Add your ONVIF camera’s credentials to your NEPI device’s by opening the NEPI device’s RUI APPLICATIONS/ONVIF tab, enter the credentials, then click the “Add” button.
NOTE: Some cameras use a custom configuration file and must use a specific
“basename” when entering the details above. These include:
e-con Systems’ RouteCam: use “econ_routecam” basename
GenICam IP 2D Cameras
Before NEPI can connect and configure the IDX interface for GenICam cameras, you must first add an IP address alias on the same subdomain as your camera.
1) Add an IP address alias by opening the NEPI device’s RUI SYSTEM/ADMIN page enter the IP address and netmask you want to add, then click the “Add” button.
ZED USB 3D Cameras
While NEPI’s IDX driver system can autodetect StereoLab ZED stereo cameras, the driver requires that a calibration file for your camera is installed on your NEPI device in order to connect. There are two options for installing the calibration file:
1) NEPI will automatically download the calibration file from the StereoLab website when the camera is connected and your NEPI device is connected to the internet. Before plugging in your ZED camera, open your NEPI device’s RUI SYSTEM/ADMIN tab and either connect your NEPI device to an Ethernet enabled switch and enable DHCP, or connect to an internet supported WiFi network. Wait for the “Internet Connected” icon at the top of the page to turn Green, then connect your ZED camera.
2) Manually download your camera’s calibration file from the StereoLab website, or create your own custom calibration file, and copy it to your NEPI device’s file system folder at
/usr/local/zed/settings/
then plug your camera in.
After the NEPI IDX driver connects to your camera and configures the interface, you should see a blue LED light on the front of your camera.
Instructions
1)If you are connecting an Ethernet IP interfaced camera, add an IP address alias, on the same subnet as your camera, to your NEPI device’s network configuration by opening the NEPI device’s RUI SYSTEM/ADMIN tab and adding a different IP address value on the same submask as your device. After accepting the new IP alias, you will see it appear in the “Device IP Addresses” List above the entry box.
NOTE: If your camera is not connected over Ethernet, you can skip this step.
Example: If you are using an Ethernet IP interfaced camera that has a factory set IP address of 192.168.0.150 with netmask 255.255.255.0 (24 in short form), you could add 192.168.0.103/24 to your NEPI device’s Ethernet aliases. 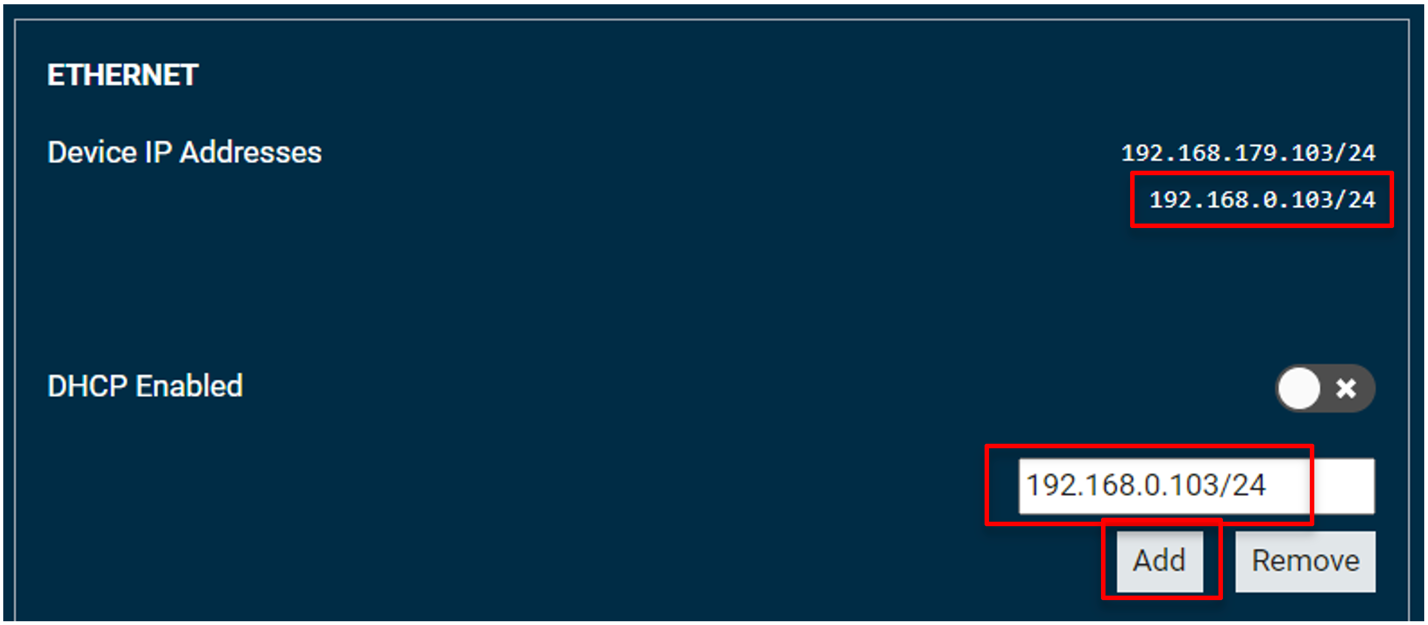
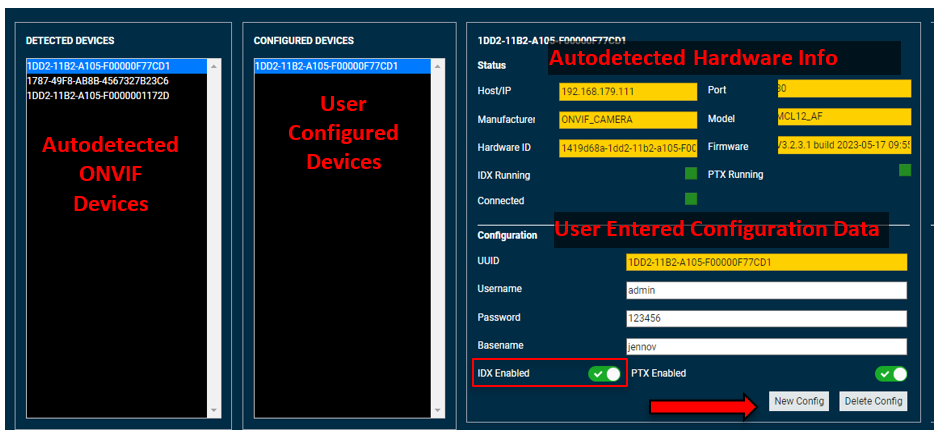
2) If you are connecting an ONVIF camera, configure the devices ONVIF configuration and credentials by opening the NEPI device’s RUI SYSTEM/ONVIF tab and adding configuration and access credentials for any autodetect ONVIF devices you want to connect to.
NOTE: If your camera is not an ONVIF camera, you can skip this step.
NOTE: In order for NEPI to autodetect your ONVIF device and attempt to login with your provided credentials, you must first add an Ethernet IP address alias on the same subdomain as your ONVIF device using the “Add” IP address button on the NEPI device’s RUI SYSTEM/ADMIN tab.
NOTE: NEPI supports both imaging sensor (NEPI IDX Drivers) and/or pan tilt actuator (NEPI PTX Drivers) ONVIF interfaces. You must select one or both of the options for your device, depending on what the hardware supports.
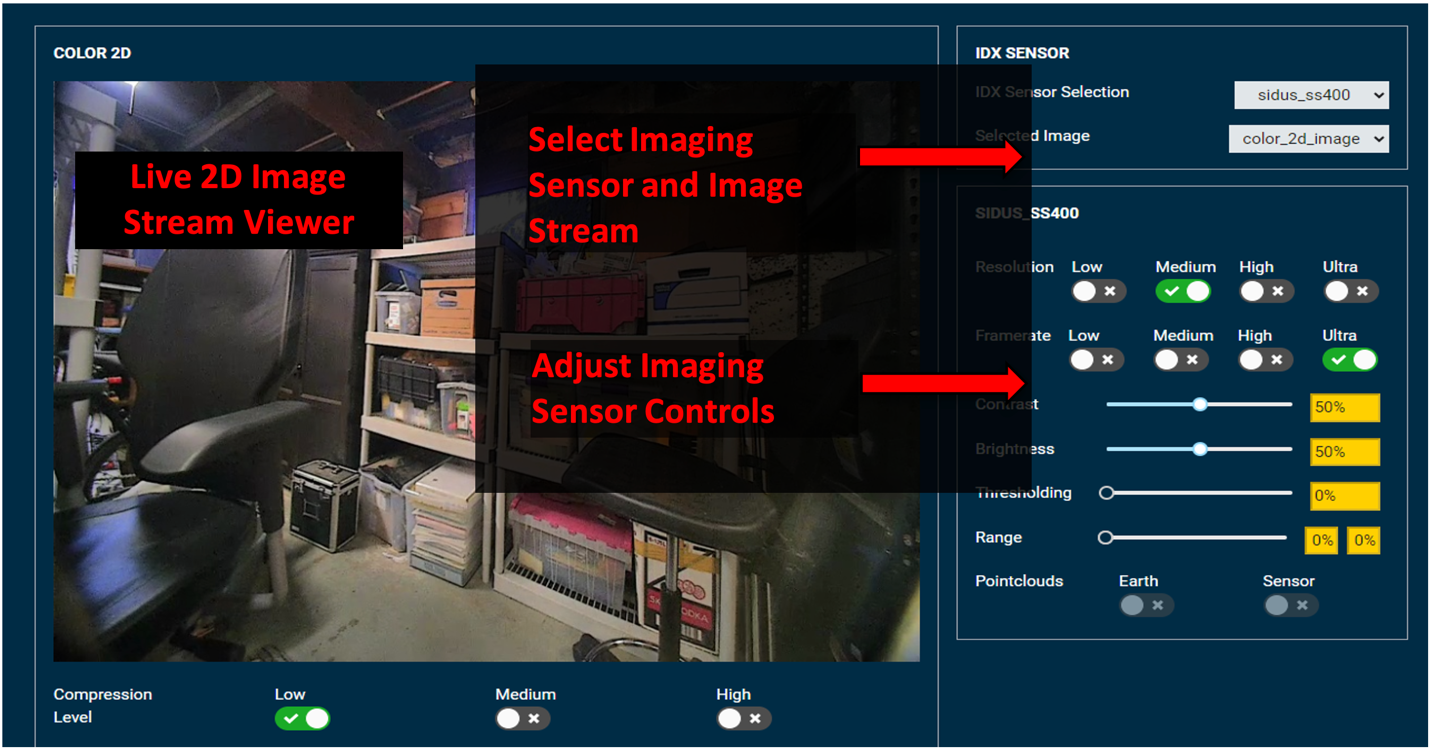
3) Open the NEPI device’s RUI SENSORS/IMAGING tab, select each of your cameras from the dropdown box, and configure any settings you want to adjust.
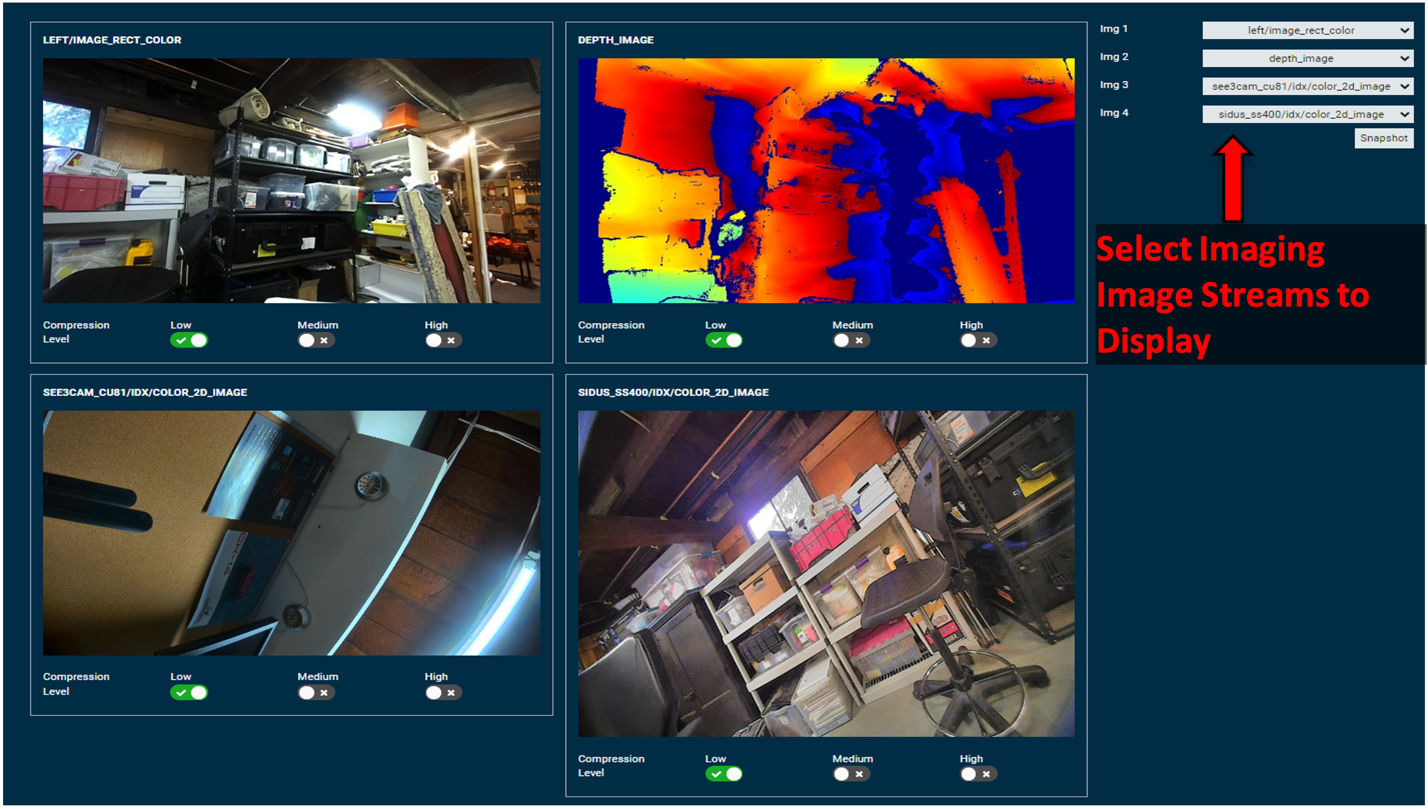
4) View camera output streams simultaneously using the RUI’s APPLICATIONS/IMAGE VIEWER tab by selecting the onboard image topics you want to have shown in each box.
5) If you want to save these cameras settings, go to the RUI’s SYSTEM/ADMIN tab and select the “Save” button.
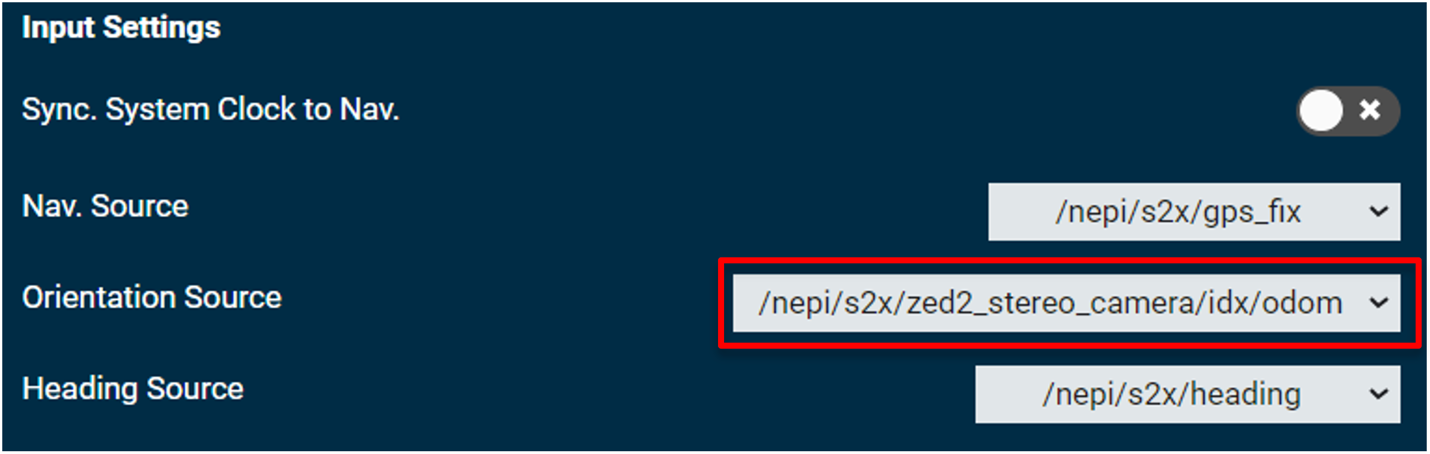
NavPose Configuration
If your imaging sensor hardware provides any navigation or orientation data streams, you can connect them to your NEPI device’s NavPose solution by opening the NEPI device’s RUI’s SENSORS/NAVPOSE tab and selecting the IDX device’s orientation and heading output streams.

Saving Data
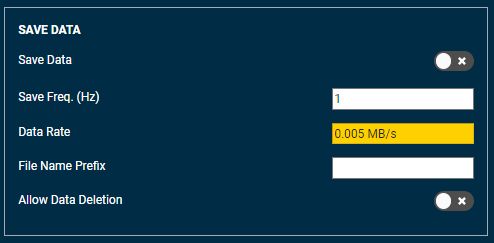
NEPI’s Data Management System provides built-in functionality for saving various types of data in standardized formats to a NEPI device’s on-board user storage drive. Data saving is managed by three controls: a start/stop saving signal, a save rate setting, and a save prefix setting. While these controls can be set for each data source separately through automation scripts, this tutorial leverages the NEPI device’s RUI interface.
1) On your PC, open your NEPI device’s RUI “DASHBOARD” tab and navigate to the “SAVE DATA” section of the page.
2) Access saved data by opening the “data” folder on you NEPI device’s user storage drive located at: \\192.168.179.103\nepi_storage\data
For more details on saving and accessing data on your NEPI device, see the NEPI Engine – Getting Started tutorial “Saving and Accessing Data” available at: https://nepi.com/nepi-tutorials/nepi-engine-saving-and-accessing-data/