NEPI Engine – Pan and Tilt Actuators
Introduction
This tutorial covers connecting NEPI PTX driver supported pan and tilt actuators to edge-compute hardware running NEPI Engine AI and automation software. NEPI’s PTX driver abstraction layer provides plug and play integration and common API interface for all connected pan and tilt actuator systems, regardless of their native interface, making setup, control, feedback, and automation processes easy to build, maintain, and reuse across all types of solution platforms.
NOTE: For a list of NEPI PTX supported pan and tilt interfaces and tested manufacturer hardware solutions, see the NEPI Hardware Driver Support tables available at: https://nepi.com/documentation/nepi-engine-hardware-driver-support-tables/
NOTE: For details on PTX driver supported controls and data streams, see the NEPI Engine – Hardware Interfacing Guide available at: https://nepi.com/documentation/
What you will need
1) 1x NEPI-enabled device. This tutorial uses an edge-compute processor box that includes an NVIDIA Jetson Xavier NX embedded GPU module with NEPI Engine software installed.
NOTE: See available off-the-shelf NEPI enabled edge-compute options at: https://numurus.com/products-nepi-enabled-hardware/
2) 1x PC configured to access the NEPI device’s RUI browser-based interface and user storage drive. This tutorial uses a Windows 11 PC with GigE USB Ethernet adapter.
3) 1x NEPI PTX supported Pan and Tilt actuator. This tutorial uses an Iquotient Robotics USB pan and tilt system.
4) 1x NEPI IDX supported imaging sensor. This tutorial uses a NEXIGO USB webcam.
Hardware Setup
1) Connect a NEPI PTX driver supported pan and tilt actuator, and a NEPI IDX driver supported pan & tilt to your NEPI device.
2) Connect the NEPI device to your PC through a NEPI Wi-Fi access point set up on your device, or a wired Ethernet cable (this may require a switch if you are connecting an IP pan & tilt as well), then power your NEPI device.
NOTE: Instructions for configuration a PC and connecting to a NEPI device’s RUI and user storage drive are provided in the NEPI Engine Getting Started tutorial at: https://nepi.com/nepi-tutorials/nepi-engine-connecting-and-setup/

Pan & Tilt Specific Software Setup
This section covers any special NEPI software setup requirements for different pan & tilt interface protocols:
IRQ USB Pan & Tilt
No special software setup required. Pan and tilt will be auto-detected.
ONVIF USB Pan & Tilt
Before NEPI can connect and configure the IDX interface for ONVIF pan & tilts, you must first add the pan & tilt’s ONVIF access credentials (username & password) to the NEPI device’s ONVIF credentials database.
1) Add your ONVIF pan & tilt’s credentials by opening the NEPI device’s RUI SYSTEM/ONVIF tab, enter the credentials, then click the “Add” button.
ONVIF IP Pan & Tilts
Before NEPI can connect and configure the IDX interface for ONVIF pan & tilts, you must first add an IP address alias on the same subdomain as your pan & tilt, then add the pan & tilt’s ONVIF access credentials (port, username, & password) to the NEPI device’s ONVIF credentials database.
1) Add an IP address alias by opening the NEPI device’s RUI SYSTEM/ADMIN page enter the IP address and netmask you want to add, then click the “Add” button.
2) Add your ONVIF pan & tilt’s credentials to your NEPI device’s by opening the NEPI device’s RUI SYSTEM/ONVIF tab, enter the credentials, then click the “Add” button.
Instructions
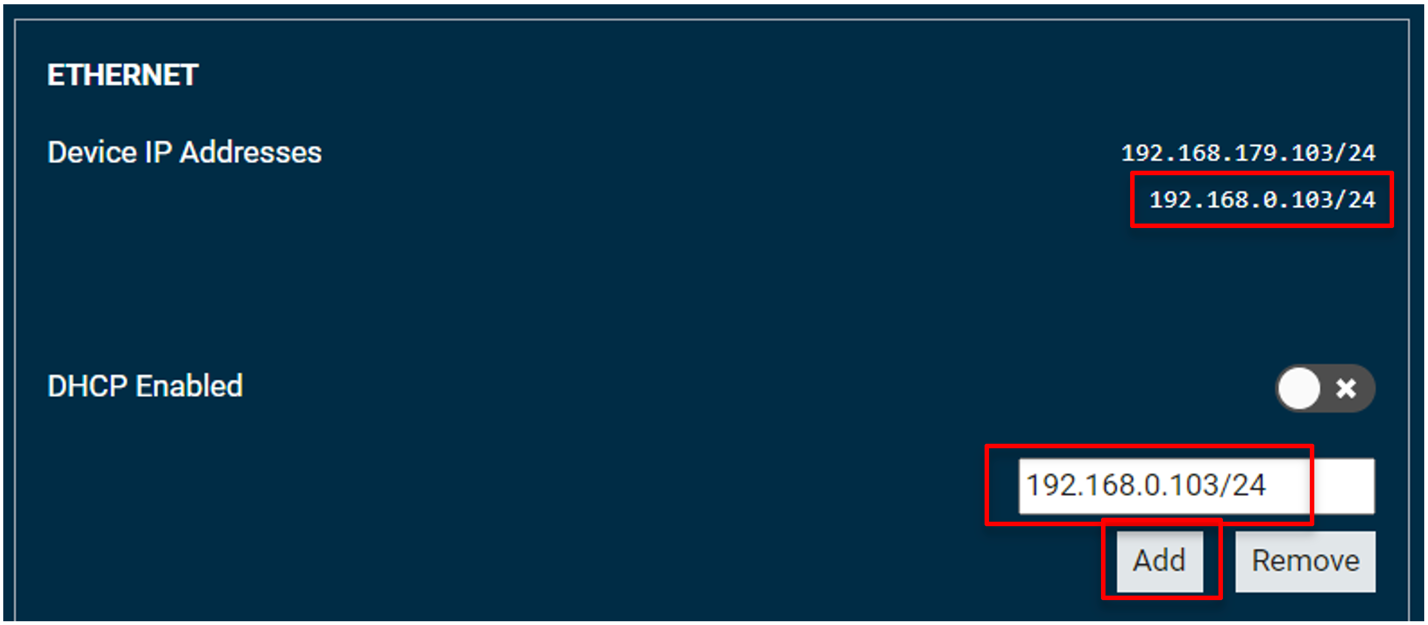
1) If you are connecting an Ethernet IP interfaced pan and tilt system, add an IP address alias, on the same subnet as your pan and tilt system, to your NEPI device’s network configuration by opening the NEPI device’s RUI SYSTEM/ADMIN tab and adding a different IP address value on the same submask as your device. After accepting the new IP alias, you will see it appear in the “Device IP Addresses” List above the entry box.
NOTE: If your camera is not connected over Ethernet, you can skip this step.
Example: If you are using an Ethernet IP interfaced pan and tilt that has a factory set IP address of 192.168.0.150 with netmask 255.255.255.0 (24 in short form), you could add 192.168.0.103/24 to your NEPI device’s Ethernet aliases.
2) If you are connecting an ONVIF pan tilt system, configure the devices ONVIF configuration and credentials by opening the NEPI device’s RUI SYSTEM/ONVIF tab and adding configuration and access credentials for any autodetect ONVIF devices you want to connect to.
NOTE: If your pan tilt system is not an ONVIF camera, you can skip this step.
NOTE: In order for NEPI to autodetect your ONVIF device and attempt to login with your provided credentials, you must first add an Ethernet IP address alias on the same subdomain as your ONVIF device using the “Add” IP address button on the NEPI device’s RUI SYSTEM/ADMIN tab.
NOTE: NEPI supports both imaging sensor (NEPI IDX drivers) and/or pan tilt actuator (NEPI PTX drivers) ONVIF interfaces. You must select one or both of the options for your device, depending on what the hardware supports.

3) Open the NEPI RUI’s CONTROLS/PANTILT tab and select the pan and tilt unit to control along with the camera’s image stream. Adjust the pan and tilt position controls and monitor the pan and tilt feedback along with the camera’s image stream while the system is moving.

NOTE: If your pan and tilt device does not support position feedback, the position controls will be grayed out and only the manual “Jog” controls will be available.
NavPose Configuration
If your pan and tilt hardware supports position feedback, you can connect them to your NEPI device’s NavPose solution by opening the NEPI device’s RUI’s SENSORS/NAVPOSE tab and selecting the PTX device’s orientation and heading output streams.

