NEPI Engine – Robotic Control Systems
Introduction
This tutorial covers connecting NEPI RBX driver supported robotic control systems to edge-compute hardware running NEPI Engine AI and automation software. NEPI’s RBX driver abstraction layer provides plug and play integration and a common API interface for all connected robotic control systems, regardless of their native interface, making setup, control, feedback, and automation processes easy to build, maintain, and reuse across all types of solution platforms.
Ardupilot Control Systems
This section covers connecting and controlling a robotic autopilot controller running Ardupilot software to a NEPI enabled hardware platform through NEPI’s RBX driver system.
What you will need
1) 1x NEPI-enabled device. This tutorial uses an edge-compute processor box that includes an NVIDIA Jetson Xavier NX embedded GPU module with NEPI Engine software installed.
NOTE: See available off-the-shelf NEPI enabled edge-compute options at: https://numurus.com/products-nepi-enabled-hardware/
2) 1x PC with internet access and configured to access the NEPI device’s RUI browser-based interface and user storage drive. This tutorial uses a Windows 11 PC and a USB GigE Ethernet adapter and Ethernet cable.
NOTE: Instructions for configuration a PC and connecting to a NEPI device’s RUI and user storage drive are provided in the NEPI Engine Getting Started tutorials at:
https://nepi.com/nepi-tutorials/nepi-engine-connecting-and-setup/
https://nepi.com/nepi-tutorials/nepi-engine-user-storage-drive/
3) 1x Pixhawk autopilot system (This tutorial uses a Pixhawk px4)
4) 1x (Optional) Quadcopter drone platform and GPS (This tutorial uses a HAWK’S WORK F450 Drone Kit)
5) 1x NEPI IDX supported 2D camera (This tutorial uses a USB webcam mounted on the drone)
6) 1x Micro USB to USB A cable for connecting your Pixhawk to your PC
7) 1x Pixhawk TELEM to NEPI-Device adapter cable. This could be a USB to Pixhawk or UART Pin to Pixhawk adapter cable.
Hardware Setup
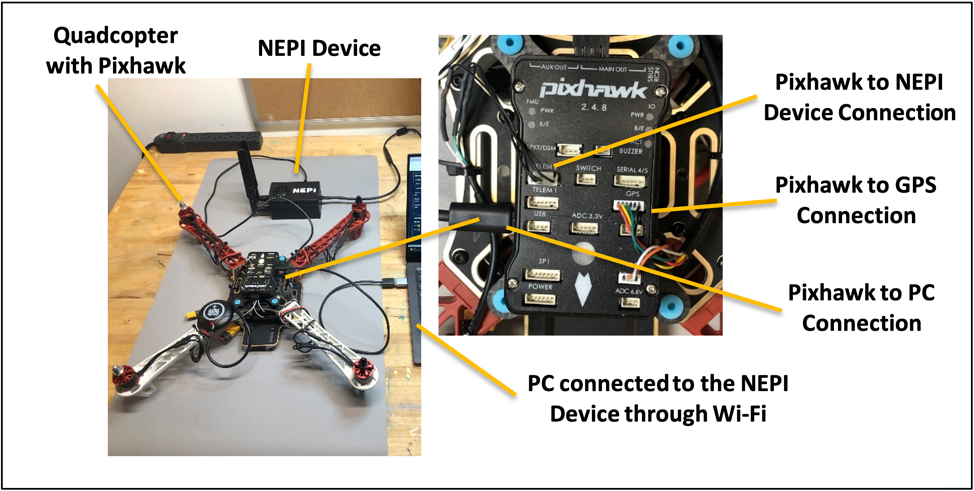
1) Connect your NEPI-enabled device to the Pixhawk’s TELEM1 (or TELEM2) port using the USB to Serial Pixhawk adapter cable. Plug your GPS module into the Pixhawk’s GPS1 port.
2) Power on all devices
3) Connect your PC to your NEPI device through a wired Ethernet connection or a NEPI Wi-Fi access point you have configured on your NEPI device.

Software Setup
Ardupilot Software Setup
This tutorial assumes you have already configured your ardupilot for NEPI’s RBX ardupilot driver communications. For detailed instructions on this process, see the NEPI Engine – Ardupilot Control System Interfacing Guide available at: https://nepi.com/documentation/
NEPI RBX Ardupilot Driver Setup
This tutorial will be using NEPI’s built-in Automation application, along with a NEPI RBX automation driver script. For detailed instructions on installing and running NEPI automation scripts using NEPI’s built-in Automation application, see the NEPI Engine tutorial available at: https://nepi.com/nepi-tutorials/nepi-engine-automation/
1) Download the “ardupilot_rbx_driver_script.py” NEPI automation script from the NEPI sample automation scripts GitHub repo at: https://github.com/numurus-nepi/nepi_sample_auto_scripts
2) Open a File Manager application on your PC and copy the automation scripts to your NEPI device’s automation script library on the NEPI device’s user storage drive located at: \\192.168.179.103\nepi_storage\automation_scripts
3) Start the ardupilot RBX driver script by opening your NEPI device’s RUI APPLICATIONS/AUTOMATION tab, select the “ardupilot_rbx_driver_script.py” from the list on the left panel, then hit the “Start” at the bottom left of the page. This script will autodetect your NEPI RBX configured ardupilot system and setup all the RBX status, settings, and control interfaces for the device.
Connecting Ardupilot NavPose Data
The NEPI RBX ardupilot driver creates navigation and position data streams you can connect to your NEPI-enabled device’s internal NavPose data solution.
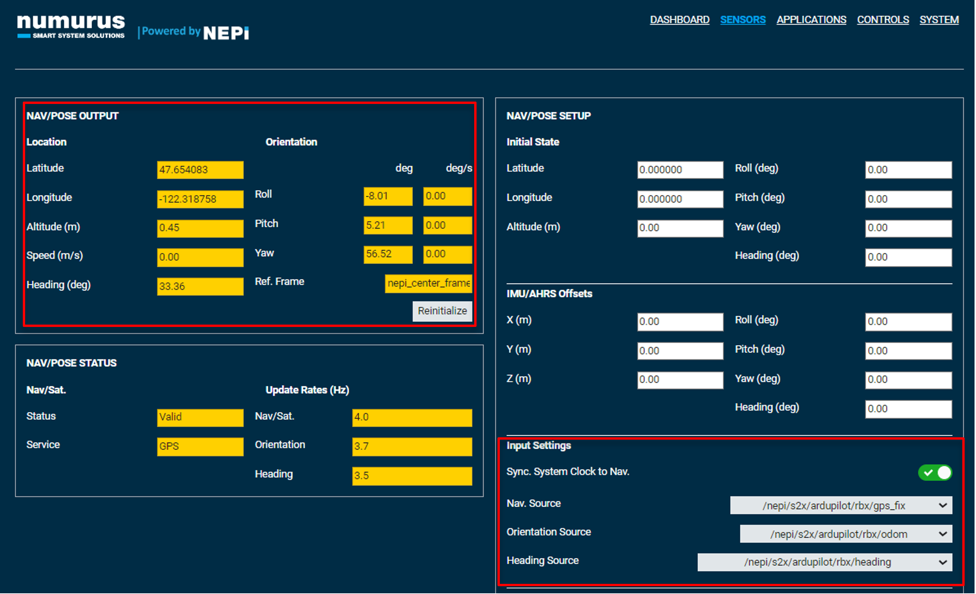
1) Open the NEPI device’s RUI interface and navigate to the RUI SENSORS/NAVPOSE tab
2) In the “Input Settings” pane,
a) select the “Sync. System Clock to Nav” button if you want to sync your NEPI device’s clock to the ardupilot GPS clock value.
b) select the rbx driver produced Nav, Orientation, and Heading sources you want to connect to NEPI’s NavPose solution.
NOTE: If you don’t have a GPS with a satellite fix, your Latitude and Longitude will be 0.
3) Wait until NAV/POSE Output data start displaying and updating from the Pixhawk module.
4) You can save these settings by going to the NEPI RUI SYSTEM/Admin tab and clicking on the “Save” button.

Monitoring the Ardupilot System
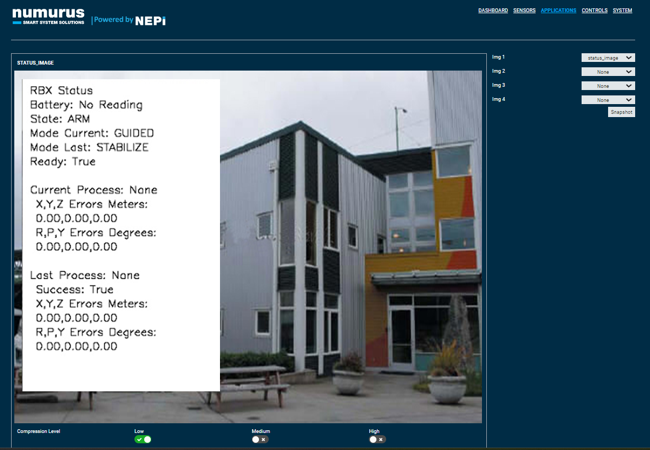
RBX drivers publish an image that overlays important status and process information on top of the robots main camera image stream, or a black image if no camera is available. This image is published on the RBX topic:
<Your NEPI Device Basename>/ardupilot/rbx/status_image
Example:
/nepi/s2x/ardupilot/rbx/status_image
You can view this status overlayed image using the NEPI Image Viewer Application, by opening the RUI APPLICATIONS/IMAGE VIEWER tab and selecting the “status_image” from one of the dropdown boxes.

Controlling the Ardupilot System
All RBX drivers support a common set of ROS status, settings, and command control topics that provide a complete set of tools for monitoring and controlling the ardupilot through NEPI automation scripts. For details on the supported RBX ardupilot driver’s ROS command control interfaces and example ardupilot automation scripts, see the NEPI Engine “Ardupilot Control Systems” interfacing guide at: https://nepi.com/documentation/
For additional examples of ardupilot automation solution examples, see the NEPI Engine “Drone Automation” tutorial available at: https://nepi.com/tutorials/

