NEPI Engine – Customizing the NEPI File System
Introduction
This tutorial will walk you through customization of the NEPI Engine File System that would be useful for NEPI developers.
What you will need:
1) 1x NEPI-enabled device with internet access. This tutorial uses an edge-compute processor box that includes an NVIDIA Jetson Xavier NX embedded GPU with NEPI Engine software installed.
NOTE: See available off-the-shelf NEPI enabled edge-compute options at: https://numurus.com/products-nepi-enabled-hardware/
2) 1x PC with internet access and configured to access the NEPI device’s File System.
NOTE: This tutorial assumes you have already cloned and built the NEPI File System repo as explained in the following tutorial:
https://nepi.com/nepi-tutorials/nepi-engine-building-from-source-code/
Testing and Fixing File System Errors
!!! This step should be done on your LINUX PC
Open and refresh the NEPI RUI and test that the system and any expected updates are working
Updating Python Files with SFTP
While any cpp based file changes will require a full deploy/build to apply, since python files are not compiled, it is sometimes helpful to just replace them on the NEPI file system while debugging an python script.
From a terminal window on your Linux PC opened in the source folder you want to update from, type:
sftpn
then navigate to the appropriate location on your NEPI device’s file system.
NOTE: While the ‘sftpn’ function will log in at the nepi home folder, their are a number of specific sftp shortcuts that will log in to a specific folder on the device, making it easier to ‘get’ ‘put’ files located in common NEPI folders. A few of these are listed below:
- Common NEPI User Driver Folders
cfg = /mnt/nepi_storage/user_cfgai = /mnt/nepi_storage/ai_modelsauto = /mnt/nepi_storage/automation_scriptsdata = /mnt/nepi_storage/datainstalls = /mnt/nepi_storage/installssrc = /mnt/nepi_storage/nepi_srctmp = /mnt/nepi_storage/tmpuser = /mnt/nepi_storage/user_cfg- Common Nepi File System Folders
aifs = /opt/nepi/ros/share/nepi_aifsapi = /opt/nepi/ros/lib/python3/dist-packages/nepi_apiapps = /opt/nepi/ros/share/nepi_appsdrivers = /opt/nepi/ros/lib/nepi_driversetc = /opt/nepi/ros/etclib = /opt/nepi/ros/libmanagers = /opt/nepi/ros/lib/nepi_managersros = /opt/nepi/rosnfi = /mnt/nepi_storage/nepi_full_imgnfia = /mnt/nepi_storage/nepi_full_img_archivepython = /opt/nepi/ros/lib/python3/dist-packages/rui = /opt/nepi/nepi_rui/src/rui_webserver/rui-app/srcsdk = /opt/nepi/ros/lib/python3/dist-packages/nepi_sdkOnce you are in the folder with the file(s) you want to update, just type:
put YOUR_FILENAME
or to upload all files from your current folder
put *
Then just call ‘nepistop’ and ‘nepistart’ from an ssh session to see your changes run.
Customizing NEPI System Configuration
While most NEPI Engine settings are configurable through the RUI, API calls, and user config files, there are some low-level configuration items like serial number, logos, and SSH keys that require changes at the file system level using SSH access. The following sections assume you have set up and tested your SSH access as described in the “Accessing the NEPI File System” tutorial.
Assuming you have set up an SSH alias as described during the SSH setup process, just open a terminal on your Linux connected PC and type:
sshn
NOTE: Both Linux vi and nano editors are installed in the NEPI file system. While this document uses the vi editor in examples, some might find the nano editor easier to use.
Change Serial Number
If you would like to give your NEPI device a unique serial number and device name, do the following from an SSH connected terminal window:
vi /opt/nepi/sys_env.bash
Then edit the value next to the “DEVICE_SN=” entry.
Change System Base IP Address
While NEPI Engine allows adding additional IP address aliases that make it easy to integrate a NEPI-enabled device into an existing local area network (LAN), the system’s factory base IP address (192.168.179.103) is only changeable through file system configuration editing. If you plan to connect multiple NEPI-enabled devices to the same LAN, you will need to make sure that they each have a unique Base IP Address. Once changed, you will need to remember this address to access your system, so it is recommended that you:
NOTE: use an IP address close to the original one such as (192.168.179.104) making it easier to remember as well as search for the system in a block of IP addresses if you forget the new value
To change your NEPI system’s base IP address, you will need to do the following from a ssh connected terminal window and edit the “address” value in the file:
vi /etc/network/interfaces.d/nepi_static_ip
Change NEPI CONNECT Configuration
If you plan to use your NEPI-enabled device to upload data and download software to a remote server running Numurus’ NEPI Connect software you may need to modify some of you NEPI device’s NEPI Connect configuration files.
1) Check that your NEPI device has a valid NEPI Connect Unique NEPI ID (NUID) and public SSH key in the “NEPI CONNECT” box on the device’s RUI APPLICATIONS/CONNECT tab as shown below.
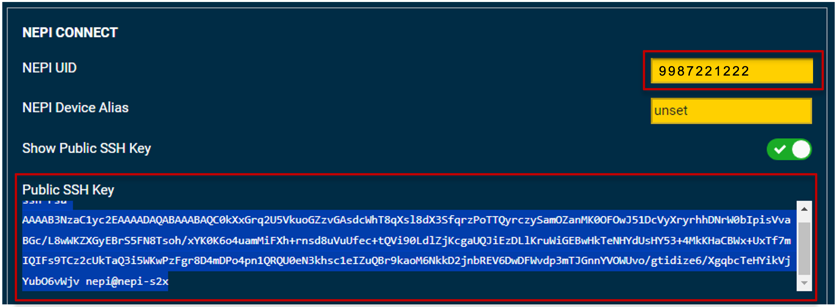
If your 10 digit NUID is set to “9999999999” and/or the Public SSH Key box is empty, your system has not yet been configured for NEPI Connect communications. If this is the case, use the following instructions to set up the NEPI Connect credentials on your device:
If you need to configure a NEPI NUID and NEPI Connect public SSH key, use the instruction below to create or update them:
a) Run the NEPI Connect identity application
cd /opt/nepi/nepi_link/nepi-bot/devinfo
python3 change_identity.py -n <Your 10 digit NUID>
For security reasons, it is recommended that you use some random number generator to generate a random 10 digit NUID value. For example:
python3 change_identity.py -n 3989789099
b) Press enter twice to skip a passphrase and (optional) press p to display the key in the terminal.
c) After rebooting your NEPI device the new NUID and public SSH key you just created should now be visible in the RUI APPLICATIONS/CONNECT tab.
2) The internet address NEPI devices try to connect to during a NEPI Connect connection process is set in a configuration file on the device’s NEPI file system. The default NEPI Connect server address set on new installation’s is to a Numurus hosted NEPI Connect installation at address nepi.io. If you are connecting to a NEPI Connect installation at another internet location, you will need to use the following instructions to change that location on your device:
a) Open NEPI Engine’s “NEPI bot” config file and edit the NEPI Connect installation location using the following commands:
cd /opt/nepi/nepi_link/nepi-bot/cfg/bot
nano config.json
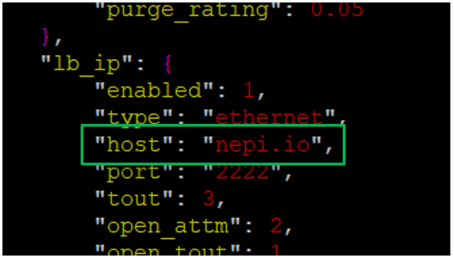
b) Then edit the “host” address value under the NEPI Link communications type(s) you plan to use.
Example: If you are connecting using an IP communications gateway (Ethernet, WiFi, Cellular…) you would edit the “host” ip location under the “lb_ip” address driver configuration. This could be either an intent domain name like “nepi.io” or a numeric IP address like “44.229.9.192”.
c) After rebooting your NEPI device will use these new NEPI Connect location values.
Configuring NEPI’s ROS Launch File
During the NEPI Engine boot process, all ROS nodes are started from the “nepi_base.launch” file. You can edit this file by typing:
<Your Git Code Folder>/nepi_base_ws/src/nepi_edge_sdk_base/launch
vi nepi_base.launch