NEPI Engine – Training Custom AI Detection Models
Introduction
This tutorial covers the process of creating and deploying custom AI models on a NEPI enabled edge-compute hardware platform. In this tutorial we will be using supervised learning AI model training techniques, which require a human to manually select target object(s) in collected images to train our model to detect using available image labeling software which will create a target meta data file for each of our images that gets feed into the AI model training software.
While you can and may prefer to use a dedicated GPU enabled PC for some of the steps in this tutorial to achieve faster model training times, your NEPI device includes all the software tools used in this tutorial, making it easy to get started.
By the end of this tutorial, you will see how to create, deploy, and test your AI model on an NEPI enabled edge-hardware platform using NEPI’s AI Management system and NEPI’s built-in AI RUI application for orchestrating and running your model.
For more information on NEPI’s AI Management system and supported NEPI AI frameworks see the NEPI Engine – Developers Manual “AI Management System” available at: https://nepi.com/documentation/nepi-engine-ai-management-system/
NOTE: This tutorial only covers AI training at a high-level and focused on the process of training an AI model, not the science behind AI model training and all the decisions made during the process. There are many great resources on the internet that discuss this topic in more detail. The article in the link below is good place to start learning more about AI model training: https://research.aimultiple.com/ai-training/
The AI Model Development Process
Creating custom AI models is a straightforward process that includes collecting data, labeling data, creating training data sets, training the model, then deploying and testing it on your NEPI device. This tutorial covers each of these steps in detail.

NOTE: While this tutorial uses camera image data and a physical object as the target to detect, this same process can be applied for any type of image data in which you want to detect some object or feature in, such as an AI model trained on NDT acoustic phased array sensor data that you want to automatically detect defects in welds.
Tutorial AI Model Goal Details
For this tutorial, our goal is to use supervised machine learning techniques to train an AI model that can detect two specific standard light bulbs located on a specific work bench operational environment. The use case application for this model is integration into a larger system solution able to autonomously grab and place the target objects using an autonomous robotic arm.
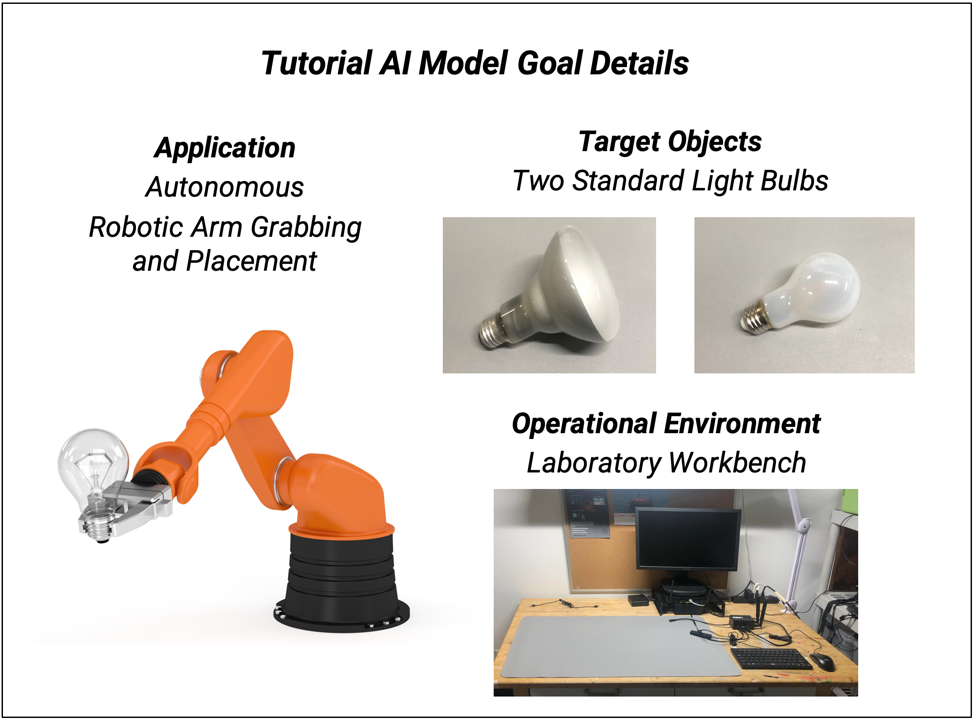
NOTE: In case you just want to try training your own model without all the work collecting and labeling data, you can download all the complete set of target image and bounding box meta data files created for this tutorial along with any custom python scripts used, and the finished model at: https://www.dropbox.com/scl/fo/85klc2ii66vstbiacd6tr/h?rlkey=dziog9gex8uds2cvzcxqq8mgb&dl=0
What you will need
1) 1x NEPI-enabled device with internet access. This tutorial uses an edge-compute processor box that includes an NVIDIA Jetson Xavier NX embedded GPU with NEPI Engine software installed.
NOTE: See available off-the-shelf NEPI enabled edge-compute options at:
NOTE: If you plan to use your NEPI device for the Image Labeling and AI Model Training portions of this tutorial, you will also need 1x USB keyboard, 1x USB mouse, and 1x HDMUI display to connect to your NEPI device.
NOTE: In this tutorial, the NEPI device is used for each stage of the AI model development process including data collection, image labeling, training set creation, model training, and deployment. If you are planning to use a more powerful processor for AI model training portion, or any other steps, you will need 1x PC with an integrated GPU running Ubuntu operating system and internet access.
2) 1x PC with internet access and configured to access the NEPI device’s RUI browser-based interface and user storage drive. This tutorial uses a Windows 11 PC and a USB GigE Ethernet adapter and Ethernet cable.
3) 1x NEPI IDX supported 2D camera. This tutorial uses a USB webcam.
NOTE: To see a list of current NEPI IDX supported cameras at: https://nepi.com/documentation/nepi-engine-hardware-driver-support-tables/
4) At least one target object you want to train your AI model to detect and identify. For this tutorial, we will use a standard light bulb as our target object.
Collecting Image Data
The first step in creating a custom AI model is collecting data of the target object(s) you want your AI model to detect. For this tutorial, we will be training our model on two specific target objects, a lamp light bulb and a can light bulb shown below. When training an AI model to detect and identify multiple objects, you can collect data with both target objects in the scene, or just repeat the described image data collection process for each of your target objects.
NOTE: This tutorial does not get into specifics or the science related to required training data quality, only how to collect and organize your data using a NEPI device and connected camera with a few suggestions along the way. There are many great resources on the internet that discuss this topic in more detail. The article in the link below is good place to start learning more about AI model data considerations: https://www.v7labs.com/blog/quality-training-data-for-machine-learning-guide
NOTE: Depending on your target object commonality and the application for your desired model, you may be able to download or purchase all the data you require from existing data sets available online. For more information on access existing data files, see the “Gather Additional Image Data” section of this tutorial.
NOTE: You can download the complete set of target image data files collected for this tutorial at: https://www.dropbox.com/scl/fo/85klc2ii66vstbiacd6tr/h?rlkey=dziog9gex8uds2cvzcxqq8mgb&dl=0
Data Collection Considerations
Before you start collecting image data on your target object, some consideration should be made as to the required target and scene robustness your model will require. Since the AI model training process uses both the labeled target object data to correctly learn the target, it also uses the image space outside of your labeled object target to learn what is not a target object. The following sections include some general guidance on common target and scene variety variance you should consider when planning your image data collections.
Target Objects
As you choose your target objects to use for your data collection, consider the variety of target characteristics you want your model to work on such as object condition, color, variety, etc. For example, if you want your AI model to detect red VW Jetta cars, then you would want to collect data on as many red Jetta’s as you can, both new and old. But if you want a general car connector, you will need to collect data on a lot of different cars and colors.
Environments
Where do you plan to use your AI detector such as in a laboratory, factory, office, yard, forest, etc. Scene environment variety could also cover weather conditions like fog, snow, or rain. While collecting data in a variety of environments will produce a more robust AI model about changing scene environments, if you are only going to use your model on as part of an automated process inspection step, you would only need to train the model in that process environment.
Lighting Conditions
While most AI model training software tools will create a variety of image variants from the images you supply such as contrast and hue, differences in lighting angles that produce unique characteristics such as shadows must be done manually. Consider what scene lighting configurations your model will require and collect data under those conditions.
Target Pose
If you want your model to work well across a variety of target object orientations, you will want to make sure that you collect data on your target object from many orientations. This can be accomplished in most cases by moving the camera or object around during a data collection process.
NOTE: Target data collection is a science and the four data collection considerations discussed above are just a few of the more common considerations you should consider when planning your data collection strategy. There are many great resources on the internet that discuss this topic in more detail. The article in the link below is good place to start learning more about data collection for AI model training: https://www.telusinternational.com/insights/ai-data/resource/the-essential-guide-to-ai-training-data
Data Quantity
There is no great rule of thumb for how much data you should collect for your model other than “more is better”. For a very robust model, most sites recommend up to 10,000 images per target object. For more specific AI detection applications where either the target object or scene conditions are controlled, you can use much less data for your training, with the result being a much less robust AI model across and target and scene variations.
Planning
Based on the data collection considerations discussed in the last section, it is a good idea to come up with a data collection plan before jumping in and collecting data to make sure you get the data you need to achieve your AI model performance goals.
We will start with a table for showing the different data collection scenes we will want to collect data in. For the light bulb detector application in this tutorial, we are assuming it only needs to work in a single lab environment with consistent lighting conditions. We also plan to collect data on both our target objects at the same time while varying target pose manually during the collection. Based on this plan we will start with the single data collection in shown in the table below.
Lightbulb Data Collection Plan
| Environment and Lighting Variations | Ceiling Light |
| Lab | √ |
NOTE: If you find later that your model needs additional training with additional target or scene conditions to improve its robustness, new data can easily be incorporated into the existing training data sets with AI model training repeated starting with the last trained version created.
Later in the AI model development process, all of the target data collecting during this phase of the process will be combined and randomized into training and test data sets, but during the data collection process, it is helpful to organize collected data into separate folders with intuitive names based on your data collection plan. To keep our different environmental and lighting collection sets organized, we will store each in a folder using the following convention:
ObjectName_Environment_Lighting
With our goal to create an AI detector model for very specific target objects and operational scenes, we will start with collecting around 1000 images to use for our initial model training process in a single folder named “Bulbs_Lab_Ceiling”.
Hardware and Software Setup
1) Connect a NEPI IDX driver supported camera to your NEPI device.
NOTE: See the NEPI Engine Hardware Interfacing tutorial “Imaging Sensors” for details on connecting a camera to your NEPI device at: https://nepi.com/tutorials/.
2) Connect the NEPI device to your PC’s Ethernet adapter using an Ethernet cable, then power your NEPI device.
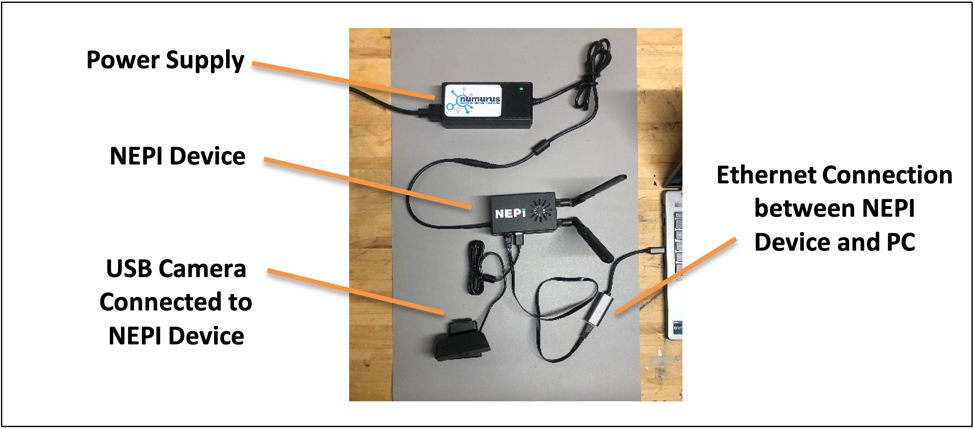
Instructions
For target object image data collection, we will NEPI’s built-in data management system to save imagery from a NEPI IDX supported camera to the NEPI device’s on-board user storage drive. See the NEPI Engine – Getting Started tutorial “Saving Data Onboard” for more details using NEPI’s built-in data logging features: https://nepi.com/nepi-tutorials/nepi-engine-saving-and-accessing-data/.
1) On your PC, open your NEPI device’s RUI “DASHBOARD” tab and find the “SAVE DATA” section of the page.
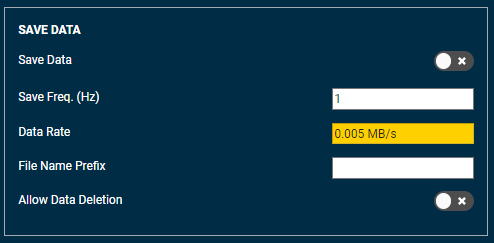
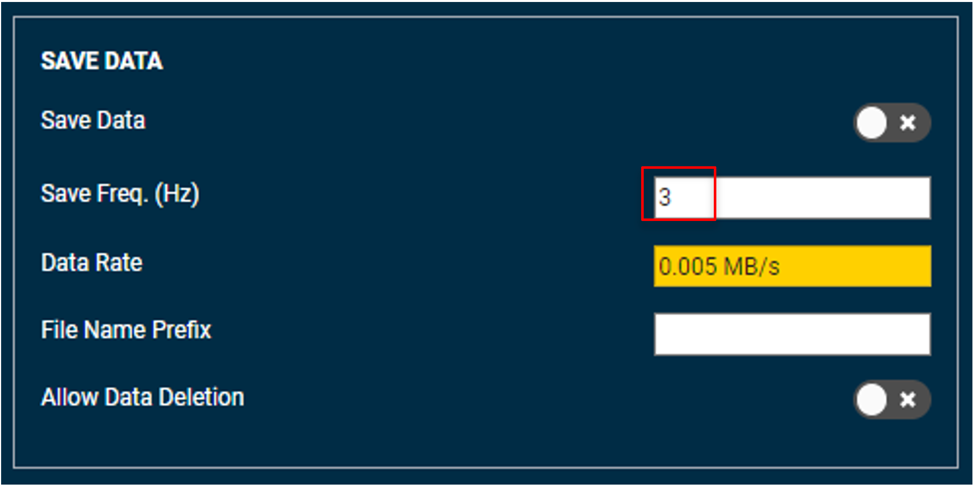
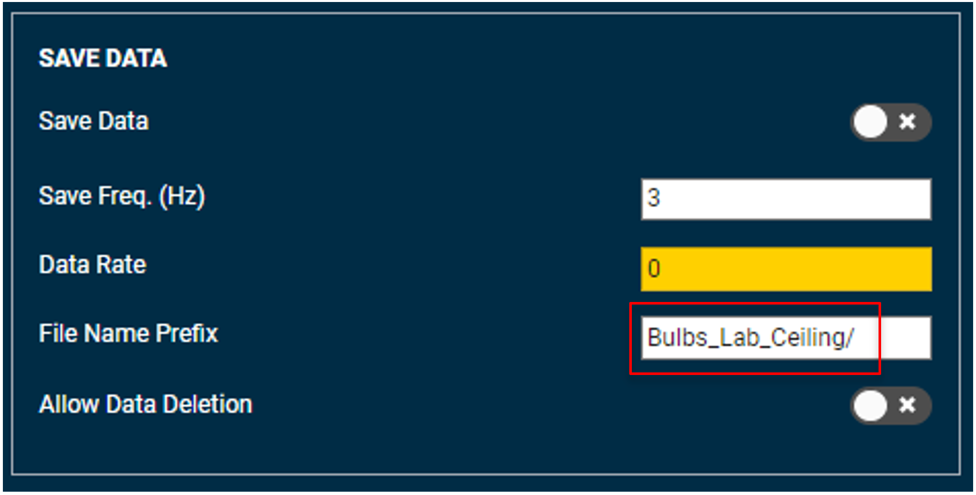
2) Adjust the max data save rate by changing the value in the “Save Freq (Hz)” input box and hitting enter. The text will turn from Red to Black indicating the input was received. We will use a save rate of 3 Hz for our data collections.
3) Enter the folder name followed by a “/” to create the subfolder name in the NEPI user drive’s data folder data collection into the “File Name Prefix” data entry box and hit return. The text will turn from Red to Black indicating the input was received. NEPI will save all data to this folder until the value is updated on your next data collection.
For our first data collection will be collecting image data for our two light bulbs on a lab bench with ceiling lights illuminating the scene. Since will be collecting data with both our bulbs on the bench at the same time, we don’t need to specify a specific target in the file name. For this first data collection, we will use a folder named “Bulbs_Lab_Ceiling”.
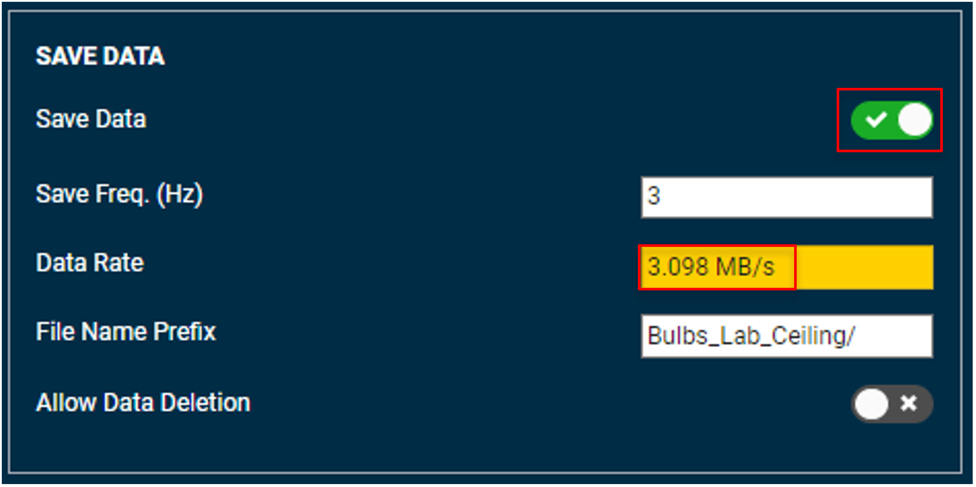
4) Start collecting data by clicking on the “Save Data” switch. When data saving is enabled, the switch will turn Green with a check icon, and you should see the data save rate increase to some value based on the data and rates you have configured. To help us ensure we capture similar amounts, and enough data for each collection, we will set a timer for 6 minutes, which with the 3 Hz data save rate we set, should give us just over the 1000 image goal we set in the Data Collection Planning portion of this tutorial. Just remember that more is better, so if you need more time to get all the angles and shots you need, keep collecting and adjust your save timer for future collections.
During the collection process, move the camera around the scene capturing images of the target object(s) at different angles, ranges, and perspectives. Also move the objects around themselves to ensure you are getting shots of important target object features and orientation.
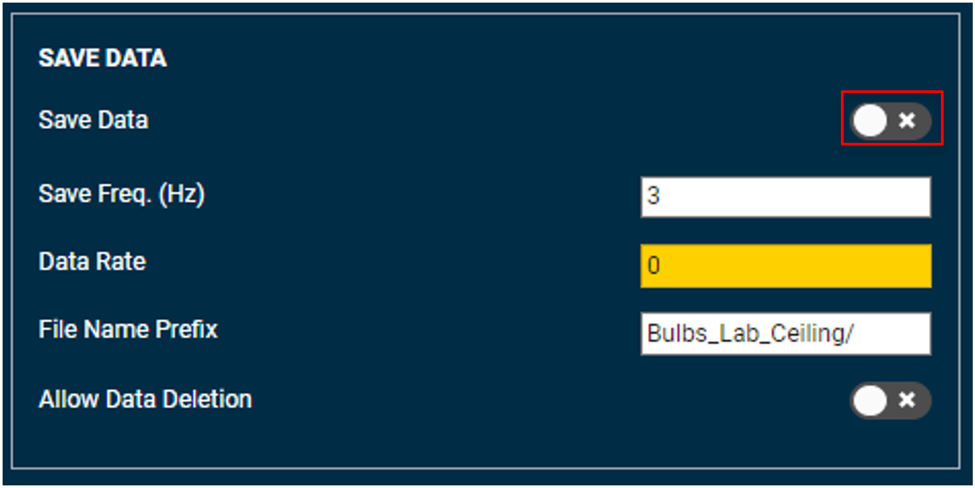
5) Once you have collected all the data you want, log into your NEPI device’s user storage drive’s “data” folder.
NEPI’s onboard user drive is a shared network drive. On a windows machine, just enter the following location in the File Manager application’s location bar:
\\192.168.179.103\nepi_storage
Then hit enter and use the following credentials to log in:
Username: nepi
Password: nepi
Then select the “data” folder to access your collected data. You should see the different subfolders for each of your collections in this folder.

NOTE: For more information on accesses and using NEPI’s shared user storage drive, see the NEPI Engine Getting Started tutorial at: https://nepi.com/nepi-tutorials/nepi-engine-user-storage-drive/.
6) Delete data we don’t need. Depending on the camera you are using to collect data, NEPI may have saved several types of image files and even point clouds during the collection process. Open up one of the collection subfolders and see what types of data files were saved. Each of the saved data files includes the camera name that created it and the type of data the file includes. From the screenshot below, you can see that the data saved for the USB webcam used during our collection included both “color_2d_img” (Color 2D Images) and “bw_2d_images” (Black and White 2D Images).
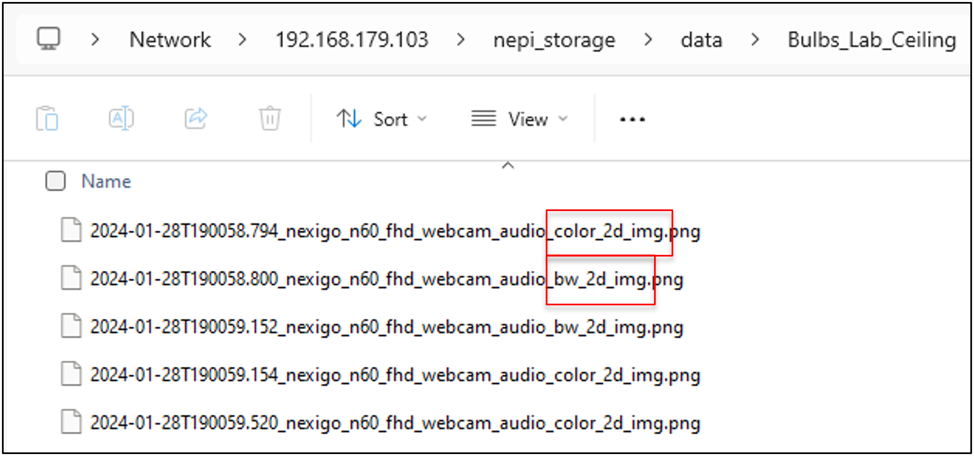
For our AI training data, we only want to use Color 2D Images which will be what our AI application will ultimately be using for target detections once deployed. We can easily delete all the black and white image files by searching for the tag “bw_2d_img” in the file manager application’s search window, then deleting all the files it finds with the “bw_2d_img” tag in them.
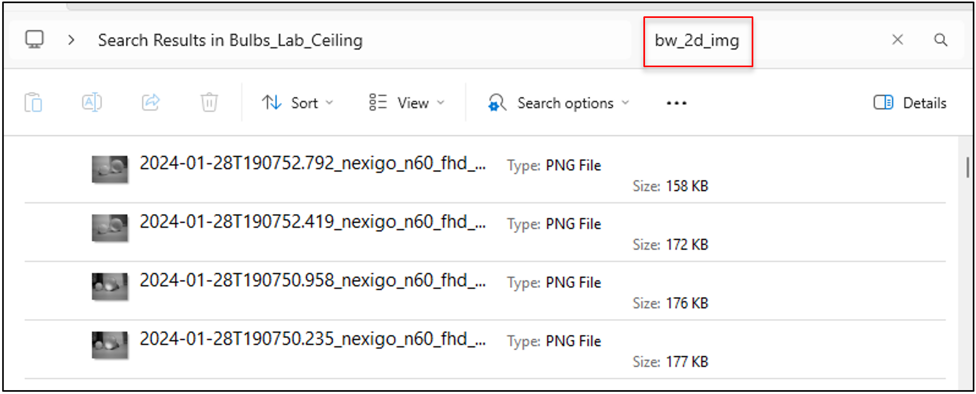
When the search process is complete, just select all the images it found and hit the “delete” button on your keyboard.
7) After deleting all the non “color_2d_image” files, clear the search field, switch to view to “Extra large icons”, and make sure you are happy with the files you collected before moving on to the next collection, or the Image Labeling process if this was your last collection.
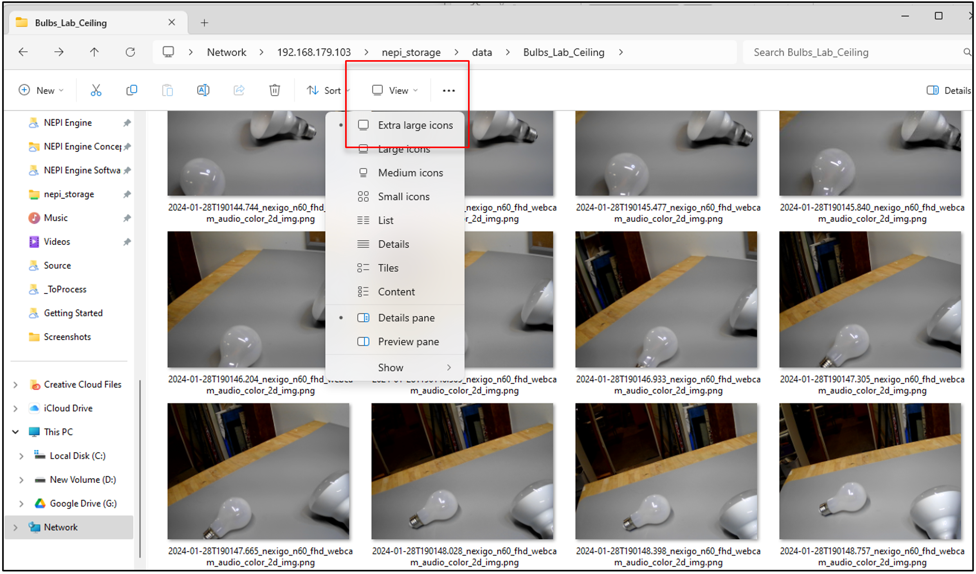
8) Repeat the processes above for any additional target, environment, and lighting conditions you defined in your data collection planning phase.
Labeling Image Data
With the AI supervised learning process used in this tutorial, the next step requires a human operator to select and label the target objects in each of our collected images.
NOTE: This tutorial is not meant to provide scientific guidance on data labeling rules, only provide some general best practice suggestions and an applied understanding of the process.
Learn more about data labeling considerations and best practices at: https://www.altexsoft.com/blog/how-to-organize-data-labeling-for-machine-learning-approaches-and-tools/.
NOTE: You can download the complete set of target image and label meta data files created for this tutorial at: https://www.dropbox.com/scl/fo/85klc2ii66vstbiacd6tr/h?rlkey=dziog9gex8uds2cvzcxqq8mgb&dl=0.
Filename: data_labeling.zip
After downloading and unzipping the files, just open the “Bulbs_Lab_Ceiling” folder in the “labelImg” application to see both the collected images and the bounding boxes created for this tutorial.
Software Tools
There are many software and online data labeling options available on the market. For this tutorial, we will be using a python application called “labelImg” that is easily installed on your NEPI device, or whatever GPU enabled PC you are labeling on. With a few setting adjustments we will go through during the software setup phase, the labelImg application is very easy-to-use and provides fast data labeling of your collected data.
Learn more about the “labelImg” data labeling application used in this tutorial at: https://blog.roboflow.com/labelimg/.
NOTE: There are other applications for labeling data. AlexeyAB has a list (including his own contribution) available at: https://github.com/AlexeyAB/darknet#how-to-mark-bounded-boxes-of-objects-and-create-annotation-files.
Planning
Before starting to label data, it is important to lock down a few things to ensure you end up with quality labeled data for your project.
Data Label Selection
The first step is to define the label name standards your team will use during the labeling process so all the labeled data used during the AI model training process is consistent.
NOTE: The label names selected during the labeling process do not set the labels (classes) that are published by your final AI model, so you don’t need to worry too much about the actual name other than that it is clear for each target object you are labeling for and used consistently by all individuals performing image labeling.
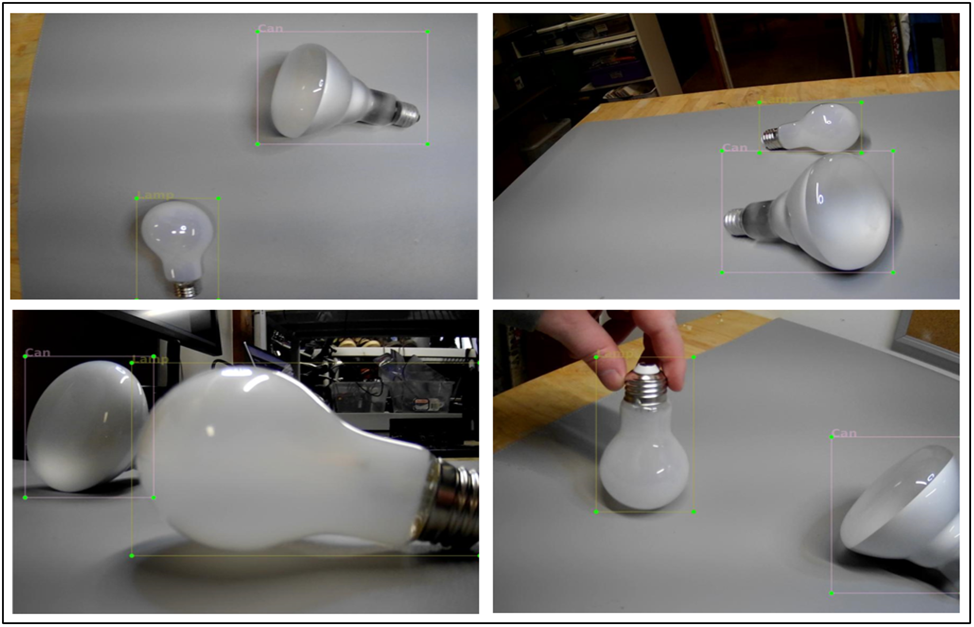
For our lightbulb demonstration set we had selected two types of target objects we wanted to identify: standard can light bulb, and a standard lamp light bulb, so we will standardize on “Can” and “Lamp” label names for the data labeling process.
Light Bulb Data Labels (Classes)
| Label Name | Target Object |
| Can | Standard ceiling can light bulb |
| Lamp | Standard lamp bulb |
Data Labelling Rules
While some data is very easy to label where target objects are centered in an image and don’t overlap with other target objects you may be training your model against, as you start labeling your data, you will find many cases where this is not the case leaving bounding box selection decisions up to the choice (gut feeling) of the individual performing the labeling work. If you have multiple individuals labeling different data sets, this can become very problematic if each individual makes drastically different bounding box selection choices.
For these reasons, it is important to create labeling rules or guidelines that everyone on the team understands before starting the labeling process. Labeling rules will vary based on the variety of targets and environments you are labeling for, and operation considerations for the application(s) you plan to use your AI model in.
Light Bulb Data Labeling Rules
| Target only partially in the picture | If 30% or more of the target is visible and has clear characteristics that distinguish it as on our target objects, the label it. If not, then ignore it. |
| Two or more targets overlap | Label the front target with a box around the entire target. Only label parts of background targets that have important features for that target. Target boxes should only have minimal overlap. |
Based on these rules, below are a number of bounding box and label selection examples for the light bulb data we collected in the “Data Collection Process” phase of this tutorial.
Hardware and Software Setup
In this part of the tutorial, we will be using our NEPI device in a stand-alone desktop configuration with connected keyboard, mouse, and display.
1) Connect a USB keyboard, USB mouse, and HDMI display to your NEPI device.
2) Connect your NEPI device to an internet connected Ethernet switch or WiFi connection.
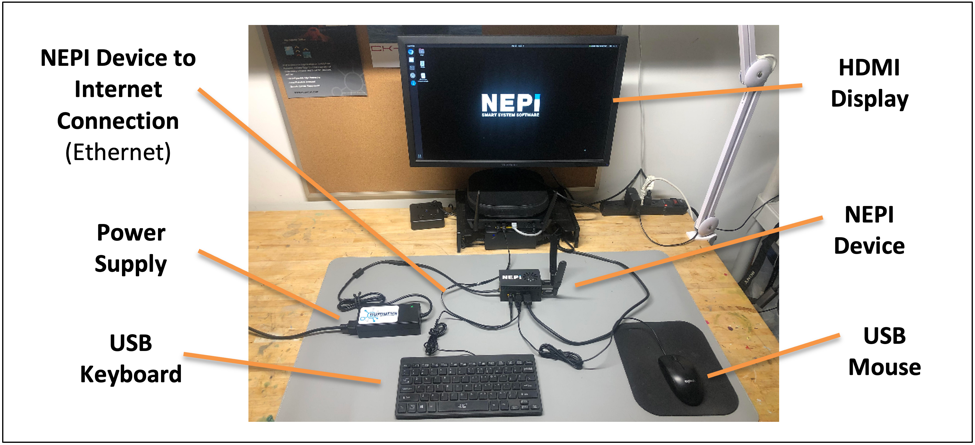
3) Power your NEPI device and wait for the software to boot to the NEPI device’s desktop login screen, then log in with the following credentials:
User: nepi
Password: nepi
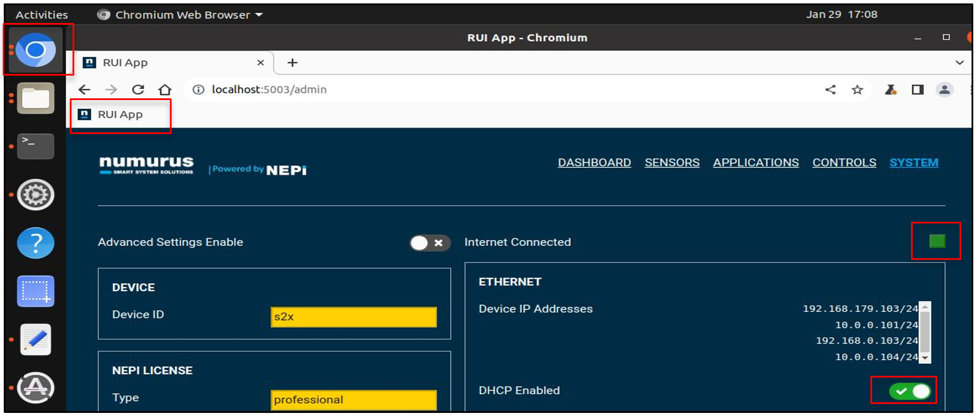
4) From the left menu bar, select and open the Google Chromium web-browsers and navigate to the NEPI device’s RUI interface using the localhost IP location:
Localhost:5003
Then navigate to the RUI SYSTEM/ADMIN tab and enable DHCP using the switch button. Wait for the RUI to indicate that it has an internet connection.
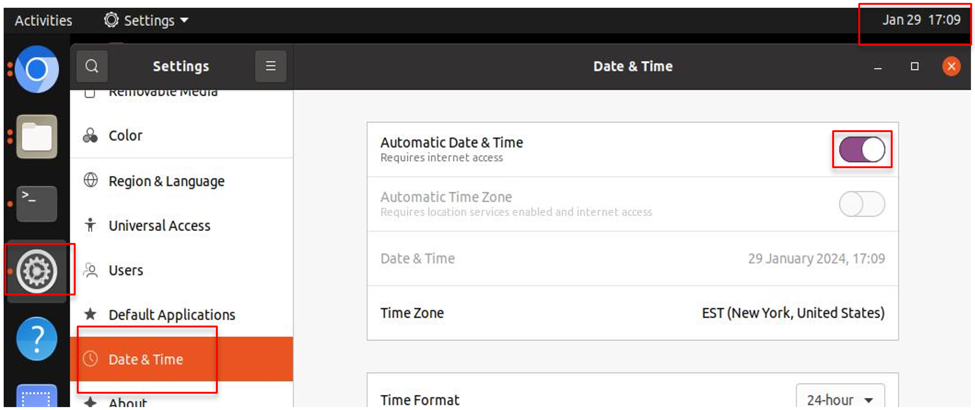
5) Turn on auto date and time syncing by selecting the “Settings” gear icon in the left desktop menu, select the “Date & Time” option, and enable the “Automatic Date & Time” option. Wait for your system’s data and time to update at the dop of the desktop window.
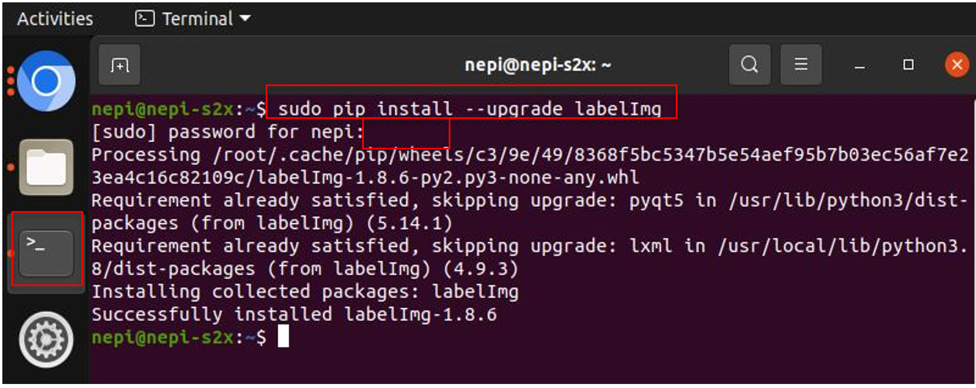
6) Install and/or update your systems python “labelImg” application to the latest version by opening a terminal window from the left desktop menu bar, or right clicking on the desktop and selecting “Open Terminal” option, then entering the following command:
sudo pip install labelImg
Or check for upgrades on an existing package
sudo pip install --upgrade labelImg
NOTE: The default NEPI sudo password is: nepi (You won’t see any feedback when entering the password, so just type it in and hit the “Enter” key on your keyboard).
7) When the installation/upgrade process has completed, you can close the terminal window.
Instructions
For target object image data collection, we will NEPI’s built-in data management system to save imagery from a NEPI IDX supported camera to the NEPI device’s on-board user storage drive. See the NEPI Engine – Getting Started tutorial “Saving Data Onboard” for more details using NEPI’s built-in data logging features: https://nepi.com/nepi-tutorials/nepi-engine-saving-and-accessing-data/.
1) First, we will move all of our collected target image data from NEPI’s default save location to a new folder called “data_labeling” on the NEPI user storage drive.
From the desktop, open the File Manager application by clicking the “Folder” icon on the desktop’s left side menu, select the “Other Locations” menu item from the left menu, then select your NEPI device which will open NEPI’s user storage drive. If prompted for access credentials enter the following:
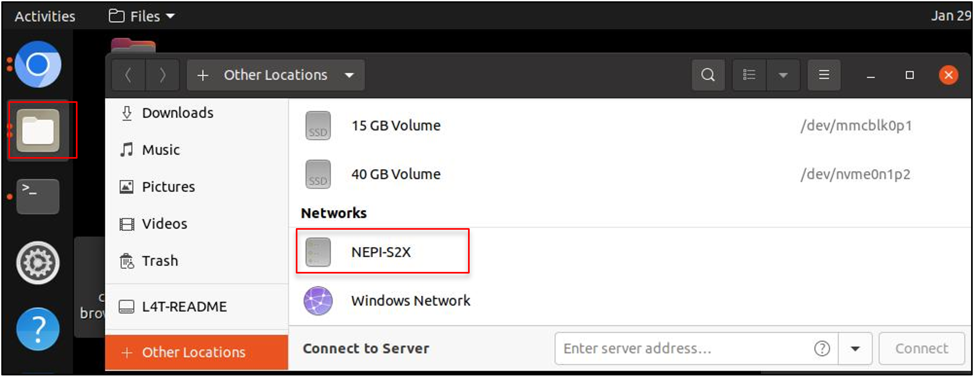
Once on the NEPI storage drive, create a new folder called “data_labeling” next to NEPI’s standard “data” folder, by right clicking in the folder area and selecting the “New Folder” option.
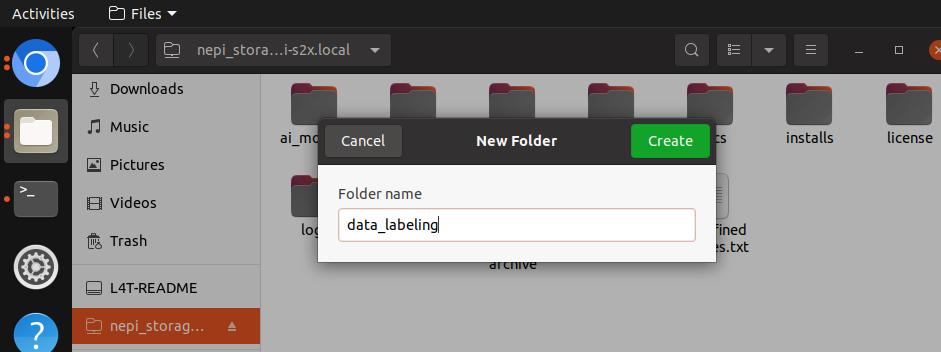
Next, navigate to the “data” folder, select all of the data folders you want to label, and move them to the new “data_labeling” folder you just created.

2) Next, start the “labelImg” application by opening a terminal window from the desktop’s left menu and entering:
sudo labelImg
The default NEPI sudo password is: nepi (You won’t see any feedback when entering the password, so just type it in and hit the “Enter” key on your keyboard).
This should open the “labelImg” application window, which you can maximize.
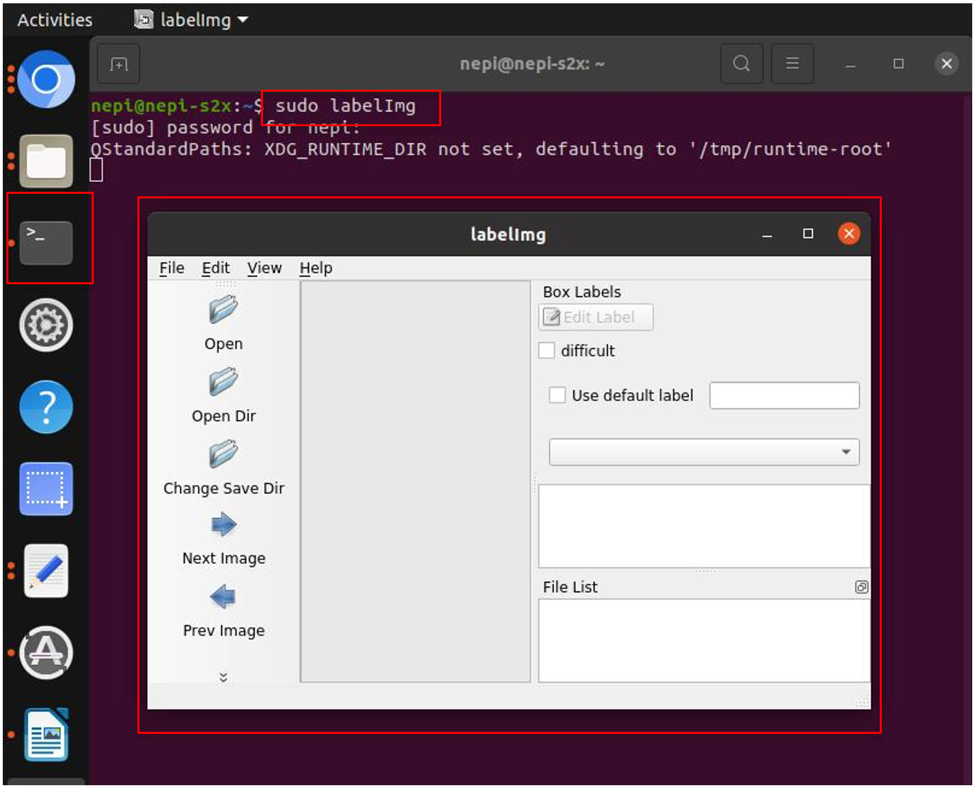
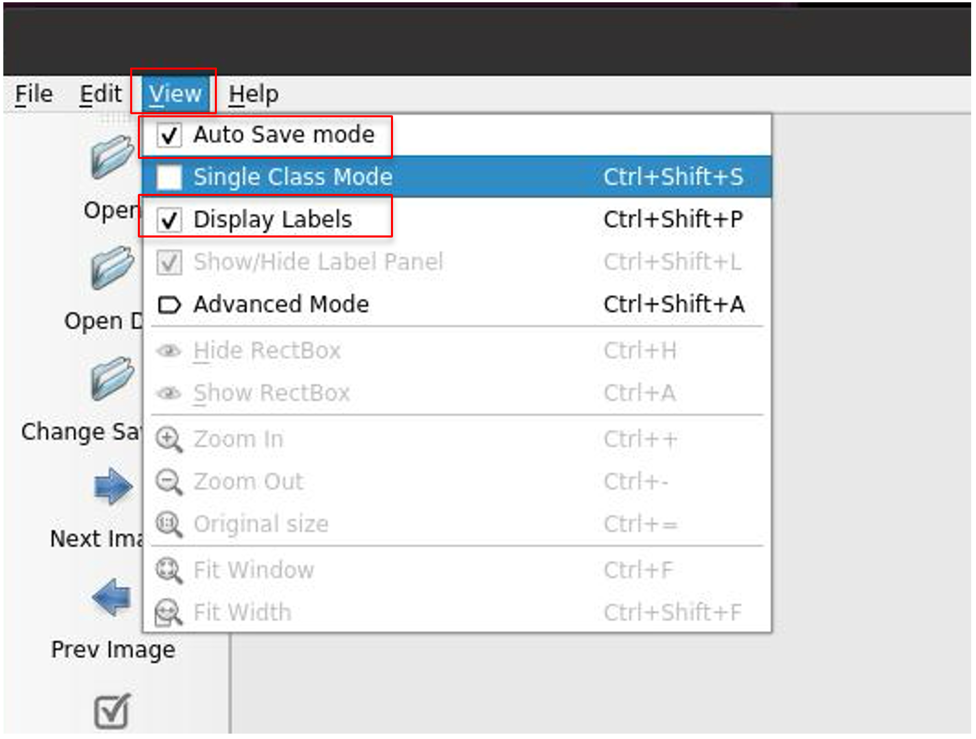
3) Set some of the “labelImg” display settings by selecting the “View” option from the top menu bar and enabling the “Auto Save mode” and “Display Labels” options.
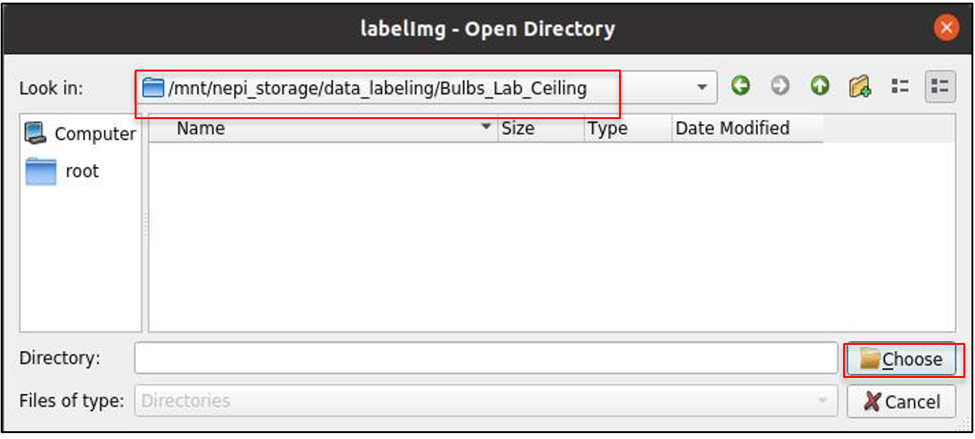
4) Open a data folder to label by selecting the “Open Dir” option from “labelImg” left menu bar and navigate to the data folder you want to label from the folders you copied to the “data_labeling” folder on NEPI’s user storage drive.
NOTE: The open data folder popup window that appears will require you to navigate to your NEPI user storage drive from within the NEPI file system. The NEPI storage drive is located within the NEPI File System at:
/mnt/nepi_storage/
First select the “Computer” option in the left menu bar, then select the “/” to access the NEPI File System.
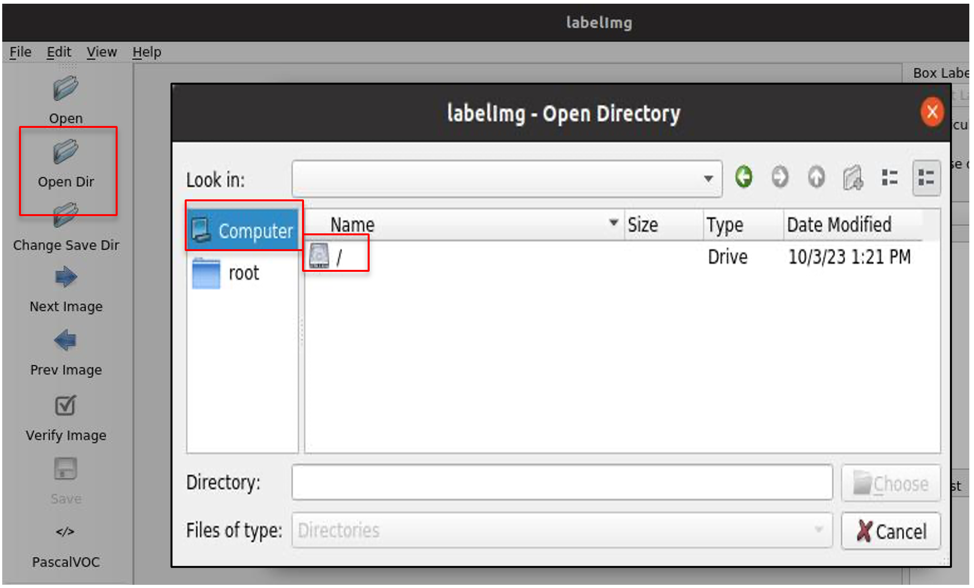
Next select the “mnt” folder, then the “nepi_storage” folder, then the data labeling folder you created, then the data folder you want to label, and select “Choose” button on the bottom right.
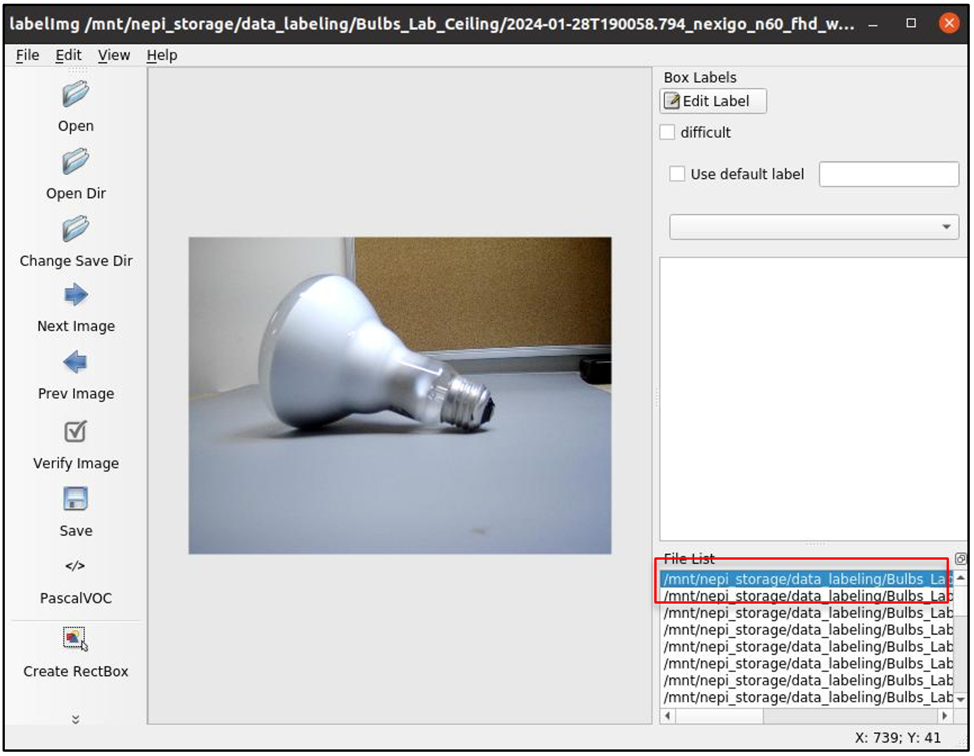
5) Select the first image in the data file from the file navigator pain in the bottom left section of the “labelImg” application. After you label this image, the application will step sequentially through the remaining image files in the selected folder.
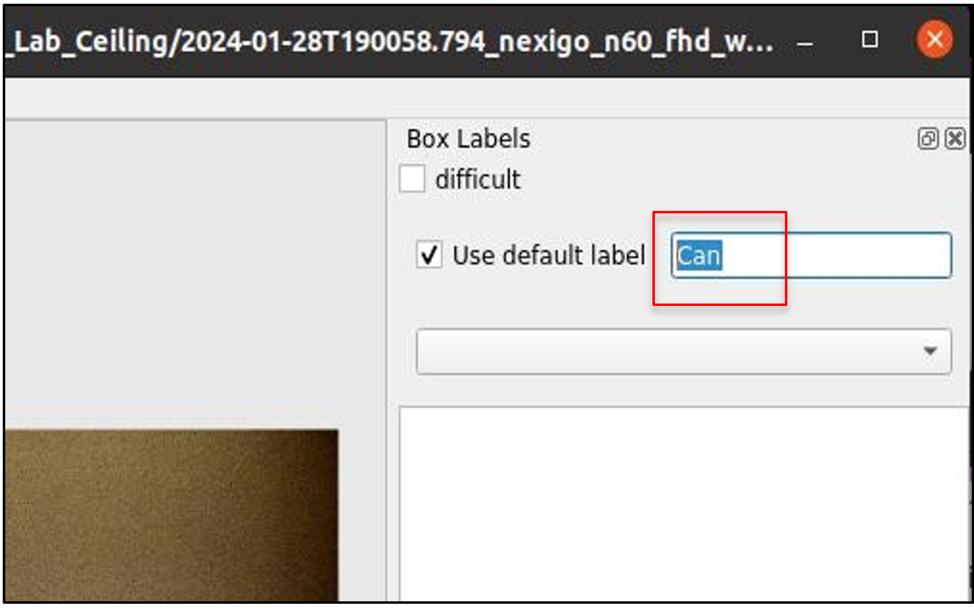
6) Select the “Use default label” option in the top right “Box Labels” box and enter the label name you want to use for this labeling run through. If your data requires multiple label names, then you will just repeat this process for each label name after labeling all the data for the current folders data.
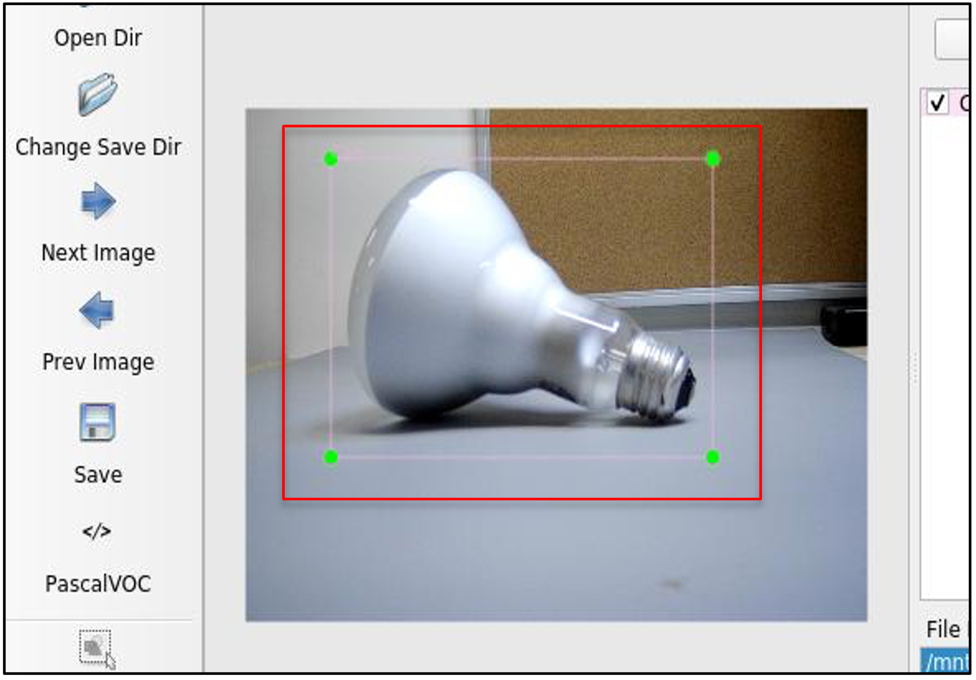
7) Now we can start labeling data. Since we set up “Auto Save mode” and selected the “Use default label” options, all we need to do is to drag a box around any “Can” type objects in the image, then advance to the next image by selecting “Next Image” option from the left menu, or even faster, just hitting the “d” key.
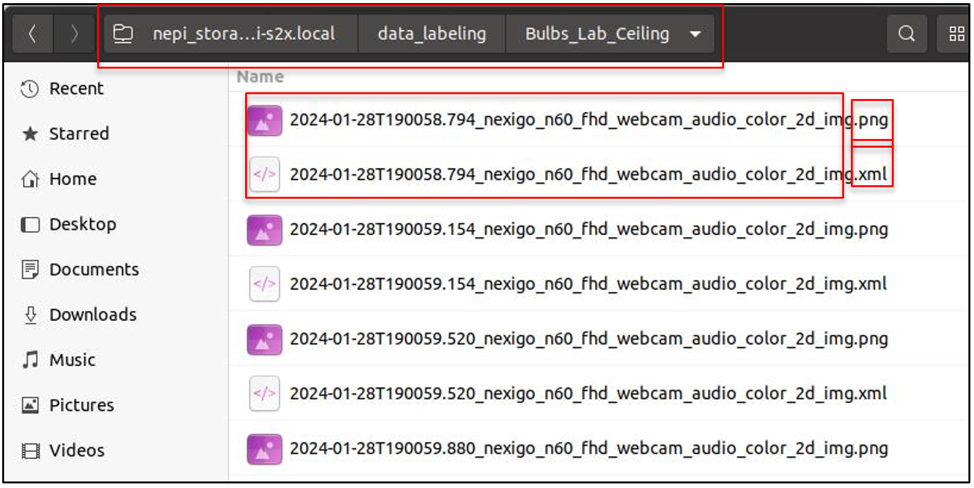
After creating a target object bounding box and moving to the next image, the “labelImg” application will create a “.xml” metadata file in the same folder and with the same name as the image you just labeled.
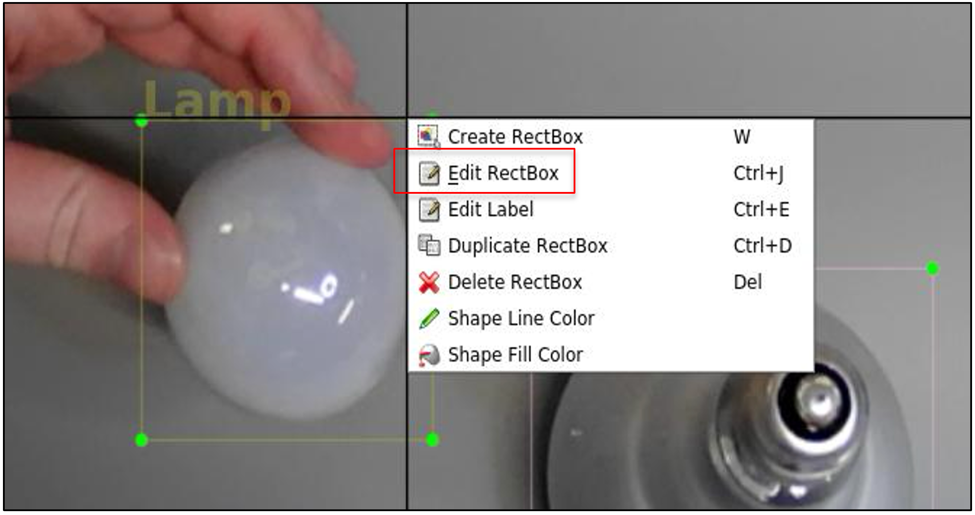
NOTE: If you make a mistake and want to correct something about our bounding box or label, just right click on the box you made and select one of the options to correct it before moving to the next image. Even if you make changes on an image that for which the meta data has been saved, the “labelImg” software will update the meta data file automatically when you change images.
NOTE: It is a good idea to make sure your bounding box and label data is being saved properly and in the correct folder you are working on before spending too much time labeling all of the data. Check that there is an “.xml” file with the same base filename next to the first few images in the folder for the images that you have labeled so far.

8) After completing your first run through, if you have a different target object class in the same data you want to label, just add the new label name to the “Use default label” entry box, hit return and start labeling your next target object type.
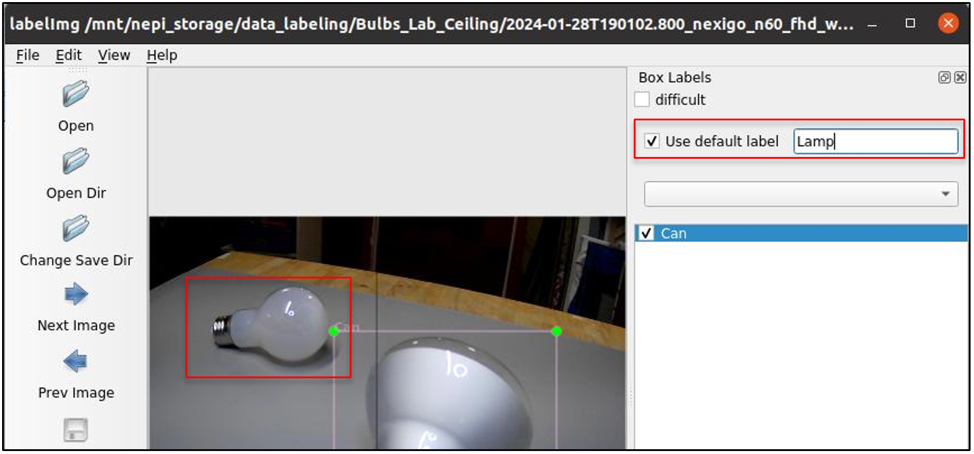
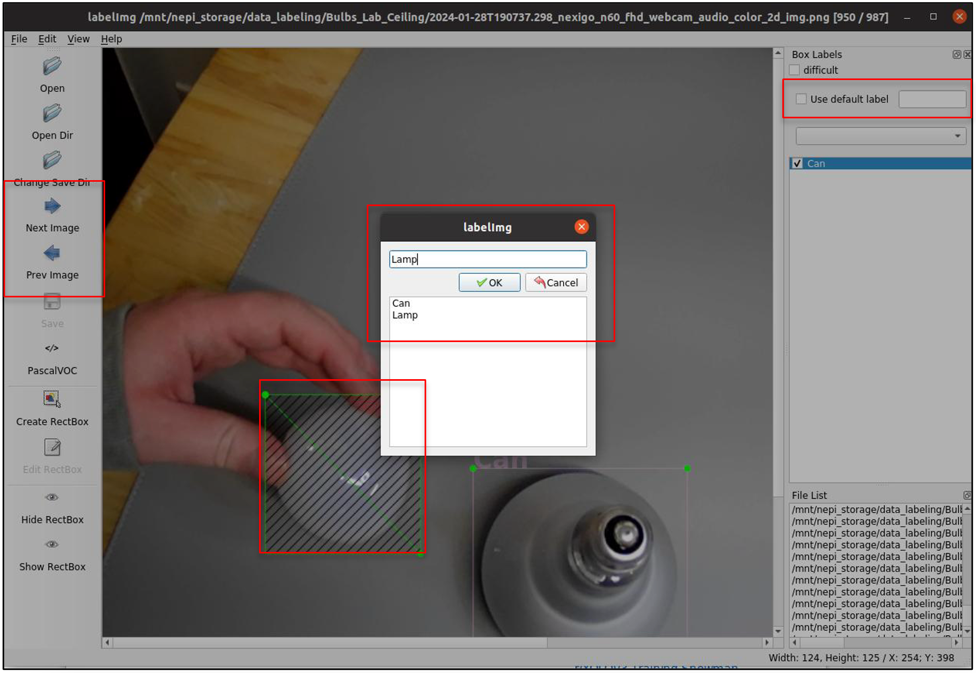
9) After completing your labeling for a given folder, it is important to do a quality review by stepping back through the data and adding or editing labels that are missing or don’t meet the critieria from your data labelling plan.
First, turn off the “Use default label” setting in the top right “Box Labels” pane, then use the “Prev Image” and “Next Image” left menu bar controls to move back or forward through all your data. In this mode, when you create a new bounding box, a label selector popup box will appear allowing you to select from the current list of labels used in the project.
If you want to modify or delete a bounding box, just right click on the bounding box and select.
The “Edit RectBox” option, then either manually adjust the box, or select the box and right click again and select the “Delete RectBox” and create a new one.$
10) When you are done with all your labeling, you can close the “labelImg” application, and open the File Manager application to any of the folders you just went through the labeling process for. You should see the original image file for each image along with a new “.xml” bounding box meta data file.
You can also double click on one of your newly created “.xml” bounding box meta data files to inspect the label data for a given image labeling.
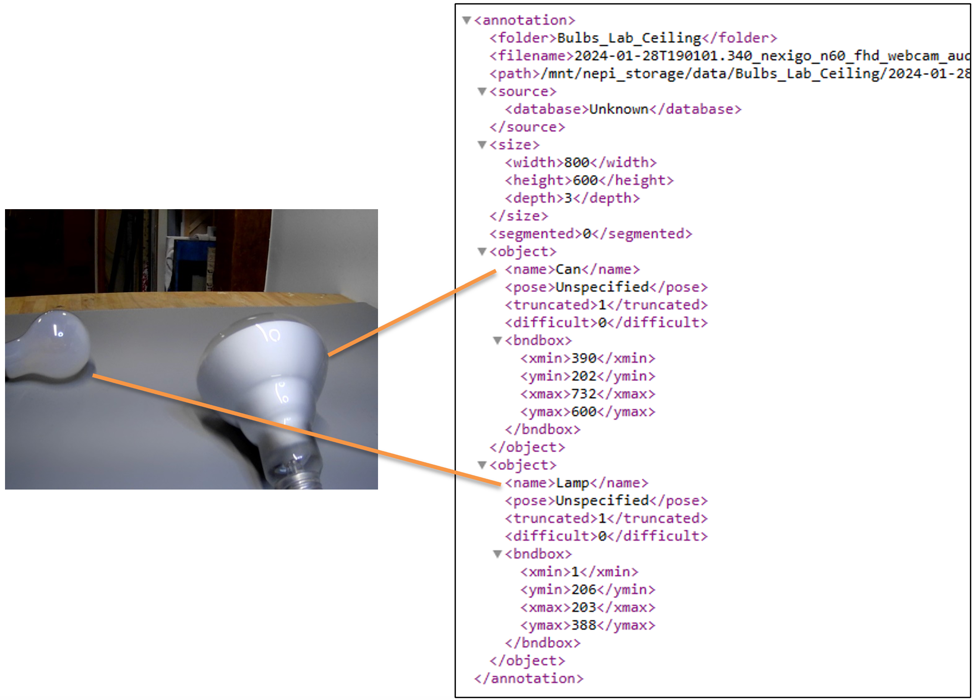
11) IMPORTANT: Create a backup of your labeled data folders on another PC or removable drive for safe keeping.
Create Training and Testing Data Sets
Once you have all the labeled target object image data collected and labeled, the next step is to organize that data into training and test data folders, that will be used during the AI model training step later in this tutorial. This training data set creation process is commonly referred to Data Partitioning. In addition to assigning the right amount of data into each of these categories, it is important that the data is randomized between them, and each set has unique data. These training and test sets we create during this part of the tutorial, which are actually just text links to the image and (.xml) meta data files in your labeled data folders, will be passed to the AI training engine during the AI model training step later in this tutorial.
NOTE: This tutorial is not meant to provide scientific guidance related to AI model data partitioning, only provide some best practice suggestions and an applied tutorial on creating AI model training data sets.
Learn more about AI model training sets and best practices at: https://en.wikipedia.org/wiki/Training,_validation,_and_test_data_sets.
NOTE: You can download the data train and text AI model training files created for this tutorial at: https://www.dropbox.com/scl/fo/85klc2ii66vstbiacd6tr/h?rlkey=dziog9gex8uds2cvzcxqq8mgb&dl=0.
Software Tools
While there are a number of available software tools on the market that can partition our labeled image data into AI model training and test data sets, in this tutorial we will be using a python script named application called “splitTrainAndTest.py”. For more information on this application see the software’s online page at: https://github.com/spmallick/learnopencv/blob/master/YOLOv3-Training-Snowman-Detector/splitTrainAndTest.py.
Planning
In general, most of your labeled data will be used for the AI model training sets with a smaller subset (10-30%) reserved for an AI model test set. As with most of the AI model training processes applied in this tutorial, there are no set rules on data partitioning percentages. For this tutorial, we will use the widely accepted industry standard of 80% data for training and 20% data for testing.
Learn more about AI model training partitioning at: https://www.obviously.ai/post/the-difference-between-training-data-vs-test-data-in-machine-learning.
Light Bulb Training Data Partitioning Values
| Data used for Training | 80% |
| Data used for Testing | 20% |
Hardware and Software Setup
In this part of the tutorial, we will be using our NEPI device in a stand-alone desktop configuration with connected keyboard, mouse, and display.
1) Connect a USB keyboard, USB mouse, and HDMI display to your NEPI device.
2) Connect your NEPI device to an internet connected Ethernet switch or WiFi connection.
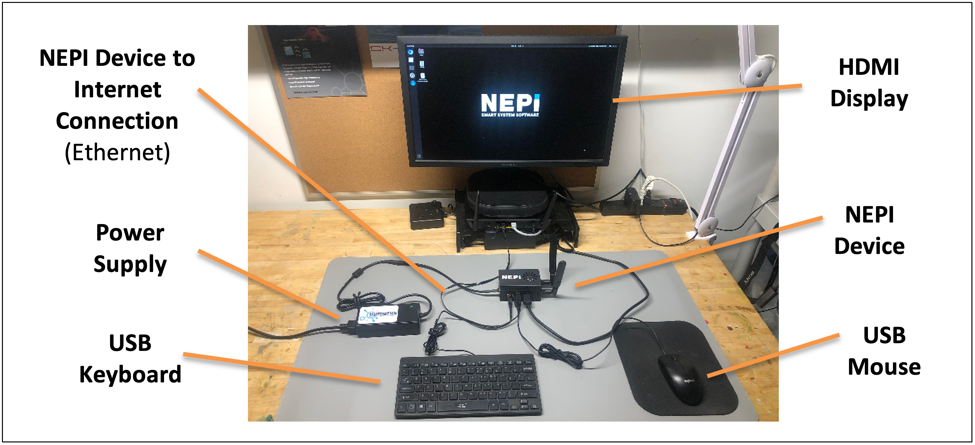
3) Power your NEPI device and wait for the software to boot to the NEPI device’s desktop login screen, then log in with the following credentials:
User: nepi
Password: nepi
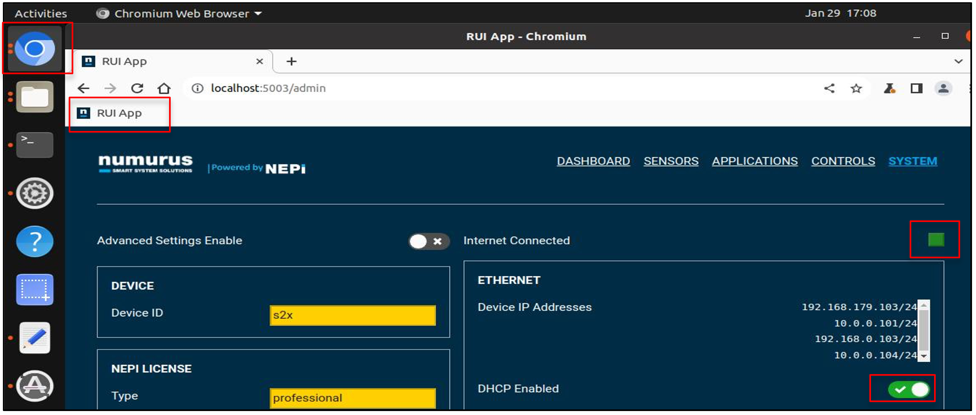
4) From the left menu bar, select and open the Google Chromium web-browsers and navigate to the NEPI device’s RUI interface using the localhost IP location:
Localhost:5003
Then navigate to the RUI SYSTEM/ADMIN tab and enable DHCP using the switch button. Wait for the RUI to indicate that it has an internet connection.
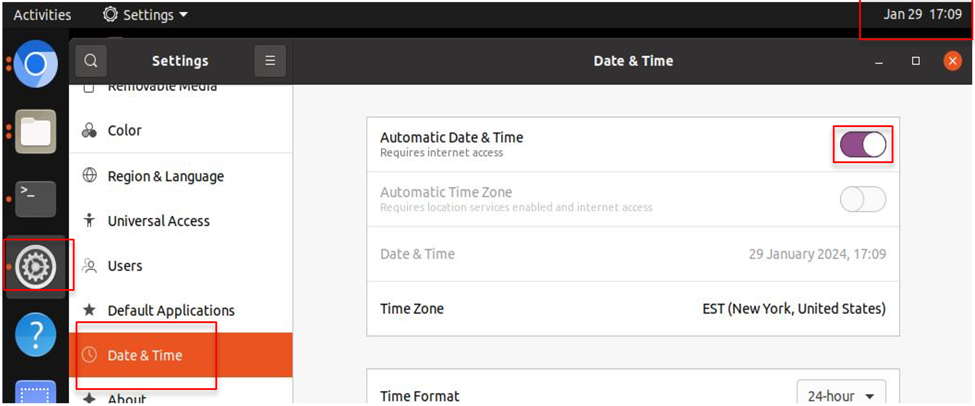
5) Turn on auto date and time syncing by selecting the “Settings” gear icon in the left desktop menu, select the “Date & Time” option, and enable the “Automatic Date & Time” option. Wait for your system’s data and time to update at the dop of the desktop window.
6) Download the following utility script files from the NEPI GitHub repo at:
https://github.com/nepi-engine/nepi_edge_sdk_base/tree/ros1_main/utilities/ai_training
partition_ai_training_data_script.py
remove_currupt_image_files_script.py
create_txt_from_xml_labels_script.py
rename_xml_label_scripts.py
Instructions
1) Move python scripts you downloaded in the previous “Hardware and Software Setup” section to the folder where your labeled image data folders are located. For this tutorial, we put our labeled data folders in a folder called “data_labeling/light_bulbs” on the NEPI user storage drive.
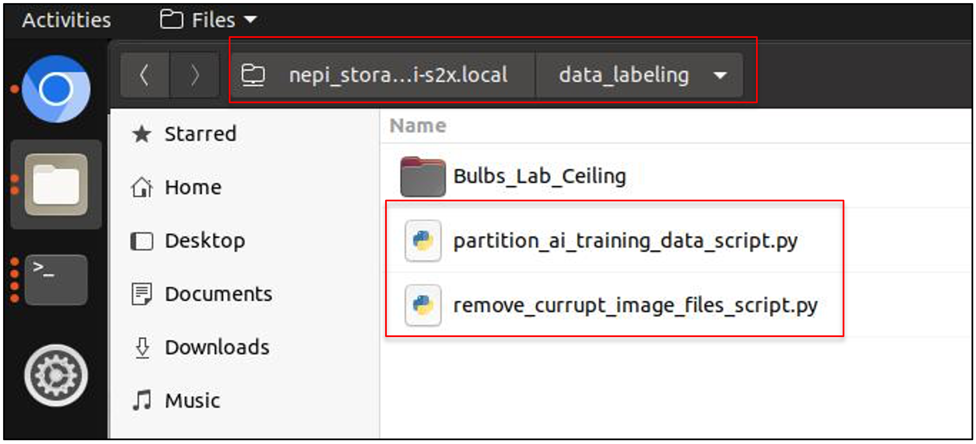
2) In each of your image data folders, add a file called “classes.txt” with a list of the class names you used for training, if not already in the folders. For our lightbulb data folders, we will add the following lines to the “classes.txt” files:
NOTE: The class names and order must be the same in each folder. Suggest creating one file and copying to all.
Can
Lamp
3) Remove any corrupt image file data from your labeled folders.
NOTE: Install and/or update required python modules by opening a terminal window from the left desktop menu bar and entering the following commands:
sudo pip install declxml
From the NEPI desktop’s left menu bar, select terminal icon to open a new terminal into NEPI’s file system, then enter the following to navigate to your labeled data folder on the NEPI user storage drive:
cd /mnt/nepi_storage/<Your_Labeled_Data_Folder_Name>
Example:
cd /mnt/nepi_storage/data_labeling/light_bulbs
NOTE: Make sure you are in the folder where your training data folders are located. The scipts only search and process folders in the folder they are run from
Then run the three python scripts by typing the following commands:
sudo python remove_currupt_image_files_script.py
sudo chown -R nepi:nepi ./
python create_txt_from_xml_labels_script.py
python partition_ai_training_data_script.py
You should see some feedback from script as it attempts to create the “data_train.txt” and “data_test.txt” files that contain links to your partitioned labeled data sets. You will also see a file called “data_unlabeled.txt” that lists image files found in your labeled data subfolders that the script did not find a bounding box meta data file for and ignored.
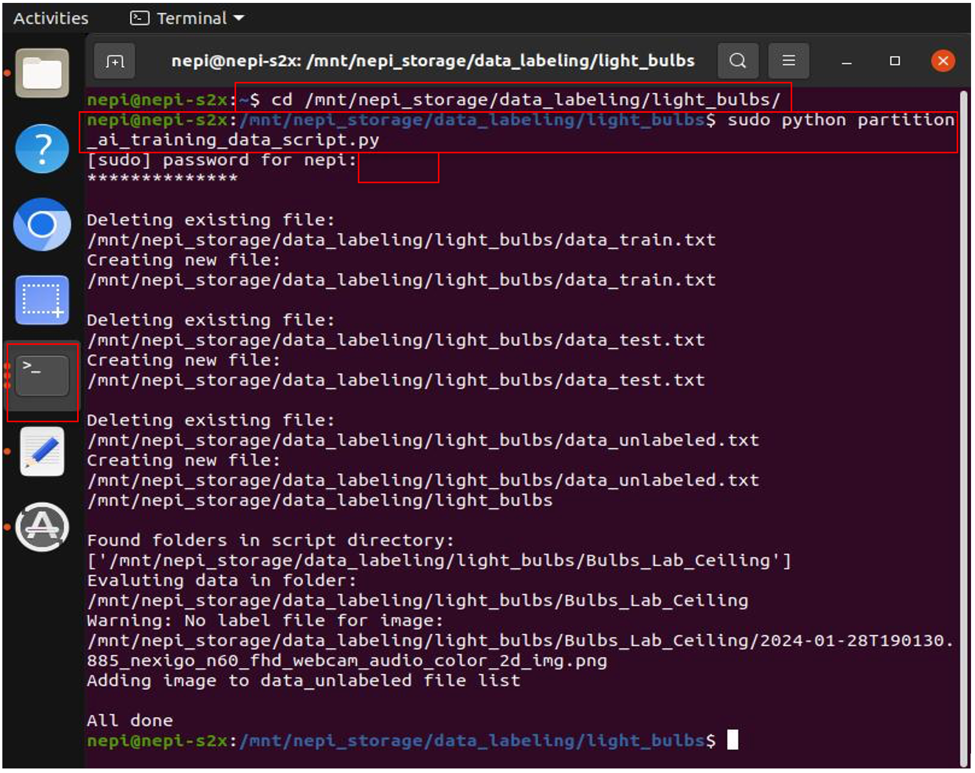
4) Your new, or updated, AI training train and test data files, along with the “information only” unlabeled data file, should now be in the folder you ran the script in.
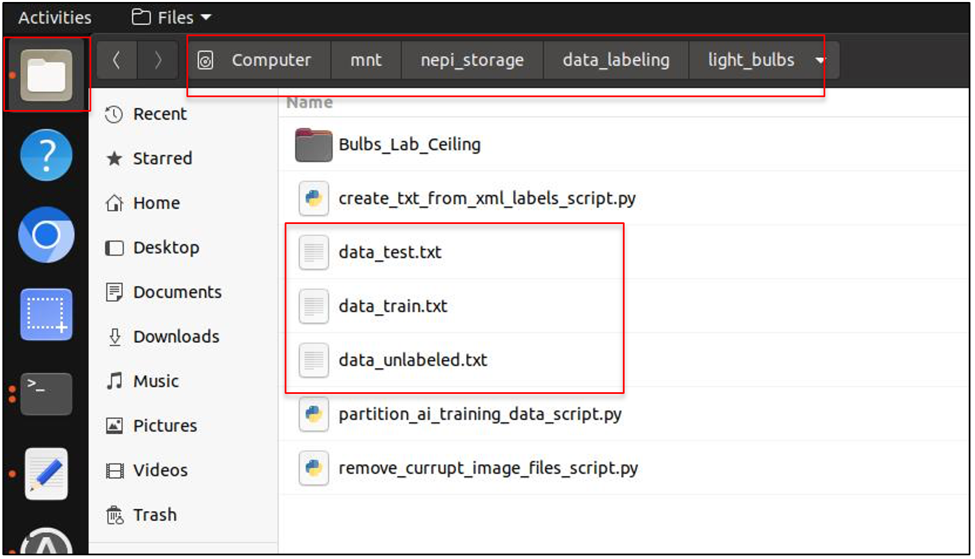
Check that the “data_train.txt” and “data_test.txt” files have data in them. Optionally, you could review the “data_unlabeled.txt” file contents, label any of the image files listed, and rerun the “partition_ai_training_data_script.py” script.

5) If everything looks good, you are ready to move on to the AI model training step described in the next section titled “AI Model Training”.
Renaming label class names
If you need to relabel class labels in the xml files, you can edit and run the rename_xml_label_script.py file downloaded with the other utility functions in this section. After renaming, rerun the other utility functions and move on.
AI Model Training – Overview
In this section, we will use the partitioned train and test data set created in the last section to train a custom AI target detector model using freely available tools installed on the NEPI device for each of the available AI model frameworks supported by NEPI’s AI Management (AIM) system. The following sections provide detailed instructions for training AI models for each of NEPI supported AI frameworks.
NOTE: To see a list of NEPI supported AI frameworks, see the NEPI Engine – Supported AI Frameworks page at: https://nepi.com/documentation/supported-ai-frameworks-and-models/.
NOTE: For more information on NEPI’s AI Management (AIM) system, see the NEPI Engine – AI Management System developer’s manual at: https://nepi.com/documentation/nepi-engine-ai-management-system/.
NOTE: There are many alternative software tools, including online tools available in the market for training AI models for standard AI frameworks in addition to the ones used in this tutorial.
NOTE: While this tutorial uses the NEPI device as the training platform, model training can be accelerated using the tools and AI model training processes applied in this section on a standalone Linux computer with a higher power GPU installed.
NOTE: Whenever possible, it is suggested that a new Detector to be deployed to a NEPI device is trained using the native AI framework’s well-documented training tools and system for the NEPI AI framework you plan to deploy and run the model in. If a DNN-based AI detector that was trained using a different framework with non-conformant network and weights file formats is to be deployed, a translation step is required. The exact steps for this translation depend on the source framework and file format, so cannot be described in detail here. The following link provides some guidance on selecting open-source converters based on input and output type, hence the most relevant entries in the matrix are along the Darknet row: https://ysh329.github.io/deep-learning-model-convertor/
In some instances, there is no direct translator between the model formats. In those cases, it is necessary to perform a two-stage translation, with an intermediate representation. The Open Neural Network Exchange (ONNX) is a common intermediate representation for this purpose.
AI Model Training – Darknet Yolov3 Models
The Darknet AI processing framework is a flexible system able to run a variety of Deep Neural Network (DNN)-based image detector models as long as the deployed AI detector configuration files adhere to the standards defined in this API. In this tutorial, we leverage the AlexyAB fork of the darknet repo for training available at: https://github.com/AlexeyAB/darknet.
This fork of the Darknet framework includes lots of usability improvements over the original darknet framework repo.
NOTE: You can download the complete set of ai training files created for this tutorial at: https://www.dropbox.com/scl/fo/85klc2ii66vstbiacd6tr/h?rlkey=dziog9gex8uds2cvzcxqq8mgb&dl=0.
Filename: ai_training_darknet-yolov3.zip
Planning
While training using darknet is straight forward, it is recommended that you review the following online resource for a deeper understanding of the process. The AlexeyAB page provides some helpful insights about increasing accuracy, etc: https://github.com/AlexeyAB/darknet#how-to-train-to-detect-your-custom-objects.
The training process requires creating a training configuration file that provides the model architecture, existing model to start training from, links to the training and testing data sets to use, the number of classes to train the model on, the max_batch and step size to use during training.
Hardware and Software Setup
In this part of the tutorial, we will be using our NEPI device in a stand-alone desktop configuration with connected keyboard, mouse, and display.
1) Connect a USB keyboard, USB mouse, and HDMI display to your NEPI device.
2) Connect your NEPI device to an internet connected Ethernet switch or WiFi connection.
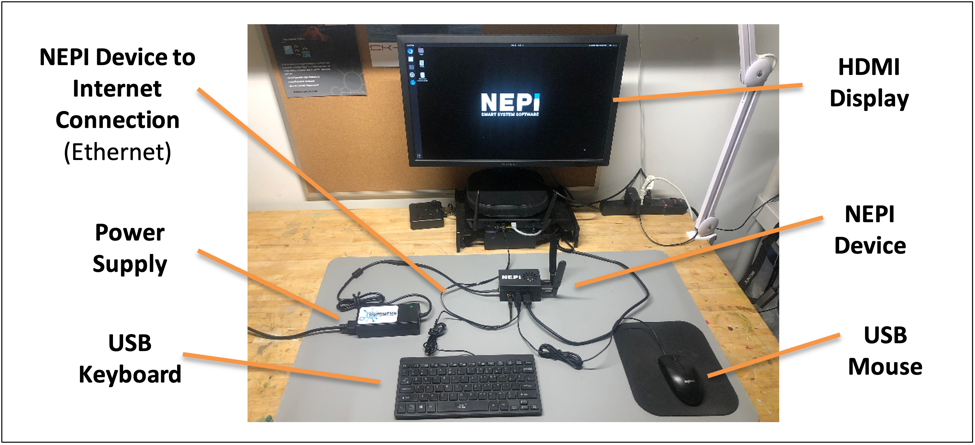
3) Power your NEPI device and wait for the software to boot to the NEPI device’s desktop login screen, then log in with the following credentials:
User: nepi
Password: nepi
4) From the left menu bar, select and open the Google Chromium web-browsers and navigate to the NEPI device’s RUI interface using the localhost IP location:
Localhost:5003
Then navigate to the RUI SYSTEM/ADMIN tab and enable DHCP using the switch button. Wait for the RUI to indicate that it has an internet connection.
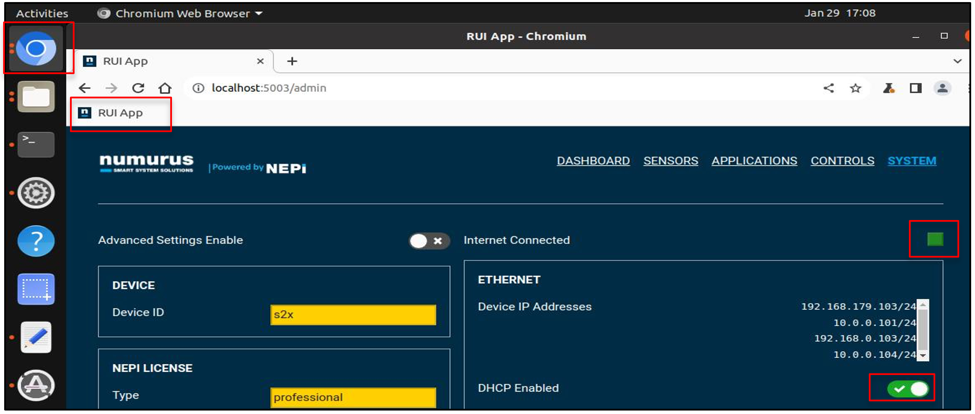
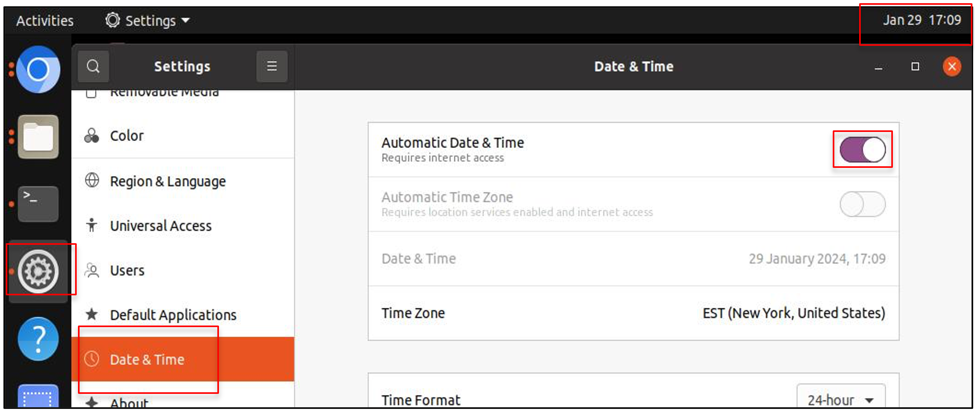
5) Turn on auto date and time syncing by selecting the “Settings” gear icon in the left desktop menu, select the “Date & Time” option, and enable the “Automatic Date & Time” option. Wait for your system’s data and time to update at the dop of the desktop window.
6) Install the Darknet framework software on your NEPI device if not already installed by selecting the terminal window icon from the left-hand desktop menu, and entering the following commands:
a) Download the Darknet source-code to your nepi device
cd /mnt/nepi_storage/nepi_src
git clone --recursive https://github.com/AlexeyAB/darknet.git
cd darknet
b) Ensure CUDA tools are on your path
export PATH=$PATH:/usr/local/cuda/bin
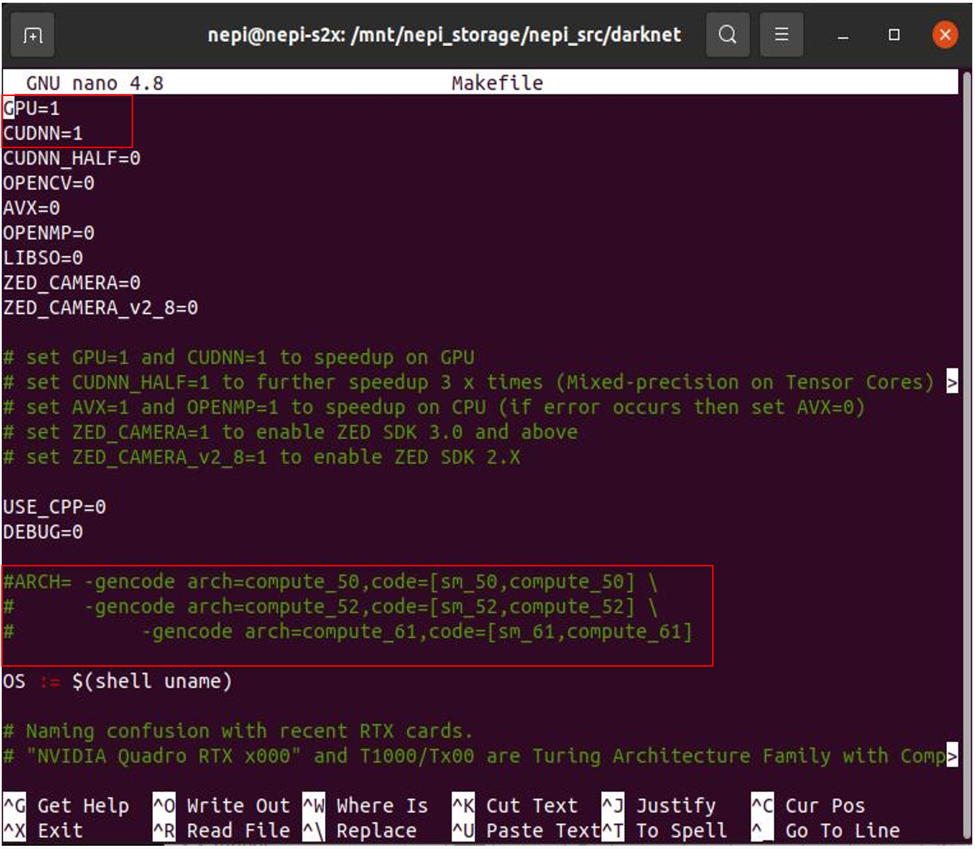
c) Edit the Makefile:
nano Makefile
Some items to configure in the file:
==> GPU=1
==> CUDNN=1
Comment out the generic ARCH section:
==> #ARCH= -gencode arch=compute_50,code=[sm_50,compute_50] \
# -gencode arch=compute_52,code=[sm_52,compute_52] \
# -gencode arch=compute_61,code=[sm_61,compute_61]
Uncomment the ARCH line for your hardware. The NEPI device we are using in this tutorial has an NVIDIA Xavier NX processor installed.
==> ARCH= -gencode arch=compute_72,code=[sm_72,compute_72]
NOTE: You can download the darknet software folder and edited “Makefile” used in this tutorial at: https://www.dropbox.com/scl/fo/85klc2ii66vstbiacd6tr/h?rlkey=dziog9gex8uds2cvzcxqq8mgb&dl=0.
Filename: darknet.zip

d) Build the application
make
Instructions
1) Create an ai training project folder and populate with the required files.
a) Create a new folder on the nepi_storage drive named “ai_training”.
b) Create a project folder in that folder. For this tutorial, we will create a project folder called “light_bulbs”.
c) Download the starting weights file for your network architecture, (or if retraining a previously trained network, skip this download step and use that weights file instead — it will save you considerable time).
For this tutorial, we will download initial yolov3 weights file “darknet53.conv.74” that will be used as the starting point for the training from: https://pjreddie.com/media/files/darknet53.conv.74.
Then copy that file to your project folder and create a copy of the file with an appropriate model name and “.weights” extension for your model. For this tutorial, we will rename the file the following and put it in our “ai_training/light_bulbs” project folder:
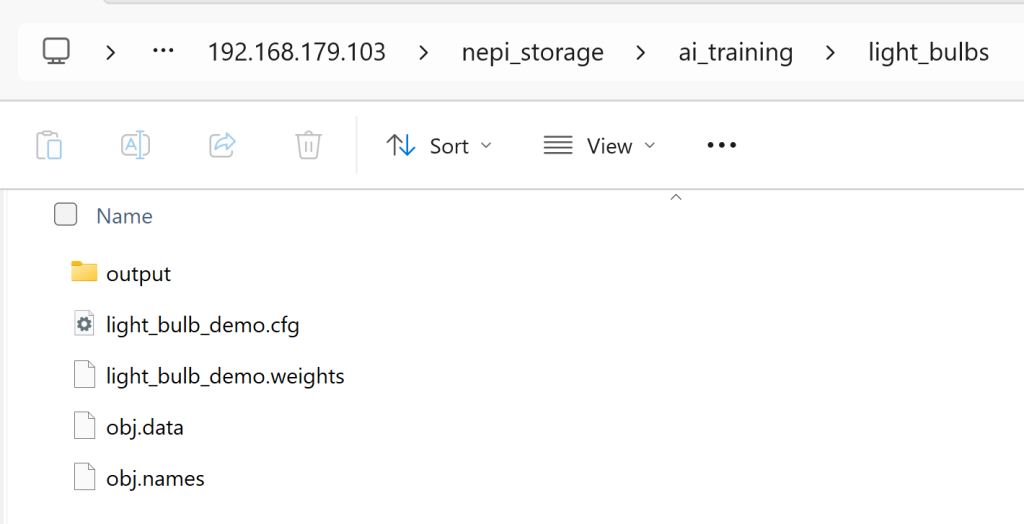
light_bulb_demo.weights
d) Copy the yolov3.cfg file from the “nepi_src/darknet/cfg” folder located on the NEPI device’s nepi_storage drive to your project folder and rename to match your weights file name used in the last step with a “.cfg” extension. For this tutorial, we will rename to the following and put it in our “ai_training/light_bulbs” project folder:
light_bulb_demo.cfg
Next, edit the file per the instructions provide in the AlexeyAB page at: https://github.com/AlexeyAB/darknet#how-to-train-to-detect-your-custom-objects.
NOTE: Because of the limited memory on our NEPI device, we will use a batch size of 32 in place of the recommended 64. Use 64 if training on a Desktop computer.
For our 2 class detector, the following changes were made to our copied file:
batch=16
subdivisions=16
width=416
height=416
max_batches = 6000
steps = 4800,5400
Change line classes=80 to your number of objects in each of 3 [yolo]-layers:
(line 610) classes=2
(line 696) classes=2
(line 783) classes=2
Change [filters=255] to filters=(classes + 5)x3 in the 3 [convolutional] before each [yolo] layer, keep in mind that it only has to be the last [convolutional] before each of the [yolo] layers.
(line 603) filters=21
(line 689) filters=21
(line 776) filters=21
e) Create and populate new text files named obj.names and obj.data files as described in AlexeyAB link, typically under a “data” subdirectory that also includes your image files and associated .txt label/box descriptions, your train.txt and your test.txt. The obj.names file is just a list of the object names, one per line, in the same order as their numeric identifiers in the .txt files.
For the obj.names file, we added the following lines that match the class names from our classes.txt file in the training data folders:
Can
Lamp
For the obj.data file, we added the following lines:
classes = 2
train = /mnt/nepi_storage/data_labeling/light_bulbs/data_train.txt
valid = /mnt/nepi_storage/data_labeling/light_bulbs/data_test.txt
names = /mnt/nepi_storage/ai_training/light_bulbs/obj.names
backup = /mnt/nepi_storage/ai_training/light_bulbs/output
f) Create a folder called “output” in that same folder.
At this point, your project folder should now look something like this:
2) Open a terminal window and stop ROS to free up processing resources using the NEPI “rosstop” bashrc alias:
rosstop
3) Open a terminal window and run darknet with appropriate command-line args:
cd /mnt/nepi_storage/nepi_src/darknet
Create and source a virtual python environment in the folder:
NOTE: The default NEPI sudo password is: nepi (You won’t see any feedback when entering the password, so just type it in and hit the “Enter” key on your keyboard)
Then run the darknet training process (THE FOLLOWING IS ONE LINE OF CODE):
sudo ./darknet detector train /mnt/nepi_storage/ai_training/light_bulbs/obj.data /mnt/nepi_storage/ai_training/light_bulbs/light_bulb_demo.cfg /mnt/nepi_storage/ai_training/light_bulbs/light_bulb_demo.weights -map -clear
NOTE: If you run into memory issues running the training on the NEPI device’s desktop, you should try runnig the training from an SSH connected terminal. The above darknet training command assumes you are running this on the NEPI device’s desktop interface using an attached display, keyboard, and mouse. If you are running the above commands in an SSH connected terminal.
NOTE: If your training process crashes or is stopped before it completes, you can pick up where you left off by replacing the ai_model.weights file in your project directory with the ai_model_last.weights file from the projects “output” folder, then rerunning darknet with appropriate command-line args without the “-clear” argument to pick up where your last training left off.
Example:
rosstop
cd /mnt/nepi_storage/ai_training/light_bulbs
sudo cp output/light_bulb_demo_last.weights light_bulb_demo.weights
cd /mnt/nepi_storage/nepi_src/darknet
sudo ./darknet detector train /mnt/nepi_storage/ai_training/light_bulbs/obj.data /mnt/nepi_storage/ai_training/light_bulbs/light_bulb_demo.cfg /mnt/nepi_storage/ai_training/light_bulbs/light_bulb_demo.weights -map
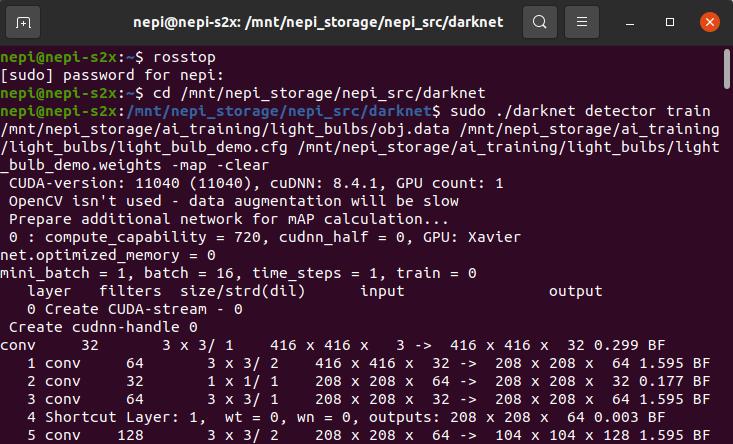
4) You can monitor the progress of your model training in the progress message printed in the terminal after every batch. The progress message shows the current batch number, the current model’s “loss” score, and the hours left in the training process. When you see that average loss 0.xxxxxx avg no longer decreases at many iterations then you should stop training. The final average loss can be from 0.05 (for a small model and easy dataset) to 3.0 (for a big model and a difficult dataset).
![]()
The training process takes many hrs if using the NEPI device as the training platform. When the training process completes, the newly trained weights file can be found in the following folder on the NEPI device’s nepi_storage drive:
/mnt/nepi_storage/ai_training/light_bulbs/output
with a “_final” added to the input weights file name.

Since we ran the darknet training command with the “sudo” command, we need to change the ownership back to the nepi user.
Right click in the window and select the “Open in Terminal” option.
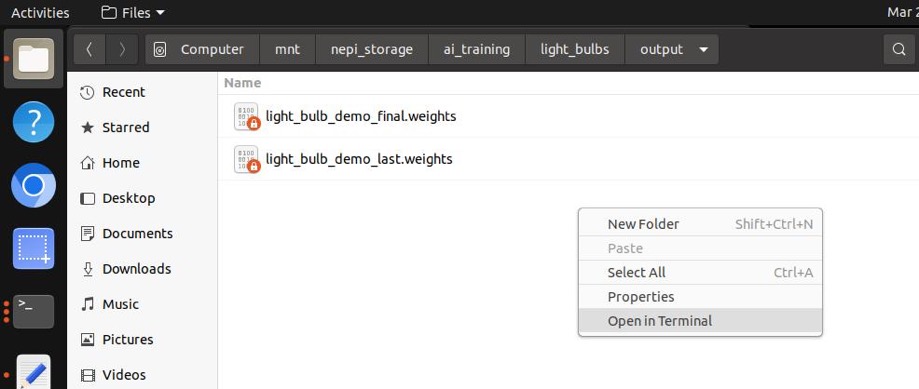
Then type:
sudo chown nepi:nepi *
Sudo password is nepi

AI Model Deployment – Darknet Models
This section of the tutorial covers deploying your custom AI models to your NEPI device.
Hardware and Software Setup
In this part of the tutorial, we will be using our NEPI device in a stand-alone desktop configuration with connected keyboard, mouse, and display.
1) Connect the NEPI device to your PC’s Ethernet adapter using an Ethernet cable, then power your NEPI device.
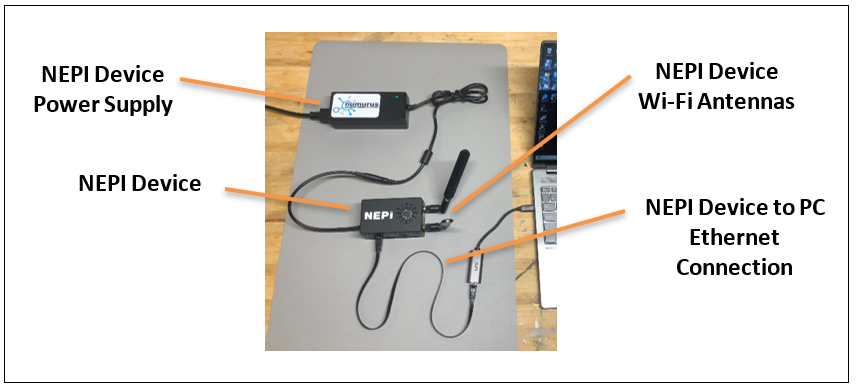
2) Power your NEPI device and wait for the software to boot
3) Using a file manager application on your PC, connect to the NEPI device’s “nepi_storage” drive following the instructions provide in the NEPI Engine – Accessing the User Storage Drive tutorial available at: https://nepi.com/nepi-tutorials/nepi-engine-user-storage-drive/.
User: nepi
Password: nepi
4) In the file manager application, navigate to the NEPI device’s AI model library folder located at:
nepi_storage/ai_models
Instructions
1) Copy the AI detector model’s “.cfg” file from your top level project folder and the final “.weights” file from the project folder’s “output” folder as shown in the tables below.
COPY FILES FROM:
Trained AI Model File Locations (Copy your model files from these folders)
| File | Description |
| “_last.weights” file | \mnt\nepi_storage\ai_training\<YOUR PROJECT FOLDER\output |
| “.cfg” file | \mnt\nepi_storage\ai_training\<YOUR PROJECT FOLDER\ |
COPY FILES TO:
NEPI AIM Model Library File Locations (Copy your model files to these folders)
| File | Description |
| “.weights” file | \mnt\nepi_storage\ai_models\darknet_ros\yolo_network_config\weights |
| “.cfg” file | \mnt\nepi_storage\ai_models\darknet_ros\yolo_network_config\cfg |
Example: From a terminal window, we can run the following commands for our light bulb demo model training:
sudo cp /mnt/nepi_storage/ai_training/light_bulbs/output/light_bulb_demo_last.weights /mnt/nepi_storage/ai_models/darknet_ros\yolo_network_config\weights\light_bulb_demo.weights
sudo cp /mnt/nepi_storage/ai_training/light_bulbs/light_bulb_demo.cfg /mnt/nepi_storage/ai_models/darknet_ros\yolo_network_config\cfg\light_bulb_demo.cfg
NOTE: The folders are also accessible from a connected PC’s File Manager application connected to the NEPI user storage drive at:
smb://192.168.179.103/nepi_storage\ai_training
and
smb://192.168.179.103/nepi_storage\ai_models
Copy your AI detector model files to the AI model library folders as shown in the table below.
2) Then remove the “_final” from the “weights” file name you copied.
light_bulb_demo_final.weights –> light_bulb_demo.weights
3) Edit the following lines in your copied “.cfg” file and save the changes:
batch=1
subdivisions=1
4) Create a new NEPI AI Manager “.yaml” config file in the NEPI device’s AI model library config folder at:
/mnt/nepi_storage/ai_models/darknet_ros/config
NOTE: While you can create this from scratch, a faster option is to just make a copy of one of the existing model “.yaml” files in that folder, rename, and edit it as needed with your detector models information.
NOTE: Make sure to use the same order of class names you used in the training set “classes.txt” files. The names don’t need to match, just the order.
Example: For the light bulb demo model developed in this tutorial, we created a file called:
light_bulb_demo.yaml
With the text content below:
yolo_model:
config_file:
name: light_bulb_demo.cfg
weight_file:
name: light_bulb_demo.weights
threshold:
value: 0.3
detection_classes:
names:
– bulb-can
– bulb-lamp
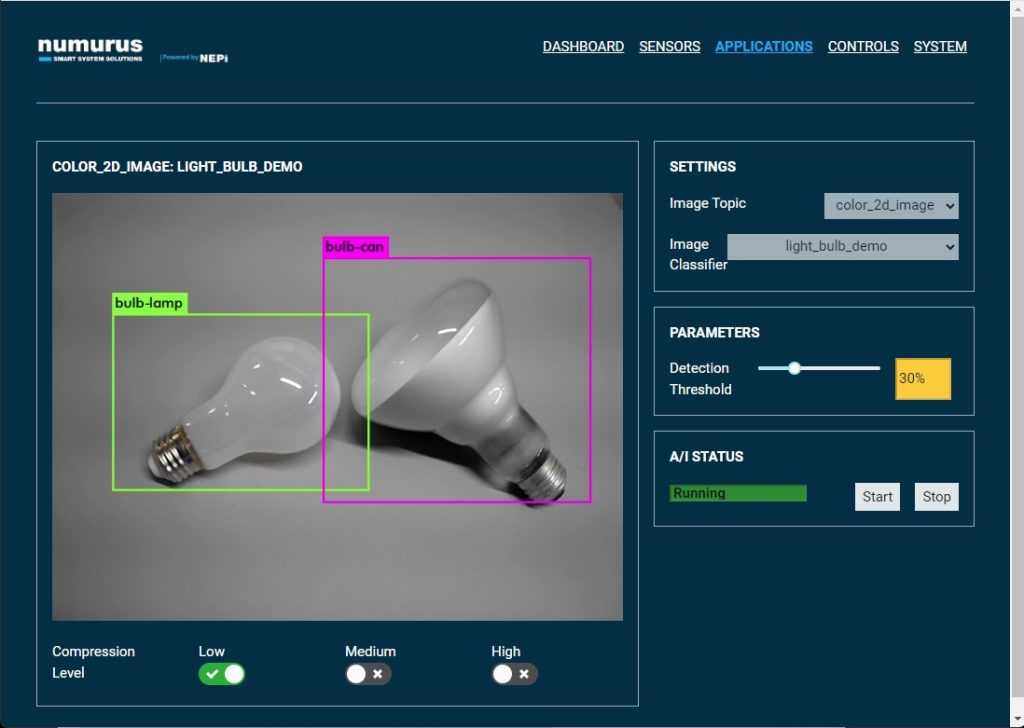
NOTE: In this file you can assign a “label name” for each of the target classes you trained against since the model itself only outputs target class id’s (i.e. 0,1,2…). The labels associated with each id value is defined in this file. For our light_bulb_demo model, we assigned “bulb-can” and” bulb-lamp” as the labels to use during AI processing.
AI Model Testing
Once you have completed the AI model deployment process to your NEPI device following the instructions in the last section, follow the instructions in the NEPI Engine – AI Application tutorial to start, connect, and test your model with an available image stream on your NEPI device: https://nepi.com/nepi-tutorials/nepi-engine-ai-application/.
NOTE: Reboot your system before testing your model
Below is a screenshot taken during our testing.
Additional Training
If you need to improve your models performance or adapt it for different environments, just collect and label additional data, add the labeled data sets to you’re the nepi_storage/data_labeling folder, rerun your data partitioning scripts, and retrain your model using the “last” model in your output folder as the starting point for your model. From a terminal window type:
rosstop
cd /mnt/nepi_storage/ai_training/light_bulbs
sudo cp output/light_bulb_demo_last.weights light_bulb_demo.weights
cd /mnt/nepi_storage/nepi_src/darknet
sudo ./darknet detector train /mnt/nepi_storage/ai_training/light_bulbs/obj.data /mnt/nepi_storage/ai_training/light_bulbs/light_bulb_demo.cfg /mnt/nepi_storage/ai_training/light_bulbs/light_bulb_demo.weights -map -clear
NOTE: Reboot your system before testing your model

